Azure Active Directory (AAD) conditional access is something I’ve been wanting to post about for a while now. A scenario I come across fairly often is the desire to prevent access or add an additional layer of security to certain Office 365 workloads when the user is connecting from a remote, non-corporate location. In the past, this could be achieved by making use of claims rules and Active Directory Federation Services (AD FS) which meant that it wasn’t possible for those organizations not making use of federated identities with Office 365.
AAD conditional access solves this problem and makes it really simple to apply access policies to AAD connected applications. Conditional access does require an AAD premium license (P1). In this post we’ll cover a simple location based scenario where we prevent users from accessing Outlook on the web (OWA) from outside of the organization’s network. In order to configure conditional access you will require:
Azure Active Directory premium licensing
Access to the Azure management portal (classic portal)
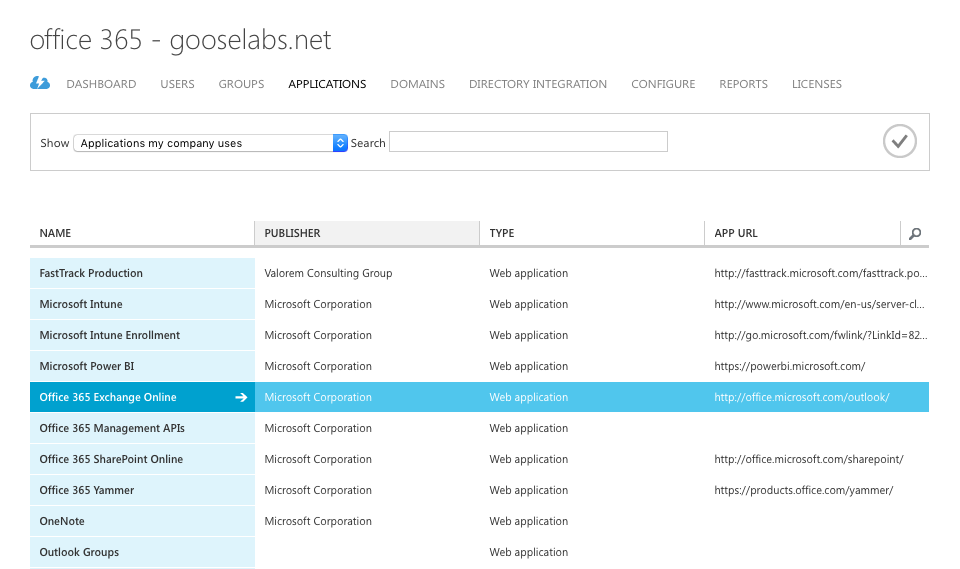
Conditional access policies are configured via the classic Azure management portal (http://manage.windowsazure.com). Locate “Active Directory” on the left-hand side, select your Office 365 directory and click the “Applications” option.
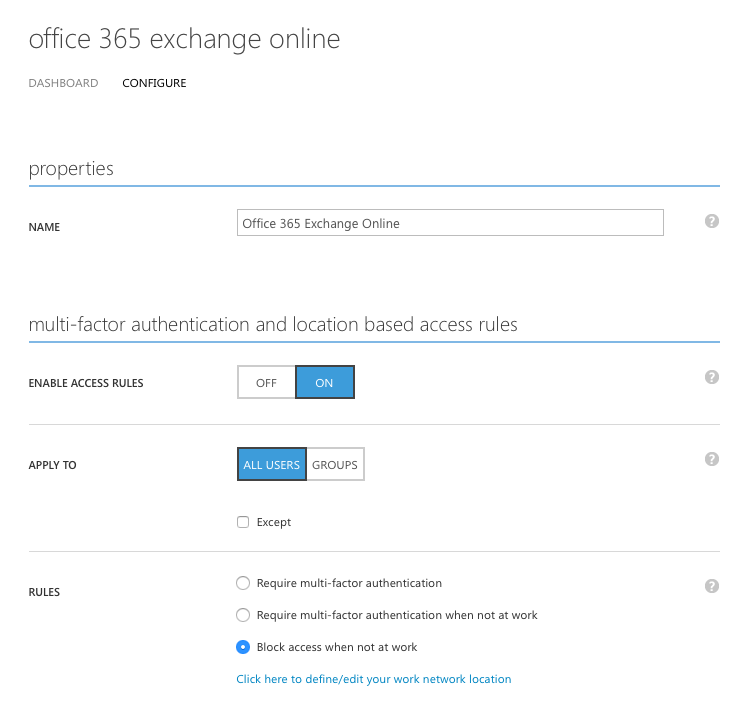
Next, select the “Office 365 Exchange Online” application and turn access rules “On” under the “Multi-factor authentication and location based access rules” section. You have the option of applying your rules to all users or select groups. You then select the “Block access when not at work” option. You also have to option to enforce MFA for an application which is useful if you would like to enable MFA only for specific applications or you could require MFA only when users are accessing the application from outside the corporate network.
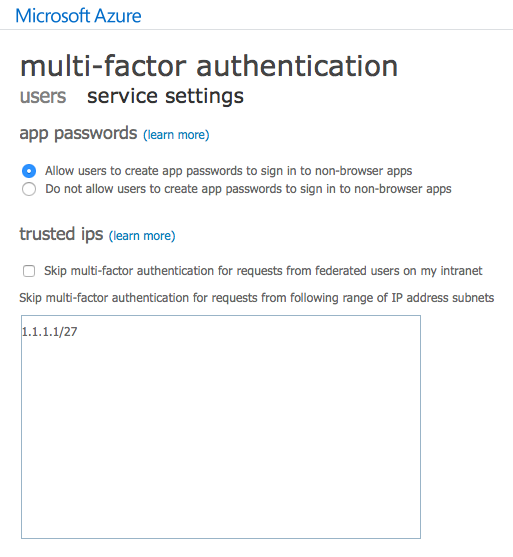
It is important to ensure that you define your corporate network ranges by clicking link. All connections from locations outside the definted network ranges will be treated as remote.
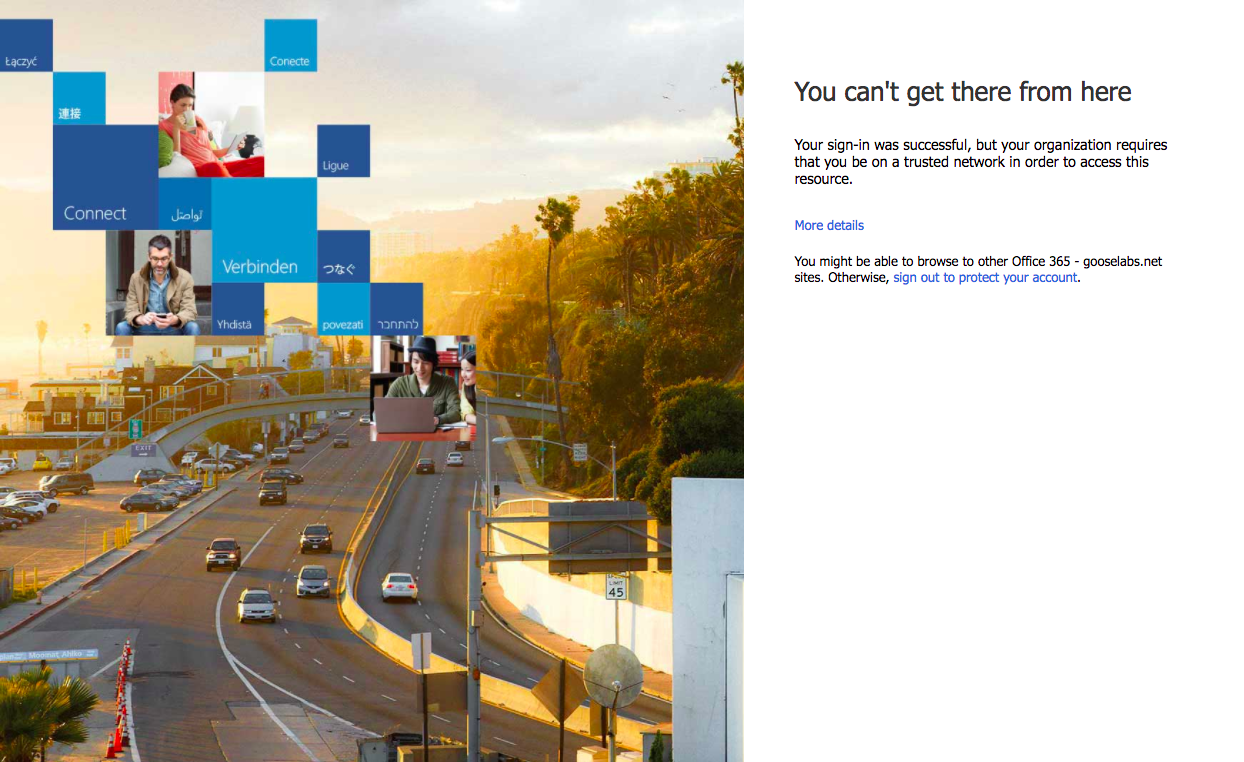
Once configured, you will notice that users are still able to access the Office 365 portal however, once they click the mail option in the app launcher they will no longer be able to access Outlook on the web unless they are connecting from a approved location.
This is a very simple example of how to use location based access rules. It is also possible to configure device based access policies which provide an incredible amount of control over which devices can access your applications. I’ll cover device based access policies in a future post.
It’s here! We’ve all had to wait a little longer than usual for our yearly conference fix since Ignite in May last year, but the wait is finally over and here I am on the eve of Ignite 2016 in my hotel room in Atlanta. There are so many great speakers this year so I wanted to put together a short post listing some of them and highlighting some of the great Office 365 and Exchange sessions that I am personally looking forward to attending.
Monday:
Take control of your security and compliance with Office 365 (THR1003) - Caroline Shin: 12:30pm - 12:50pm, Microsoft Theater 4
Design global voice deployments with Skype for Business (THR3057) - Ståle Hansen: 1:30pm - 1:50pm, MVP Hub Talk 1
Learn how Microsoft IT governs SharePoint Online and Office 365 Groups (THR2031) - David Johnson: 5:40pm - 6:00pm, Microsoft Theater 4
Tuesday:
Debate the top 10 reasons not to move your Exchange on-premises mailboxes to Exchange Online (BRK2215) - Greg Taylor, Tony Redmond, Steve Conn: 9:00am - 10:15am, B401 – B402
Experience Scott Schnoll's Exchange tips and tricks (BRK3253) - Scott Schnoll: 10:45am - 12:00pm, B401 – B402
Meet twin sons of different mothers - Exchange Engineers and Exchange MVPs (BRK2219) - Tony Redmond, Jeff Mealiffe, Andrew Higginbotham, Jeff Guillet, Karim Batthish :12:30pm - 1:45pm, C112
Unplug with the experts on Exchange Server and Exchange Online (BRK2216) - Wendy Wilkes, Greg Taylor, Ross Smith IV, Jeff Mealiffe, Timothy Heeney: 2:15pm - 3:30pm, B401 – B402
Access intelligence in the Microsoft Graph and API (BRK3199) - Jon Meling, Andreas Eide: 4:00pm - 5:15pm, A311 – A312
Wednesday:
Run Microsoft Exchange Hybrid for the long haul (BRK3217) - Timothy Heeney, Nicolas Blank: 9:00am - 10:15am, Georgia Ballroom
Prepare for the future with Windows 10 & Office 365 - better together (THR3061) - Raphael Köllner: 10:20am - 10:40am, Expo Theater 2
Explore the ultimate field guide to Microsoft Office 365 Groups (BRK3001) - Tony Redmond, Benjamin Niaulin, Amit Gupta: 10:45am - 12:00pm, Georgia Ballroom
Understand the Microsoft Exchange Server 2016 Architecture (BRK3221) - Ross Smith IV, Mike Cooper: 12:30pm - 1:45pm, Georgia Ballroom
Migrate to Exchange Online via Exchange Hybrid (BRK3219) - Michael Van Horenbeeck, Timothy Heeney - 2:15pm - 3:30pm, Thomas Murphy Ballroom 2&3
Design your Exchange infrastructure right (or consider moving to Office 365) (BRK2093) - Adrian Moore, Boris Lokhvitsky, Robert Gillies: 4:00pm - 5:15pm, B312 – B314
Thursday:
Deploy Microsoft Exchange Server 2016 (BRK3220) - Jeff Guillet: 9:00am - 10:15am, Sidney Marcus Auditorium
Unplug with the experts on Microsoft Exchange Top Issues (BRK3000) - Nino Bilic, Nasir Ali, Amir Haque, Shawn McGrath, Timothy Heeney, Scott Landry, Gabe Bratton, Angela Taylor: 10:45am - 12:00pm, B401 – B402
Investigate tools and techniques for Exchange Performance Troubleshooting (BRK3007) - Jeff Mealiffe, Nasir Ali: 12:30pm - 1:45pm, Georgia Ballroom
Automate Exchange deployment with Powershell Desired State Configuration (THR3040) - Ingo Gegenwarth: 2:10pm - 2:30pm, Expo Theater 2
Deploy Microsoft Office 365 Client using Configuration Manager (BRK3002) - Amesh Mansukhani, Doug Davis: 4:30pm - 5:15pm, B211 – B212
There is so much great content this year that conflicts are inevitable. Many sessions are repeated throughout the conference, especially on Friday so be sure to look at the alternate times if you are torn between two sessions that are scheduled at the same time.
Outside of the content, there are a bunch of activities taking place this year. ENow Software will once again host one of their legendary “Scheduled Maintenance” parties, these are usually one of the must-attend events of any conference but are for registered guests only so hopefully you have already registered. QUADROtech has put an interesting spin on the Pokemon Go craze with their “QTmon” competition where contestants have the chance to win $2,220 in cash. Tony Redmond has a great post about this on his blog here, you can also visit this QUADROtech page for more info.
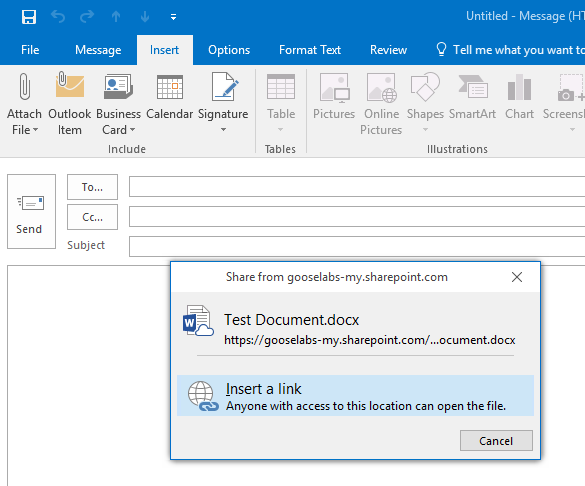
The modern attachments (aka cloudy attachments) feature in Outlook 2016 makes it simple for users to share documents stored in OneDrive for Business or SharePoint with each other as links instead of actually attaching the file and emailing it around. This is a great way to reduce the number of different document versions floating around the organization and helps promote collaboration and co-authoring. Once a cloudy attachment is attached to an email, the user can grant view only or edit permissions to the recipient and Exchange will automatically take care of applying the appropriate permission to the document.
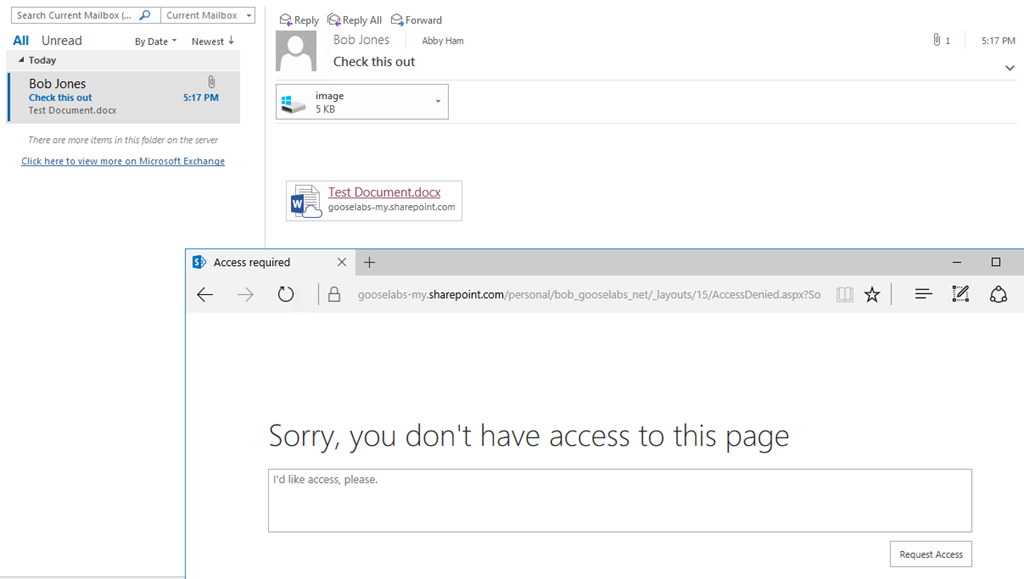
This feature is available out of the box for Exchange Online users using Outlook 2016 and can be enabled for on-premises users with mailboxes on Exchange 2016 provided OAuth between Exchange 2016 and Office 365 has been configured properly and the appropriate prerequisites are in place, but what happens to on-premises customers who do not have Exchange 2016 deployed? The scenario is really interesting in that Outlook will still allow users to send cloudy attachments, but because the backend Exchange environment isn’t able to apply the appropriate permission to the document the recipient will be unable to view the attachment:
This behavior may confuse users and may not be desirable in some environments and while there is no way to specifically disable modern attachments, there is a workaround that may help achieve similar results. There are two options in Outlook that enable modern attachments:
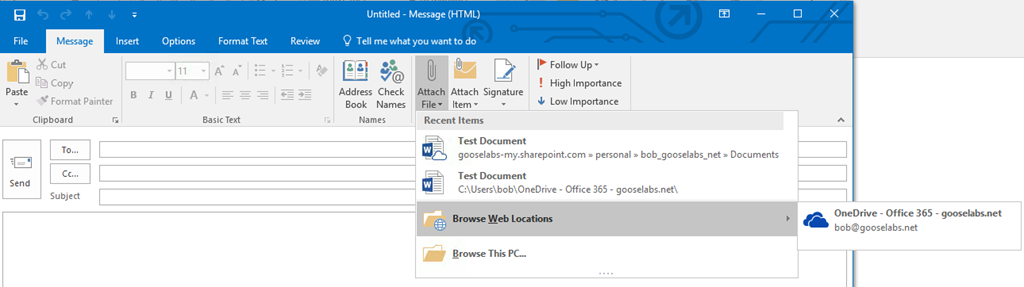
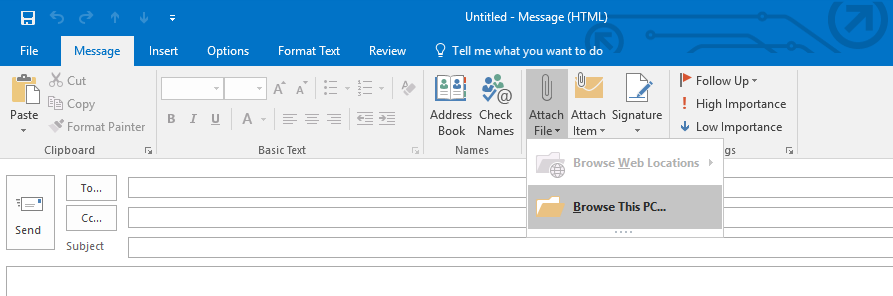
The “Browse Web Locations” option allows users to select files from OneDrive for Business, SharePoint sites or Groups.
The “Recent items” list provides a list of recently saved documents and when these documents are saved to OneDrive for Business or SharePoint it will automatically provide the option to attach a cloudy attachment version of the document.
Disabling these two options in Outlook will effectively prevent users from being able to send cloudy attachments and change the user experience from this:
To this:
In order to do this, the following registry keys need to be added to the client machine for each user:
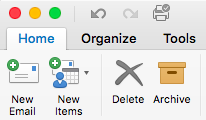
If you are using Outlook 2016 on Windows or Mac you will have noticed the recent addition of a one-click ‘Archive’ button to the ribbon. The addition of the archive button was announced at the end of February, but seems to have caught a bunch of customers by surprise and there appears to be some confusion about it’s intended purpose. If you are unfamiliar with the one-click ‘Archive’ button, here’s what it looks like:
The archive button is intended to make archiving email a one-click operation, but this does not archive email to an Online Archive and does not require users to have an Online Archive enabled. Instead, the button will file email to an ‘Archive’ folder in your existing mailbox. The intention here is that this button provides a single-click way to clean or declutter your inbox of messages that you have already read. It is important to understand the following about the archive button:
The archive button cannot be used to send email messages to the Online Archive.
Since the archive folder is a folder in the root of the mailbox, moving email to it will not reduce the overall size of the mailbox.
If a folder called ‘Archive’ does not already exist in the root of the mailbox, the user will be prompted to create one:
Certain organizations may feel like this creates confusion amongst their user community and would therefore like to automate the create of the ‘Archive’ folder in their user mailboxes. Fortunately, MVP (and fellow Aussie!) Glen Scales has a great solution for creating mailbox folders using PowerShell the EWS managed API. In order to use his module, you will need to download and install the EWS managed API from here. Once installed, you will need to connect to Exchange Online via remote PowerShell and import the module. It them becomes a matter of using the Create-Folder cmdlet included in the module. The module has few parameters and a lot of other functionality but we only need the following:
functionLoad-EWSManagedAPI{param()Begin{## Load Managed API dll###CHECK FOR EWS MANAGED API, IF PRESENT IMPORT THE HIGHEST VERSION EWS DLL, ELSE EXIT$EWSDLL=(($(Get-ItemProperty-ErrorActionSilentlyContinue-PathRegistry::$(Get-ChildItem-ErrorActionSilentlyContinue-Path'Registry::HKEY_LOCAL_MACHINE\SOFTWARE\Microsoft\Exchange\Web Services'|Sort-ObjectName-Descending|Select-Object-First1-ExpandPropertyName)).'Install Directory')+"Microsoft.Exchange.WebServices.dll")if(Test-Path$EWSDLL){Import-Module$EWSDLL}else{"$(get-date -format yyyyMMddHHmmss):""This script requires the EWS Managed API 1.2 or later.""Please download and install the current version of the EWS Managed API from""http://go.microsoft.com/fwlink/?LinkId=255472""""Exiting Script."exit}}}functionConnect-Exchange{param([Parameter(Position=0,Mandatory=$true)][string]$MailboxName,[Parameter(Position=1,Mandatory=$true)][System.Management.Automation.PSCredential]$Credentials)Begin{Load-EWSManagedAPI## Set Exchange Version$ExchangeVersion=[Microsoft.Exchange.WebServices.Data.ExchangeVersion]::Exchange2010_SP1## Create Exchange Service Object$service=New-ObjectMicrosoft.Exchange.WebServices.Data.ExchangeService($ExchangeVersion)#Credentials$creds=New-ObjectSystem.Net.NetworkCredential($Credentials.UserName.ToString(),$Credentials.GetNetworkCredential().password.ToString())$service.Credentials=$creds#CAS URL hardcoded for Exchange Online$uri=[system.URI]"https://outlook.office365.com/EWS/Exchange.asmx"$service.Url=$uriif(!$service.URL){throw"Error connecting to EWS"}else{return$service}}}functionCreate-Folder{param([Parameter(Position=0,Mandatory=$true)][string]$MailboxName,[Parameter(Position=1,Mandatory=$true)][System.Management.Automation.PSCredential]$Credentials,[Parameter(Position=2,Mandatory=$true)][String]$NewFolderName)Begin{$service=Connect-Exchange-MailboxName$MailboxName-Credentials$Credentials$NewFolder=new-objectMicrosoft.Exchange.WebServices.Data.Folder($service)$NewFolder.DisplayName=$NewFolderName$NewFolder.FolderClass="IPF.Note"#Bind to the MsgFolderRoot folder$folderid=new-objectMicrosoft.Exchange.WebServices.Data.FolderId([Microsoft.Exchange.WebServices.Data.WellKnownFolderName]::MsgFolderRoot,$MailboxName)$EWSParentFolder=[Microsoft.Exchange.WebServices.Data.Folder]::Bind($service,$folderid)#Define Folder Veiw Really only want to return one object$fvFolderView=new-objectMicrosoft.Exchange.WebServices.Data.FolderView(1)#Define a Search folder that is going to do a search based on the DisplayName of the folder$SfSearchFilter=new-objectMicrosoft.Exchange.WebServices.Data.SearchFilter+IsEqualTo([Microsoft.Exchange.WebServices.Data.FolderSchema]::DisplayName,$NewFolderName)#Do the Search$findFolderResults=$service.FindFolders($EWSParentFolder.Id,$SfSearchFilter,$fvFolderView)if($findFolderResults.TotalCount-eq0){Write-host("Folder Doesn't Exist")-ForegroundColorYellow$NewFolder.Save($EWSParentFolder.Id)Write-host("Folder Created")-ForegroundColorGreen}else{Write-error("Folder already Exist with that Name")}}}#Define tenant credentials$Credentials=Get-Credential#Define mailboxes that need the archive folder created# Get all mailboxes$Mailboxes=Get-Mailbox-ResultSizeUnlimited|Where-Object{$_.Name-notlike"DiscoverySearchMailbox*"}#Or import a list of mailboxes from .txt# $Mailboxes = Get-Content C:\Temp\Mailboxes.txt#Create the folderForEach($MailboxNamein$Mailboxes){Write-host"Processing $MailboxName"-ForegroundColorYellowCreate-Folder-MailboxName$MailboxName.PrimarySmtpAddress-NewFolderNameArchive-Credentials$Credentials}
Once the ‘Archive’ folder has been created, it will become the destination for all messages that are selected when the ‘Archive’ button is clicked.
A word of caution: If you have a large number of mailboxes, you may run into throttling issues if you attempt to do this on all mailboxes at the same time so it is definitely worth considering a phased rollout in larger environments.
I've been traveling this week and spent a couple of days in Washington D.C were I presented two sessions at a small technology conference for overseas schools (K-12). I had a great time presenting and interacting with attendees from all over the world - my Microsoft focussed sessions definitely stood out at a conference heavily dominated by Google.
The highlight of my week was the email I received this morning from the Microsoft MVP program presenting me with a 2016 MVP award. This is my third MVP award and as always I'm honored to part of the MVP community. I'm very fortunate to have the opportunity to interact with so many folks who I admire and respect as often as I do.
I've just published an updated version of my Connect-EXO.ps1 script. This version, (version 3.2) includes a very minor fix for those using German language keyboards. This update is the result of testing and feedback from the TechNet community and I wanted to thank all those involved.
I have been planning some big updates to this script and work on version 4.0 will begin soon - watch this space!
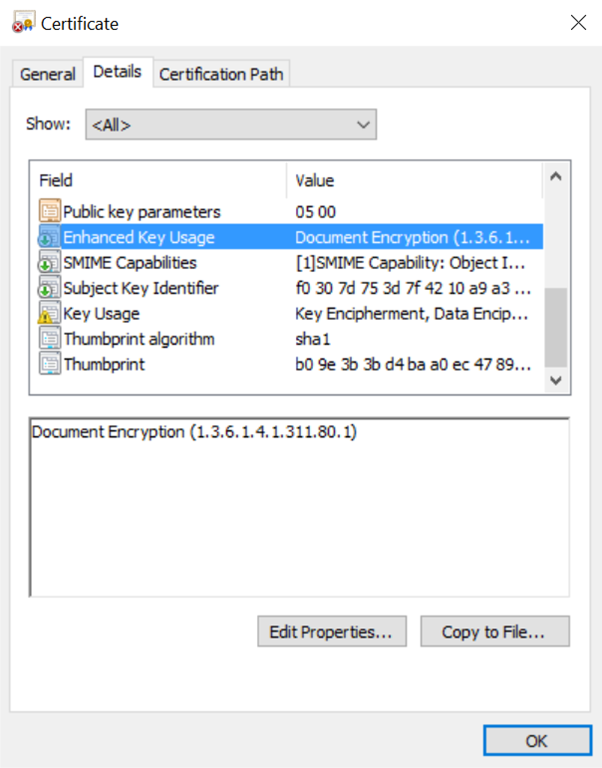
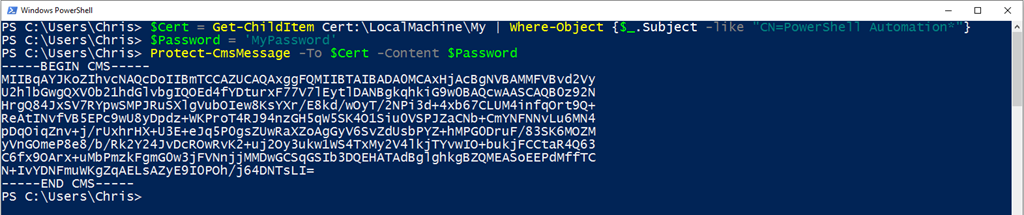
Early last year I wrote a post about encrypting script credentials using certificates. At the time, someone (thanks Dave Wyatt!) commented on the post suggesting a couple of alternative methods to encrypt and decrypt the data, in particular I was interested in the Protect-CmsMessage and Unprotect-CmsMessage cmdlets included in PowerShell 5.0. Now that PowerShell 5.0 is more widespread I wanted to post a quick update about how these cmdlets can help simplify the process. The process is similar, but there are less steps and it is important to note that the certificate must contain the Data Encipherment or Key Encipherment key usage, and include the Document Encryption Enhanced Key Usage (1.3.6.1.4.1.311.80.1).
Let’s start by first locating our certificate using the Get-ChildItem cmdlet:
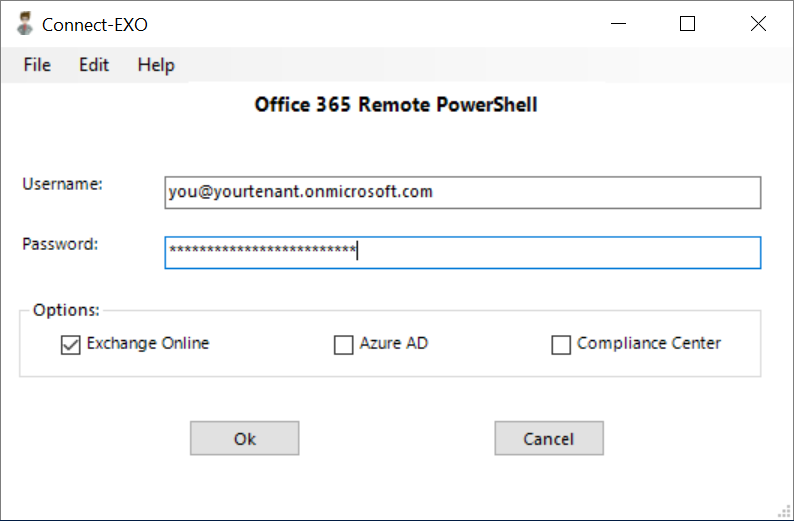
I've just published an updated version of my Connect-EXO.ps1 script. Version 3.1 includes the ability to connect to the Office 365 Security & Compliance Center. Based on the options selected it will connect to either or all services with Exchange Online being the only one selected by default. Here is a screenshot of the new interface:
The move to Office 365 almost always requires changes to existing operational processes. One of the processes that inevitably requires an update is the provisioning process and the extent of these changes will differ from organization to organization and depend on the maturity of your identity lifecycle management process. In many environments, license assignment can be easily automated using a scheduled task and PowerShell so I wanted to put together a post that provides an outline on how this can be done.
Before getting into it, I just want to add a little disclaimer to this post – I love PowerShell and because I love PowerShell, I like to use it, but this doesn’t mean it is always fit for purpose. Each environment is different so I would urge you to consider all options before implementing a full blown PowerShell provisioning process because you may already own better tools for the job (FIM/MIM, etc). These tools often take a while to implement when done properly, so PowerShell could also be a great stop-gap solution. This post is intended to provide a foundation that helps you put together your own process and should not necessarily be implemented “as-is”.
With that out of the way, there are some requirements to think of as well. The server executing the script will need the following:
The ability to connect to Azure AD via remote PowerShell which requires the Azure AD Module – Click here for more info
Remote Server Administration Tools – RSAT
A certificate to encrypt and decrypt your service account passwords. This certificate can be from an internal CA – See this post for more info
Service accounts with the relevant permissions
Relay permission on your Exchange server – Used for send report emails
The scenario I will be addressing in this post is to automate mailbox provisioning and license assignment in a hybrid deployment. All new mailboxes get provisioned as remote mailboxes directly in Office 365 and users are assigned the relevant Office 365 license. Each user account has an entry in the ‘extensionAttribute1’ attribute which determines the license they will be assigned, eg. E3 or Exchange Plan 2. We make use of 2 security groups during this process so users can be created in any OU as long as that OU is being synchronized to Azure AD. These groups are:
O365_Provision – Starts the provisioning process. New accounts are added to this group once they have been created in Active Directory
O365_License – Used by the script to keep track of users who still need to have licenses assigned
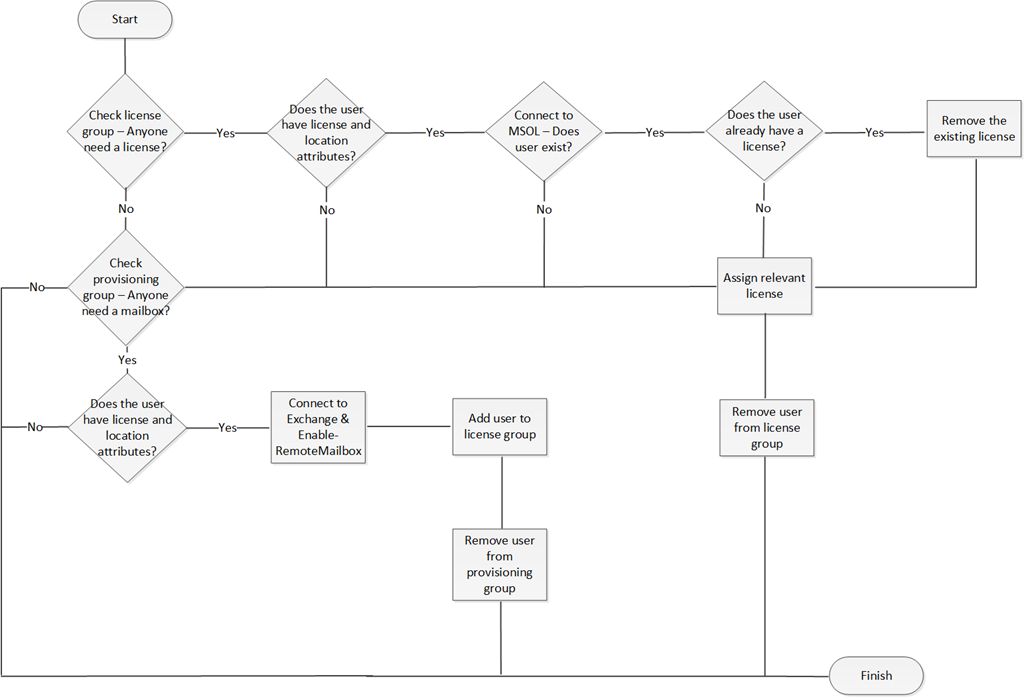
At a high level the workflow looks something like this:
Lets start by looking at the variables and functions we need. Here you can define you license SKUs, service account credentials, etc:
# ModulesImport-ModuleActiveDirectory# Variables - Edit these#########################$ErrorActionPreference='Stop'$ExchangeServer='you_exchange_server'$FromAddress='Provisioning Service
<provisioning@yourdomain.com>'$ToAddress='you@yourdomain.com'$ADUsername='YourDomain\service_acc'$RoutingDomain='yourtenant.mail.onmicrosoft.com'$ADEncryptedPwd=''$MSOLUsername='service_acc@yourtenant.onmicrosoft.com'$MSOLEncryptedPwd=''$Cert=Get-ChildItemCert:\LocalMachine\My|Where-Object{$_.Subject-like'CN=Provisioning Service*'}$E3SKU='yourtenant:ENTERPRISEPACK'$EP2SKU='yourtenant:EXCHANGEENTERPRISE'#Email Styling$EmailBody=@"
<html>
<head>
<style>
.table {
border:1px solid #F0F0F0;
border-collapse: collapse;
padding:10px;
}
.table th {
border:1px solid #F0F0F0;
padding:10px;
background:#F0F0F0;
}
.table td {
border:1px solid #F0F0F0;
padding:10px;
}
</style>
</head>
<body>
Hello,
This is an automated report from the Office 365 Provisioning Service. The following user accounts have been successfully provisioned in Office 365:
<table class="table">
<thead>
<tr>
<th>Username</th>
<th>Email Address</th>
<th>License Assigned</th>
</tr>
</thead>
<tbody>
"@$EmailBodyClosure=@"
Regards,
Provisioning Service
</body>
</html>
"@############################ Functions# Function to create report emailfunctionSend-Report{$Msg=New-ObjectNet.Mail.MailMessage$Smtp=New-ObjectNet.Mail.SmtpClient($ExchangeServer)$Msg.From=$FromAddress$Msg.To.Add($ToAddress)$Msg.Subject=$EmailSubject$Msg.Body=$EmailBody$Msg.IsBodyHTML=$true$Smtp.Send($Msg)}# Function for Exchange ConnectionfunctionConnect-Exchange{$ADEncryptedBytes=[System.Convert]::FromBase64String($ADEncryptedPwd)$ADDecryptedBytes=$Cert.PrivateKey.Decrypt($ADEncryptedBytes,$true)$ADDecryptedPwd=[system.text.encoding]::UTF8.GetString($ADDecryptedBytes)|ConvertTo-SecureString-AsPlainText-Force$ADCredentials=New-ObjectSystem.Management.Automation.PSCredential($ADUsername,$ADDecryptedPwd)$ExchSession=New-PSSession-ConfigurationNameMicrosoft.Exchange-ConnectionUrihttp://$ExchangeServer/PowerShell/-AuthenticationKerberos-Credential$ADCredentialsImport-PSSession$ExchSession}# Function for MSOL ConnectionfunctionConnect-MSOL{$MSOLEncryptedBytes=[System.Convert]::FromBase64String($MSOLEncryptedPwd)$MSOLDecryptedBytes=$Cert.PrivateKey.Decrypt($MSOLEncryptedBytes,$true)$MSOLDecryptedPwd=[system.text.encoding]::UTF8.GetString($MSOLDecryptedBytes)|ConvertTo-SecureString-AsPlainText-Force$MSOLCredentials=New-ObjectSystem.Management.Automation.PSCredential($MSOLUsername,$MSOLDecryptedPwd)Connect-MSOLService-Credential$MSOLCredentials}
Next we have the ‘licensing phase’ – This phase also generates the email report because a user is considered to be fully provisioned once they have a license assigned. We can also catch any errors and generate an error report email for those.
# Licensing Phase - Check if any users need to have licenses assigned$NeedLicense=Get-AdGroupMember-IdentityO365_LicenseIf($NeedLicense){$HasMbxArray=@()Connect-MSOLForeach($Userin$NeedLicense){$UserInfo=Get-ADUser$User.SamAccountName-Properties*$Username=$UserInfo.SamAccountName$UserEmail=$UserInfo.Mail$UserLic=$UserInfo.extensionAttribute1$UserLoc=$UserInfo.c$UPN=$UserInfo.UserPrincipalName$MsolUser=Get-MsolUser-UserPrincipalName$UPN$HasLic=$MsolUser.IsLicensedIf($MsolUser-and$UserLic-and$UserLoc){Try{If($HasLic){$ExistingLic=$MsolUser.Licenses.AccountSkuIdSet-MsolUserLicense-UserPrincipalName$UPN-RemoveLicenses$ExistingLic}If($UserLic-eq'Exchange 2'){Set-MsolUser-UserPrincipalName$UPN-UsageLocation$UserLocSet-MsolUserLicense-UserPrincipalName$UPN-AddLicenses$EP2SKURemove-AdGroupMember-IdentityO365_License-Members$Username-Confirm:$False}ElseIf($UserLic-eq'E3'){Set-MsolUser-UserPrincipalName$UPN-UsageLocation$UserLocSet-MsolUserLicense-UserPrincipalName$UPN-AddLicenses$E3SKURemove-AdGroupMember-IdentityO365_License-Members$Username-Confirm:$False}}Catch{$EmailSubject='Office 365 Provisioning Error'$EmailBody=@"
<html>
<head>
</head>
<body>
Hello,
This is an automated report from the Office 365 Provisioning Service. The following errors occurred when attempting to provision users in Office 365:
$Error
Additional Diagnostic Info:
Username: $Username
Email Address: $UserEmail
License Assigned: $UserLic
Usage Location: $UserLoc
Regards,
Provisioning Service
</body>
</html>
"@Send-Report}$EmailBody+='<tr>'$EmailBody+="<td>$Username</td>"$EmailBody+="<td>$UserEmail</td>"$EmailBody+="<td>$UserLic</td>"$EmailBody+='</tr>'}}$Licenses=Get-MsolAccountSku$E3Consumed=$Licenses[0].ConsumedUnits$E3Total=$Licenses[0].ActiveUnits$E3Remaining=$E3Total-$E3Consumed$ExP2Consumed=$Licenses[1].ConsumedUnits$ExP2Total=$Licenses[1].ActiveUnits$ExP2Remaining=$ExP2Total-$ExP2Consumed$EmailBodyLic=@"
</tbody>
</table>
<strong>License Summary:</strong>
<ul>
<li>You have consumed <strong>$E3Consumed</strong> Exchange Online (Plan 2) licenses and have <strong>$E3Remaining</strong> remaining</li>
<li>You have consumed <strong>$ExP2Consumed</strong> Office 365 Enterprise E3 licenses and have <strong>$ExP2Remaining</strong> remaining</li>
</ul>
"@$EmailSubject='Office 365 Provisioning Report'$EmailBody+=$EmailBodyLic$EmailBody+=$EmailBodyClosureSend-Report}
The ‘mailbox enablement phase’ connects to the local Exchange server and creates a new remote mailbox. See this post for more information on this process. This phase also attempts to generate error notification emails.
# Mailbox Enablement Phase - Check if any new mailboxes need to be provisioned$NeedMailbox=Get-AdGroupMember-IdentityO365_ProvisioningIf($NeedMailbox){Connect-ExchangeForeach($Userin$NeedMailbox){$Username=$User.SamAccountName$UserInfo=Get-ADUser$Username-Properties*$UserLic=$UserInfo.extensionAttribute1$UserLoc=$UserInfo.cIf($UserLic-and$UserLoc){Try{Enable-RemoteMailbox$Username-RemoteRoutingAddress"$Username@$RoutingDomain"Add-ADGroupMember-IdentityO365_License-Members$UsernameRemove-AdGroupMember-IdentityO365_Provisioning-Members$Username-Confirm:$False}Catch{$EmailSubject='Office 365 Provisioning Error'$EmailBody=@"
<html>
<head>
</head>
<body>
Hello,
This is an automated report from the Office 365 Provisioning Service. The following errors occurred when attempting to mail-enable users:
<span style="color:#B22222;">$Error</span><strong>AdditionalDiagnosticInfo:</strong>Username:$UsernameRegards,ProvisioningService</body>
</html>"@
Send-Report
}
}
Else {
$EmailSubject = 'Office 365 Provisioning Error'
$EmailBody = @"<html><head></head>
<body>
Hello,
This is an automated report from the Office 365 Provisioning Service. The following user could not be provisioned, please check to ensure that the required license type has been correctly entered in the "Company" field and that the "Country/region" has been set:
<span style="color:#B22222;">User: $Username</span>Regards,ProvisioningService</body>
</html>"@
Send-Report
}
}
}
Putting this all together will hopefully form be a great foundation to help you build your own workflow. Once done, you can simply schedule your script to run using task scheduler.
In case you missed it, the latest version of Azure AD Connect (version 1.1.105.0) was recently made available for download. One of the big changes and great new additions in this version is the new built-in scheduler which was separate to the sync engine in previous releases and would run as a scheduled task in Windows task scheduler:
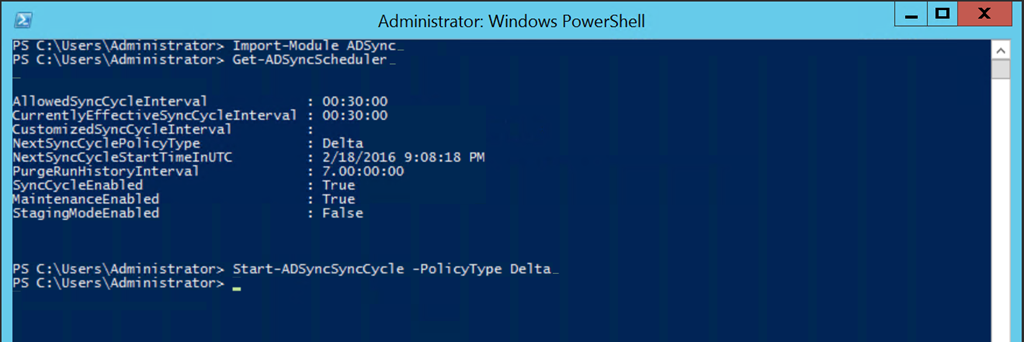
Another big change is the fact that the default synchronization frequency has been updated and is now 30 minutes which is a big change from the previous default of 3 hours. In addition, this value can now be configured which is something that was not supported previously – I know this change is going to be very well received by many organizations. The scheduler can be viewed and configured using the
1
  Get-ADSyncScheduler
and
1
  Set-ADSyncScheduler
cmdlets. You can also manually start a synchronization cycle with the
1
  Start-ADSyncSyncCycle
cmdlet
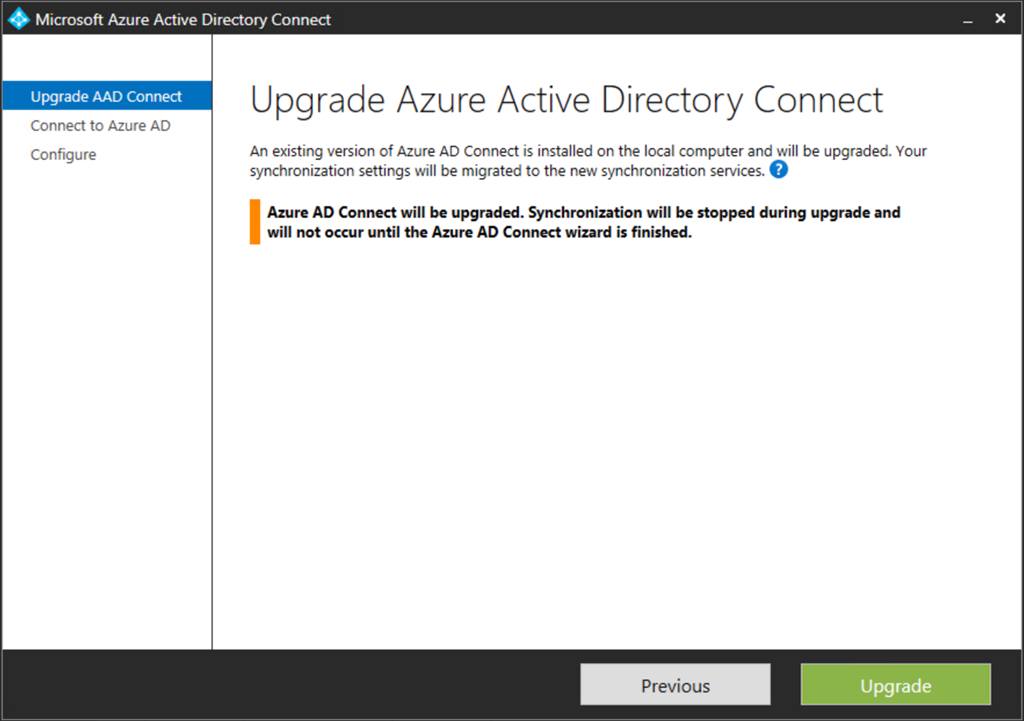
As before, the upgrade process from previous versions is very simple – The wizard will detect the previous installation and ask to if you would like to upgrade:
You will notice after the upgrade that the old Azure AD Sync Scheduler task no longer exists in Windows task scheduler
Other new features in this release are:
Automatic upgrade feature for Express settings customers.
Support for the global admin using MFA and PIM in the installation wizard.
Support changing the user's sign-in method after initial install.
Allows Domain and OU filtering in the installation wizard.
 Once configured, you will notice that users are still able to access the Office 365 portal however, once they click the mail option in the app launcher they will no longer be able to access Outlook on the web unless they are connecting from a approved location.