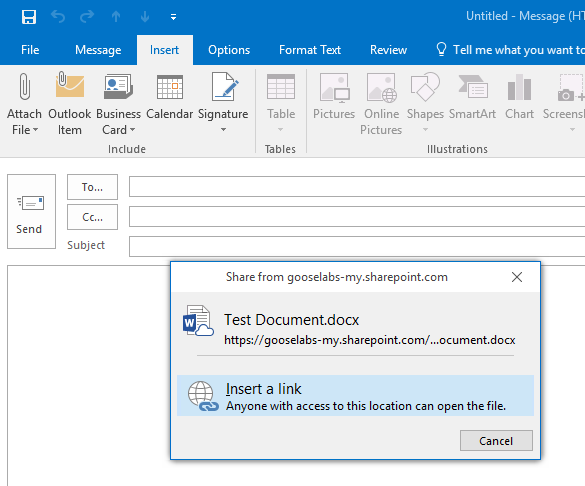
The modern attachments (aka cloudy attachments) feature in Outlook 2016 makes it simple for users to share documents stored in OneDrive for Business or SharePoint with each other as links instead of actually attaching the file and emailing it around. This is a great way to reduce the number of different document versions floating around the organization and helps promote collaboration and co-authoring. Once a cloudy attachment is attached to an email, the user can grant view only or edit permissions to the recipient and Exchange will automatically take care of applying the appropriate permission to the document.
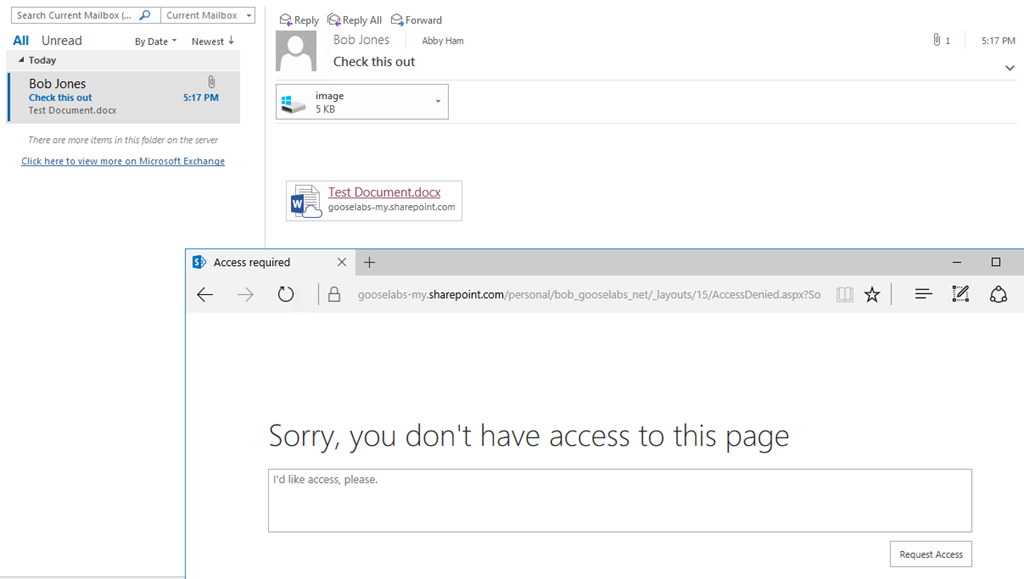
This feature is available out of the box for Exchange Online users using Outlook 2016 and can be enabled for on-premises users with mailboxes on Exchange 2016 provided OAuth between Exchange 2016 and Office 365 has been configured properly and the appropriate prerequisites are in place, but what happens to on-premises customers who do not have Exchange 2016 deployed? The scenario is really interesting in that Outlook will still allow users to send cloudy attachments, but because the backend Exchange environment isn’t able to apply the appropriate permission to the document the recipient will be unable to view the attachment:
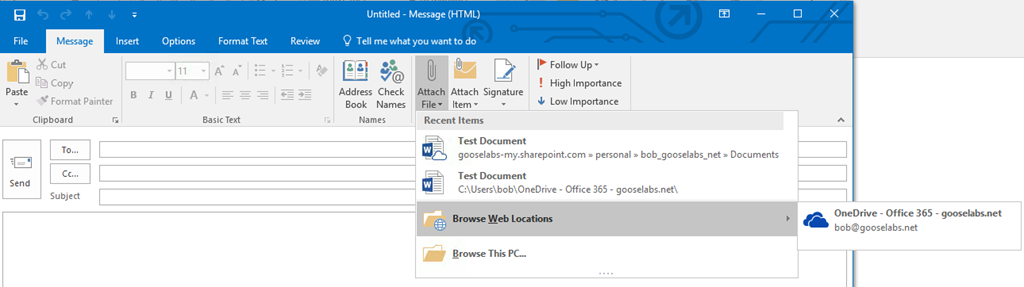
This behavior may confuse users and may not be desirable in some environments and while there is no way to specifically disable modern attachments, there is a workaround that may help achieve similar results. There are two options in Outlook that enable modern attachments:
The “Browse Web Locations” option allows users to select files from OneDrive for Business, SharePoint sites or Groups.
The “Recent items” list provides a list of recently saved documents and when these documents are saved to OneDrive for Business or SharePoint it will automatically provide the option to attach a cloudy attachment version of the document.
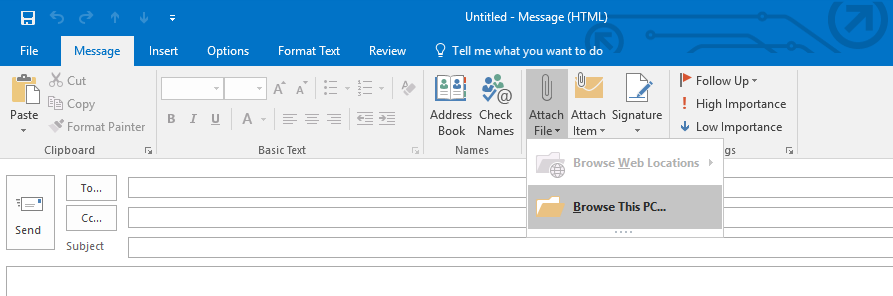
Disabling these two options in Outlook will effectively prevent users from being able to send cloudy attachments and change the user experience from this:
To this:
In order to do this, the following registry keys need to be added to the client machine for each user:
If you are using Outlook 2016 on Windows or Mac you will have noticed the recent addition of a one-click ‘Archive’ button to the ribbon. The addition of the archive button was announced at the end of February, but seems to have caught a bunch of customers by surprise and there appears to be some confusion about it’s intended purpose. If you are unfamiliar with the one-click ‘Archive’ button, here’s what it looks like:
The archive button is intended to make archiving email a one-click operation, but this does not archive email to an Online Archive and does not require users to have an Online Archive enabled. Instead, the button will file email to an ‘Archive’ folder in your existing mailbox. The intention here is that this button provides a single-click way to clean or declutter your inbox of messages that you have already read. It is important to understand the following about the archive button:
The archive button cannot be used to send email messages to the Online Archive.
Since the archive folder is a folder in the root of the mailbox, moving email to it will not reduce the overall size of the mailbox.
If a folder called ‘Archive’ does not already exist in the root of the mailbox, the user will be prompted to create one:
Certain organizations may feel like this creates confusion amongst their user community and would therefore like to automate the create of the ‘Archive’ folder in their user mailboxes. Fortunately, MVP (and fellow Aussie!) Glen Scales has a great solution for creating mailbox folders using PowerShell the EWS managed API. In order to use his module, you will need to download and install the EWS managed API from here. Once installed, you will need to connect to Exchange Online via remote PowerShell and import the module. It them becomes a matter of using the Create-Folder cmdlet included in the module. The module has few parameters and a lot of other functionality but we only need the following:
functionLoad-EWSManagedAPI{param()Begin{## Load Managed API dll###CHECK FOR EWS MANAGED API, IF PRESENT IMPORT THE HIGHEST VERSION EWS DLL, ELSE EXIT$EWSDLL=(($(Get-ItemProperty-ErrorActionSilentlyContinue-PathRegistry::$(Get-ChildItem-ErrorActionSilentlyContinue-Path'Registry::HKEY_LOCAL_MACHINE\SOFTWARE\Microsoft\Exchange\Web Services'|Sort-ObjectName-Descending|Select-Object-First1-ExpandPropertyName)).'Install Directory')+"Microsoft.Exchange.WebServices.dll")if(Test-Path$EWSDLL){Import-Module$EWSDLL}else{"$(get-date -format yyyyMMddHHmmss):""This script requires the EWS Managed API 1.2 or later.""Please download and install the current version of the EWS Managed API from""http://go.microsoft.com/fwlink/?LinkId=255472""""Exiting Script."exit}}}functionConnect-Exchange{param([Parameter(Position=0,Mandatory=$true)][string]$MailboxName,[Parameter(Position=1,Mandatory=$true)][System.Management.Automation.PSCredential]$Credentials)Begin{Load-EWSManagedAPI## Set Exchange Version$ExchangeVersion=[Microsoft.Exchange.WebServices.Data.ExchangeVersion]::Exchange2010_SP1## Create Exchange Service Object$service=New-ObjectMicrosoft.Exchange.WebServices.Data.ExchangeService($ExchangeVersion)#Credentials$creds=New-ObjectSystem.Net.NetworkCredential($Credentials.UserName.ToString(),$Credentials.GetNetworkCredential().password.ToString())$service.Credentials=$creds#CAS URL hardcoded for Exchange Online$uri=[system.URI]"https://outlook.office365.com/EWS/Exchange.asmx"$service.Url=$uriif(!$service.URL){throw"Error connecting to EWS"}else{return$service}}}functionCreate-Folder{param([Parameter(Position=0,Mandatory=$true)][string]$MailboxName,[Parameter(Position=1,Mandatory=$true)][System.Management.Automation.PSCredential]$Credentials,[Parameter(Position=2,Mandatory=$true)][String]$NewFolderName)Begin{$service=Connect-Exchange-MailboxName$MailboxName-Credentials$Credentials$NewFolder=new-objectMicrosoft.Exchange.WebServices.Data.Folder($service)$NewFolder.DisplayName=$NewFolderName$NewFolder.FolderClass="IPF.Note"#Bind to the MsgFolderRoot folder$folderid=new-objectMicrosoft.Exchange.WebServices.Data.FolderId([Microsoft.Exchange.WebServices.Data.WellKnownFolderName]::MsgFolderRoot,$MailboxName)$EWSParentFolder=[Microsoft.Exchange.WebServices.Data.Folder]::Bind($service,$folderid)#Define Folder Veiw Really only want to return one object$fvFolderView=new-objectMicrosoft.Exchange.WebServices.Data.FolderView(1)#Define a Search folder that is going to do a search based on the DisplayName of the folder$SfSearchFilter=new-objectMicrosoft.Exchange.WebServices.Data.SearchFilter+IsEqualTo([Microsoft.Exchange.WebServices.Data.FolderSchema]::DisplayName,$NewFolderName)#Do the Search$findFolderResults=$service.FindFolders($EWSParentFolder.Id,$SfSearchFilter,$fvFolderView)if($findFolderResults.TotalCount-eq0){Write-host("Folder Doesn't Exist")-ForegroundColorYellow$NewFolder.Save($EWSParentFolder.Id)Write-host("Folder Created")-ForegroundColorGreen}else{Write-error("Folder already Exist with that Name")}}}#Define tenant credentials$Credentials=Get-Credential#Define mailboxes that need the archive folder created# Get all mailboxes$Mailboxes=Get-Mailbox-ResultSizeUnlimited|Where-Object{$_.Name-notlike"DiscoverySearchMailbox*"}#Or import a list of mailboxes from .txt# $Mailboxes = Get-Content C:\Temp\Mailboxes.txt#Create the folderForEach($MailboxNamein$Mailboxes){Write-host"Processing $MailboxName"-ForegroundColorYellowCreate-Folder-MailboxName$MailboxName.PrimarySmtpAddress-NewFolderNameArchive-Credentials$Credentials}
Once the ‘Archive’ folder has been created, it will become the destination for all messages that are selected when the ‘Archive’ button is clicked.
A word of caution: If you have a large number of mailboxes, you may run into throttling issues if you attempt to do this on all mailboxes at the same time so it is definitely worth considering a phased rollout in larger environments.
I've been traveling this week and spent a couple of days in Washington D.C were I presented two sessions at a small technology conference for overseas schools (K-12). I had a great time presenting and interacting with attendees from all over the world - my Microsoft focussed sessions definitely stood out at a conference heavily dominated by Google.
The highlight of my week was the email I received this morning from the Microsoft MVP program presenting me with a 2016 MVP award. This is my third MVP award and as always I'm honored to part of the MVP community. I'm very fortunate to have the opportunity to interact with so many folks who I admire and respect as often as I do.
I've just published an updated version of my Connect-EXO.ps1 script. This version, (version 3.2) includes a very minor fix for those using German language keyboards. This update is the result of testing and feedback from the TechNet community and I wanted to thank all those involved.
I have been planning some big updates to this script and work on version 4.0 will begin soon - watch this space!
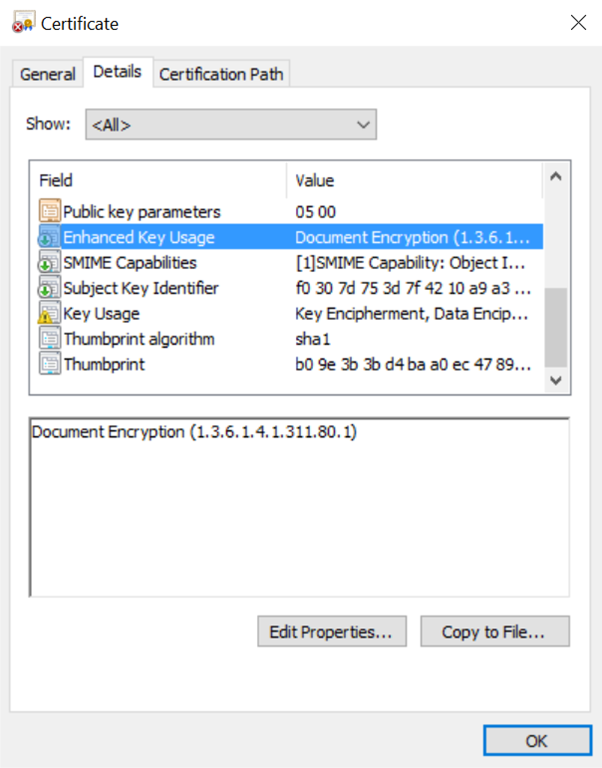
Early last year I wrote a post about encrypting script credentials using certificates. At the time, someone (thanks Dave Wyatt!) commented on the post suggesting a couple of alternative methods to encrypt and decrypt the data, in particular I was interested in the Protect-CmsMessage and Unprotect-CmsMessage cmdlets included in PowerShell 5.0. Now that PowerShell 5.0 is more widespread I wanted to post a quick update about how these cmdlets can help simplify the process. The process is similar, but there are less steps and it is important to note that the certificate must contain the Data Encipherment or Key Encipherment key usage, and include the Document Encryption Enhanced Key Usage (1.3.6.1.4.1.311.80.1).
Let’s start by first locating our certificate using the Get-ChildItem cmdlet:
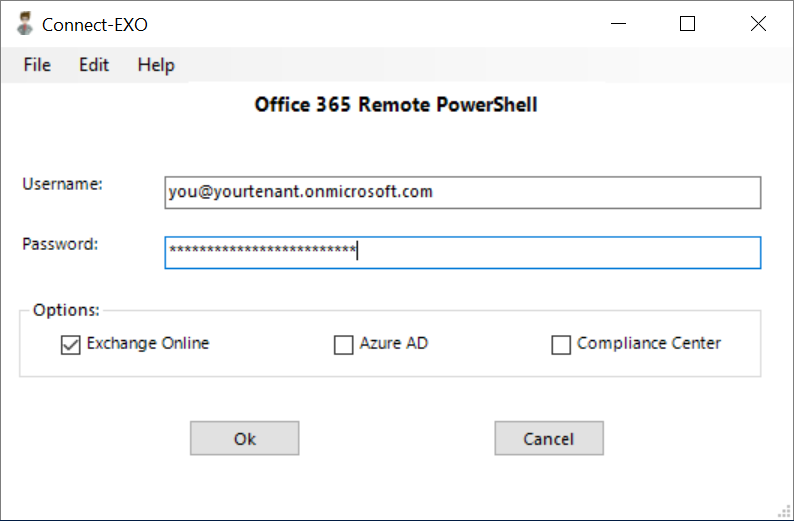
I've just published an updated version of my Connect-EXO.ps1 script. Version 3.1 includes the ability to connect to the Office 365 Security & Compliance Center. Based on the options selected it will connect to either or all services with Exchange Online being the only one selected by default. Here is a screenshot of the new interface:
The move to Office 365 almost always requires changes to existing operational processes. One of the processes that inevitably requires an update is the provisioning process and the extent of these changes will differ from organization to organization and depend on the maturity of your identity lifecycle management process. In many environments, license assignment can be easily automated using a scheduled task and PowerShell so I wanted to put together a post that provides an outline on how this can be done.
Before getting into it, I just want to add a little disclaimer to this post – I love PowerShell and because I love PowerShell, I like to use it, but this doesn’t mean it is always fit for purpose. Each environment is different so I would urge you to consider all options before implementing a full blown PowerShell provisioning process because you may already own better tools for the job (FIM/MIM, etc). These tools often take a while to implement when done properly, so PowerShell could also be a great stop-gap solution. This post is intended to provide a foundation that helps you put together your own process and should not necessarily be implemented “as-is”.
With that out of the way, there are some requirements to think of as well. The server executing the script will need the following:
The ability to connect to Azure AD via remote PowerShell which requires the Azure AD Module – Click here for more info
Remote Server Administration Tools – RSAT
A certificate to encrypt and decrypt your service account passwords. This certificate can be from an internal CA – See this post for more info
Service accounts with the relevant permissions
Relay permission on your Exchange server – Used for send report emails
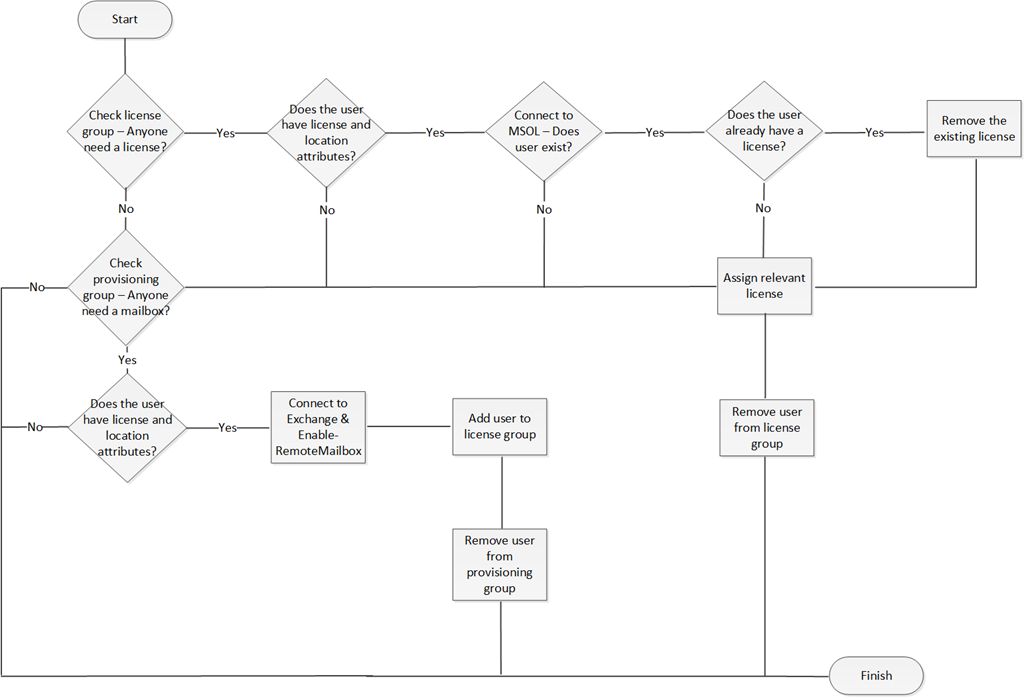
The scenario I will be addressing in this post is to automate mailbox provisioning and license assignment in a hybrid deployment. All new mailboxes get provisioned as remote mailboxes directly in Office 365 and users are assigned the relevant Office 365 license. Each user account has an entry in the ‘extensionAttribute1’ attribute which determines the license they will be assigned, eg. E3 or Exchange Plan 2. We make use of 2 security groups during this process so users can be created in any OU as long as that OU is being synchronized to Azure AD. These groups are:
O365_Provision – Starts the provisioning process. New accounts are added to this group once they have been created in Active Directory
O365_License – Used by the script to keep track of users who still need to have licenses assigned
At a high level the workflow looks something like this:
Lets start by looking at the variables and functions we need. Here you can define you license SKUs, service account credentials, etc:
# ModulesImport-ModuleActiveDirectory# Variables - Edit these#########################$ErrorActionPreference='Stop'$ExchangeServer='you_exchange_server'$FromAddress='Provisioning Service
<provisioning@yourdomain.com>'$ToAddress='you@yourdomain.com'$ADUsername='YourDomain\service_acc'$RoutingDomain='yourtenant.mail.onmicrosoft.com'$ADEncryptedPwd=''$MSOLUsername='service_acc@yourtenant.onmicrosoft.com'$MSOLEncryptedPwd=''$Cert=Get-ChildItemCert:\LocalMachine\My|Where-Object{$_.Subject-like'CN=Provisioning Service*'}$E3SKU='yourtenant:ENTERPRISEPACK'$EP2SKU='yourtenant:EXCHANGEENTERPRISE'#Email Styling$EmailBody=@"
<html>
<head>
<style>
.table {
border:1px solid #F0F0F0;
border-collapse: collapse;
padding:10px;
}
.table th {
border:1px solid #F0F0F0;
padding:10px;
background:#F0F0F0;
}
.table td {
border:1px solid #F0F0F0;
padding:10px;
}
</style>
</head>
<body>
Hello,
This is an automated report from the Office 365 Provisioning Service. The following user accounts have been successfully provisioned in Office 365:
<table class="table">
<thead>
<tr>
<th>Username</th>
<th>Email Address</th>
<th>License Assigned</th>
</tr>
</thead>
<tbody>
"@$EmailBodyClosure=@"
Regards,
Provisioning Service
</body>
</html>
"@############################ Functions# Function to create report emailfunctionSend-Report{$Msg=New-ObjectNet.Mail.MailMessage$Smtp=New-ObjectNet.Mail.SmtpClient($ExchangeServer)$Msg.From=$FromAddress$Msg.To.Add($ToAddress)$Msg.Subject=$EmailSubject$Msg.Body=$EmailBody$Msg.IsBodyHTML=$true$Smtp.Send($Msg)}# Function for Exchange ConnectionfunctionConnect-Exchange{$ADEncryptedBytes=[System.Convert]::FromBase64String($ADEncryptedPwd)$ADDecryptedBytes=$Cert.PrivateKey.Decrypt($ADEncryptedBytes,$true)$ADDecryptedPwd=[system.text.encoding]::UTF8.GetString($ADDecryptedBytes)|ConvertTo-SecureString-AsPlainText-Force$ADCredentials=New-ObjectSystem.Management.Automation.PSCredential($ADUsername,$ADDecryptedPwd)$ExchSession=New-PSSession-ConfigurationNameMicrosoft.Exchange-ConnectionUrihttp://$ExchangeServer/PowerShell/-AuthenticationKerberos-Credential$ADCredentialsImport-PSSession$ExchSession}# Function for MSOL ConnectionfunctionConnect-MSOL{$MSOLEncryptedBytes=[System.Convert]::FromBase64String($MSOLEncryptedPwd)$MSOLDecryptedBytes=$Cert.PrivateKey.Decrypt($MSOLEncryptedBytes,$true)$MSOLDecryptedPwd=[system.text.encoding]::UTF8.GetString($MSOLDecryptedBytes)|ConvertTo-SecureString-AsPlainText-Force$MSOLCredentials=New-ObjectSystem.Management.Automation.PSCredential($MSOLUsername,$MSOLDecryptedPwd)Connect-MSOLService-Credential$MSOLCredentials}
Next we have the ‘licensing phase’ – This phase also generates the email report because a user is considered to be fully provisioned once they have a license assigned. We can also catch any errors and generate an error report email for those.
# Licensing Phase - Check if any users need to have licenses assigned$NeedLicense=Get-AdGroupMember-IdentityO365_LicenseIf($NeedLicense){$HasMbxArray=@()Connect-MSOLForeach($Userin$NeedLicense){$UserInfo=Get-ADUser$User.SamAccountName-Properties*$Username=$UserInfo.SamAccountName$UserEmail=$UserInfo.Mail$UserLic=$UserInfo.extensionAttribute1$UserLoc=$UserInfo.c$UPN=$UserInfo.UserPrincipalName$MsolUser=Get-MsolUser-UserPrincipalName$UPN$HasLic=$MsolUser.IsLicensedIf($MsolUser-and$UserLic-and$UserLoc){Try{If($HasLic){$ExistingLic=$MsolUser.Licenses.AccountSkuIdSet-MsolUserLicense-UserPrincipalName$UPN-RemoveLicenses$ExistingLic}If($UserLic-eq'Exchange 2'){Set-MsolUser-UserPrincipalName$UPN-UsageLocation$UserLocSet-MsolUserLicense-UserPrincipalName$UPN-AddLicenses$EP2SKURemove-AdGroupMember-IdentityO365_License-Members$Username-Confirm:$False}ElseIf($UserLic-eq'E3'){Set-MsolUser-UserPrincipalName$UPN-UsageLocation$UserLocSet-MsolUserLicense-UserPrincipalName$UPN-AddLicenses$E3SKURemove-AdGroupMember-IdentityO365_License-Members$Username-Confirm:$False}}Catch{$EmailSubject='Office 365 Provisioning Error'$EmailBody=@"
<html>
<head>
</head>
<body>
Hello,
This is an automated report from the Office 365 Provisioning Service. The following errors occurred when attempting to provision users in Office 365:
$Error
Additional Diagnostic Info:
Username: $Username
Email Address: $UserEmail
License Assigned: $UserLic
Usage Location: $UserLoc
Regards,
Provisioning Service
</body>
</html>
"@Send-Report}$EmailBody+='<tr>'$EmailBody+="<td>$Username</td>"$EmailBody+="<td>$UserEmail</td>"$EmailBody+="<td>$UserLic</td>"$EmailBody+='</tr>'}}$Licenses=Get-MsolAccountSku$E3Consumed=$Licenses[0].ConsumedUnits$E3Total=$Licenses[0].ActiveUnits$E3Remaining=$E3Total-$E3Consumed$ExP2Consumed=$Licenses[1].ConsumedUnits$ExP2Total=$Licenses[1].ActiveUnits$ExP2Remaining=$ExP2Total-$ExP2Consumed$EmailBodyLic=@"
</tbody>
</table>
<strong>License Summary:</strong>
<ul>
<li>You have consumed <strong>$E3Consumed</strong> Exchange Online (Plan 2) licenses and have <strong>$E3Remaining</strong> remaining</li>
<li>You have consumed <strong>$ExP2Consumed</strong> Office 365 Enterprise E3 licenses and have <strong>$ExP2Remaining</strong> remaining</li>
</ul>
"@$EmailSubject='Office 365 Provisioning Report'$EmailBody+=$EmailBodyLic$EmailBody+=$EmailBodyClosureSend-Report}
The ‘mailbox enablement phase’ connects to the local Exchange server and creates a new remote mailbox. See this post for more information on this process. This phase also attempts to generate error notification emails.
# Mailbox Enablement Phase - Check if any new mailboxes need to be provisioned$NeedMailbox=Get-AdGroupMember-IdentityO365_ProvisioningIf($NeedMailbox){Connect-ExchangeForeach($Userin$NeedMailbox){$Username=$User.SamAccountName$UserInfo=Get-ADUser$Username-Properties*$UserLic=$UserInfo.extensionAttribute1$UserLoc=$UserInfo.cIf($UserLic-and$UserLoc){Try{Enable-RemoteMailbox$Username-RemoteRoutingAddress"$Username@$RoutingDomain"Add-ADGroupMember-IdentityO365_License-Members$UsernameRemove-AdGroupMember-IdentityO365_Provisioning-Members$Username-Confirm:$False}Catch{$EmailSubject='Office 365 Provisioning Error'$EmailBody=@"
<html>
<head>
</head>
<body>
Hello,
This is an automated report from the Office 365 Provisioning Service. The following errors occurred when attempting to mail-enable users:
<span style="color:#B22222;">$Error</span><strong>AdditionalDiagnosticInfo:</strong>Username:$UsernameRegards,ProvisioningService</body>
</html>"@
Send-Report
}
}
Else {
$EmailSubject = 'Office 365 Provisioning Error'
$EmailBody = @"<html><head></head>
<body>
Hello,
This is an automated report from the Office 365 Provisioning Service. The following user could not be provisioned, please check to ensure that the required license type has been correctly entered in the "Company" field and that the "Country/region" has been set:
<span style="color:#B22222;">User: $Username</span>Regards,ProvisioningService</body>
</html>"@
Send-Report
}
}
}
Putting this all together will hopefully form be a great foundation to help you build your own workflow. Once done, you can simply schedule your script to run using task scheduler.
In case you missed it, the latest version of Azure AD Connect (version 1.1.105.0) was recently made available for download. One of the big changes and great new additions in this version is the new built-in scheduler which was separate to the sync engine in previous releases and would run as a scheduled task in Windows task scheduler:
Another big change is the fact that the default synchronization frequency has been updated and is now 30 minutes which is a big change from the previous default of 3 hours. In addition, this value can now be configured which is something that was not supported previously – I know this change is going to be very well received by many organizations. The scheduler can be viewed and configured using the
1
  Get-ADSyncScheduler
and
1
  Set-ADSyncScheduler
cmdlets. You can also manually start a synchronization cycle with the
1
  Start-ADSyncSyncCycle
cmdlet
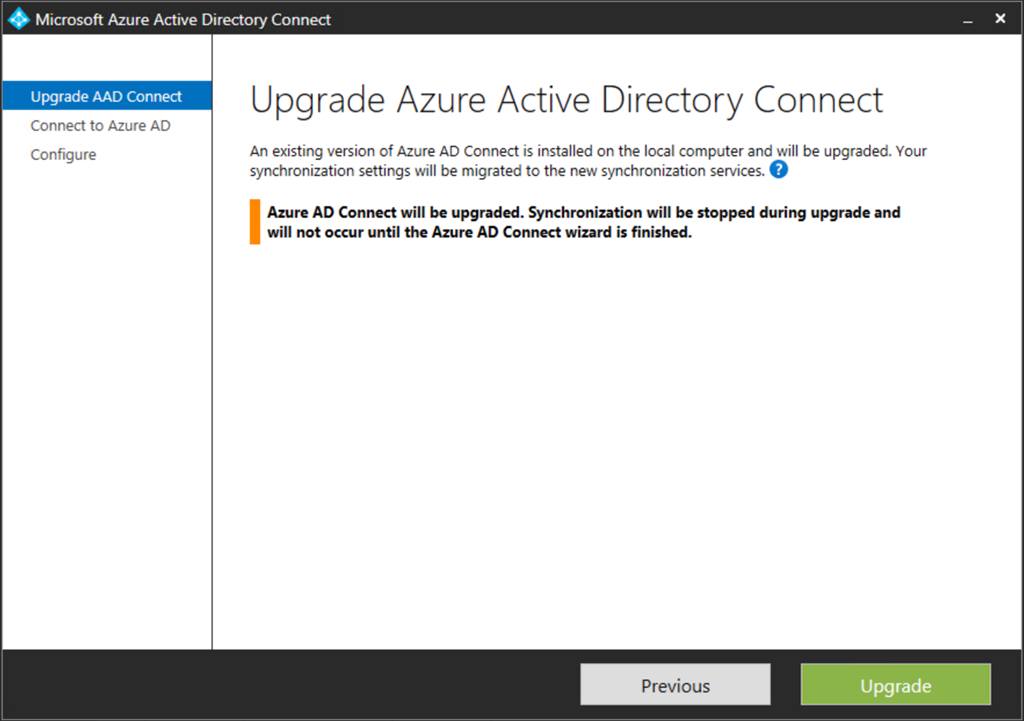
As before, the upgrade process from previous versions is very simple – The wizard will detect the previous installation and ask to if you would like to upgrade:
You will notice after the upgrade that the old Azure AD Sync Scheduler task no longer exists in Windows task scheduler
Other new features in this release are:
Automatic upgrade feature for Express settings customers.
Support for the global admin using MFA and PIM in the installation wizard.
Support changing the user's sign-in method after initial install.
Allows Domain and OU filtering in the installation wizard.
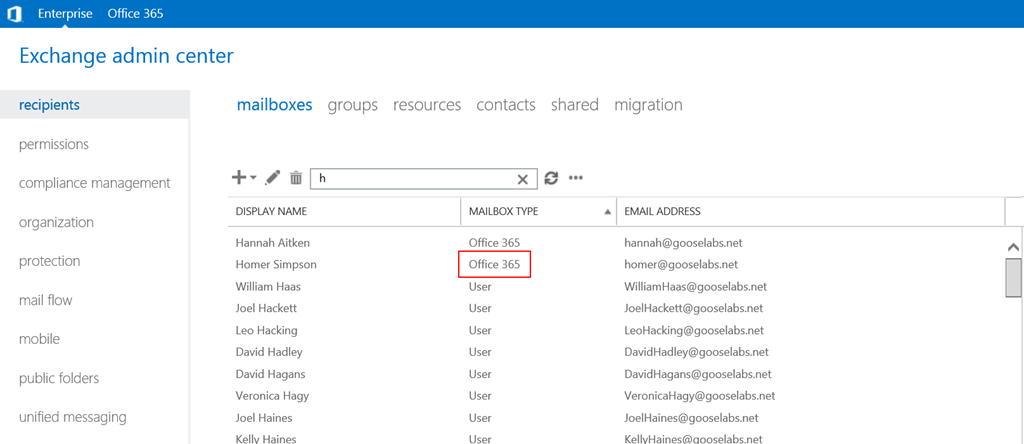
I’ve recently seen the same issue pop up in a few different environments so I thought I would put together a short post that explains how to create a “Office 365” mailbox when using a hybrid deployment of Exchange. One of the questions I’ve had had answer a few times recently is “Why do newly created Exchange Online mailboxes not appear in the on-premises Exchange Admin Center as “Office 365” mailboxes like migrated mailboxes do?”
There appears to be some confusion around provisioning of new user mailboxes once a hybrid deployment has been configured as this issue is caused when the mailbox has not be correctly provisioned in the on-premises environment.
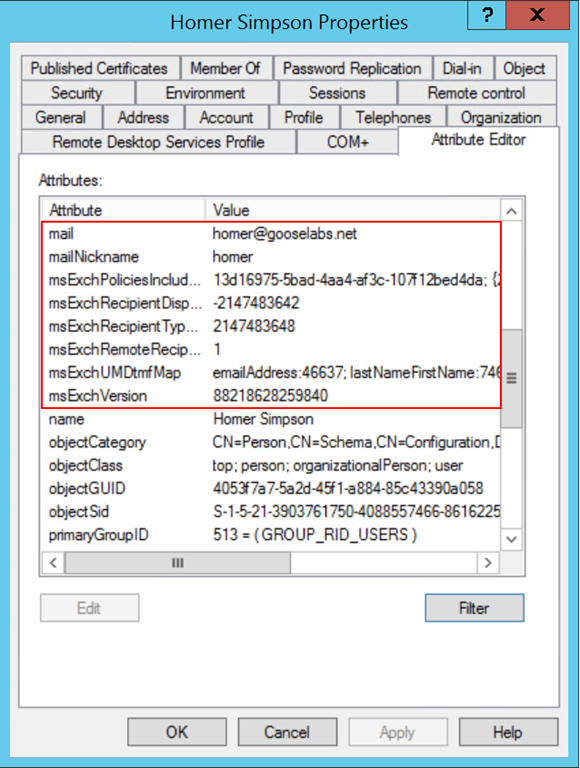
While it is technically possible to create a new user account in Active Directory, wait for AAD Connect to provision that account to AAD and then assign an Exchange Online license to that user to create their mailbox, but the problem with that process is that it does not set the msExchRecipientType (and other) Exchange related attributes for that user object and that is why it will never appear in the on-premises Exchange Admin Center:
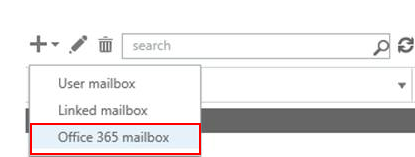
In order to correctly popular these attributes, you either need to create the new user and mailbox via the Exchange Admin Center by clicking on the “+” icon and selecting “Office 365 Mailbox” or you need to enable a remote mailbox for a previously created user using the Enable-RemoteMailbox cmdlet
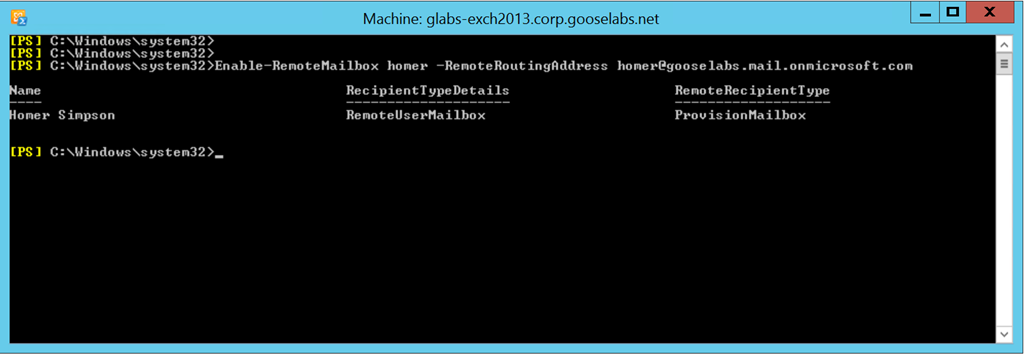
Many organizations already have automated provisioning processes in place so adjusting the mailbox enablement workflow may be the preferred method, an example of the cmdlet is shown below:
1
2
#Syntax is: Enable-RemoteMailbox <user> –RemoteRoutingAddress <user@tenant.mail.onmicrosoft.com><br />Enable-RemoteMailboxhomer-RemoteRoutingAddresshomer@gooselabs.mail.onmicrosoft.com<br/>
The Enable-RemoteMailbox cmdlet can be run immediately after creating the user account in Active Directory so there is no need to wait for the next AAD Connect synchronization cycle to complete before enabling the mailbox. Once the user account has been provisioned to AAD, the mailbox will automatically created and the appropriate license should then be assigned to the user.
I recently worked with a customer who had a large number of different business units and each one had their own domain. As part of their Office 365 enablement project they wanted to enable Yammer Enterprise for their tenant and allow users from the different business units to collaborate with each other using the same Yammer network. Yammer integration with Office 365 has come a long way over the last few years and while merging multiple networks or adding domains into the same network is possible, there are a few things to think about before initiating the process and I wanted to post some of my notes.
Firstly, here are some of the key points to remember:
Yammer no longer requires the use of Yammer Directory Sync and can now make use of Azure AD Connect
Once Yammer has been activated and a Yammer Enterprise network has been created for the tenant, any user who was a valid account in the tenant will be able to log on to Yammer without any additional license assignment
Yammer users are created the first time they log on and will therefore not appear in the Yammer people directory prior to that
Office 365 supports one activated Yammer Enterprise network per tenant
Yammer content is not copied during the merge process
Since Office 365 supports only one activated Yammer Enterprise network per tenant, it is recommended that in environments with multiple domains the home network is activated using the domain that accommodates the majority of users. Once this network has been created, adding a domain to a network is very simple. log into the Office 365 portal, submit a service request and once you have completed the request form (pictured below) it only takes a day or two to complete.
If a domain already has a Yammer Basic network, you can choose to either upgrade that network to an Enterprise network or create a new Enterprise network and merge the old Basic one, but it is important to understand that during the merge process the old Yammer content will not be copied. This network migration process no longer requires a service request and can be performed by Yammer admins. There is some great documentation available here.