Online Migration Tools - Comparing MigrationWiz and Dell On Demand Migration

I recently needed to migrate my own personal Office 365 tenant to another Office 365 tenant and even though I only have a few fairly small mailboxes, I decided to use online migration tools to ease the migration and I thought it would be a good idea to put together a little comparison between two of the leading solutions, MigrationWiz and Dell (formerly Quest) On Demand Migration.

The truth is, migration tools aren’t new and many of today’s players in this market have been around for a some time. Cloud adoption however has driven innovation in the market and migration toolsets have changed in recent years. Online migration tools allow organizations to migrate their data between email platforms without having to install or maintain any migration software on-premises. From an IT professional perspective, the configuration is far simpler and because you are typically using a web browser to initiate and manage the migration you are now free to do it from wherever you want (the train in my case!) using whatever device you have available. At a high level, it is a fairly simple process which typically involves the configuration of source and destination connectors (with all the required permissions of course) and the solution will extract, convert and ingest your data for you. If either your source or target mail infrastructure is located on-premises, you would need to ensure that remote connectivity is correctly configured as well.

For this comparison, I used exactly the same source mailbox and migrated the content to two new target mailboxes (one for each tool) in a new Office 365 tenant. Both tenants (source and destination) were located in North America and the migrations did not run simultaneously. The source mailbox contained the following:

  • Number of folders = 38
  • Number of items = 26255
  • Total mailbox size = ~1.94 GB

image

Introduction and features:

MigrationWiz has been around for a few years now and was the first online migration tool I used. I have successfully used MigrationWiz several times and migrated users from Domino/Lotus Notes and Exchange to Exchange or Office 365/Exchange Online. One of the great things about MigrationWiz is the amount of supported source and target platforms.

Supported sources

Supported targets

Amazon S3
Google Apps/Gmail
IMAP
Microsoft Exchange (2003+)
Microsoft Office 365
Microsoft Office 365 China
Novell GroupWise
POP
VMware Zimbra Server
IBM Lotus Notes

Amazon S3
Google Apps/Gmail
IMAP​
Microsoft Exchange (2007+)
Microsoft Office 365
Microsoft Office 365 China

For more detailed information about the platforms currently supported by MigrationWiz, click here.
I should also mention that migrations from Domino/Lotus Notes require a small “Lotus Extractor” to be installed on-premises. The extractor should be installed on a workstation and not your Domino servers themselves. MigrationWiz are also in the process of launching a new migration portal which is currently in beta and will support a couple of new migrations, namely:
  • Public Folder migrations
  • Storage migrations

image

These options look really promising, however I haven’t personally tested them (yet!). A list of items not migrated by MigrationWiz can be found here.

Dell On Demand Migration for Email is a relative newcomer to the online migration tools market, however I’m sure we can all agree that they (Quest Software) really set the standard for migration tools in general for a long time. I haven’t personally used Dell On Demand for any production migrations but have been meaning to try it out for some time now. Dell On Demand supports the following platforms:

Supported sources

Supported targets

Google Apps
IMAP​
Lotus Notes
Microsoft Exchange (2000+)
Microsoft Office 365
Novell GroupWise
POP
SunONE/iPlanet
Windows Live Hotmail
Zimbra
Microsoft Exchange (2010, 2013)
Microsoft Office 365

Dell has published a list of known issues and limitations.

Licensing and cost:

One of the great things about both these tools is that they are licensed on a consumption basis and there is no minimum purchase required. MigrationWiz offers a couple of different license options, with the difference being that a “Premium” license will allow you to perform multiple migration passes. I usually suggest purchasing the “Premium” license because this works really well with the “seed and cutover” type migrations I usually perform with these tools. With MigrationWiz, you purchase you license up front and each successfully migrated mailbox consumes one of those licenses. Their licensing is based on volume so the more licenses you purchase, the more you save. A basic license will cost you $9.99 (USD) while a premium license costs $11.99 (USD).

image

The Dell On Demand licensing model is somewhat simpler in the sense that they only have one license type. The difference is that you add your credit card details to the portal and they will bill you monthly for the amount of licenses you consume with each successfully migrated mailbox consuming one license and getting billed accordingly. Dell also appear to add an “Australia Tax” as the same license costs about 20% more when you pay in AUD, I always think this is a little cheeky, $1 or $2 could really add up if you are buying thousands of licenses. One license will cost you $11.00 (USD).

image

Configuration:

To configure MigrationWiz, you first create a “Mailbox Connector” which defines your source and target mailboxes as well as your migration credentials. You have the ability to use administrator credentials or end-user credentials configured per mailbox. If you have neither of these available, MigrationWiz also provides the ability to request credentials from each individual user. This is done via an email with a secure link in which the end-user may provide their credentials directly to the system.

image

Once you have created your “Mailbox Connector” you can import your mailbox list. If you have more than one mailbox to migrate, MigrationWiz provides a few methods of doing this.

image

I typically use .csv import. You can download a sample import file to get started (see sample below). If you are using administrator credentials for your migration, you only need to populate the “Source Email” and “Destination Email” fields. More information about migration flags can be found here. I once did a migration for a customer using end-user credentials where some of the users had commas “,” in their passwords and needless to say, this didn’t work very well with .csv files so be mindful of that.

image

Once all your mailboxes have been added, you have the ability to tweak many of the migration settings, like filtering, before beginning the migration process.

image

You now have the ability to migrate a few or all of the mailboxes you have imported. You will also be able to monitor the migration statistics while the migration is running. The MigrationWiz documentation is really helpful as well, for example if you need more information about migration credentials, see this link

The Dell On Demand configuration process is very similar, you start by creating a “Migration Plan” which defines your source and target mailboxes as well as your credentials. You have the ability to use administrator credentials or end-user credentials and the tool allows you to increase the number of concurrent mailbox migrations by adding additional administrator credentials. Each administrator can migrate 10 target mailboxes concurrently.

image

The next step is to import your mailboxes, this can be done via a .tsv file. A sample file is also provided for reference.

image

The final configuration step allows you to tweak the migration options

image

You are now ready to start migrating!

Migration Velocity:

As a consultant, one of the most common questions I get asked is “How long will my migration take?”. Unfortunately, this is a very difficult question to answer and the reality is, even with thorough testing and analysis, it is difficult to accurately predict how long a migration will take as every environment is different and migration velocity depends on so much more than just your network speeds. About 6 months ago, I helped a customer complete a migration from Exchange 2003 in one region to Exchange 2010 in another. They had a very tight deadline and it was a hard cut-off so there was no pushing the deadline. I did I whole bunch of calculations based on their source data size, connectivity, etc and in my mind there was no way we would be able to get all the data migrated in time so we started to prepare the business for that. We decided to use MigrationWiz for the migration and we ended up completing the entire migration with 4 full days to spare. Because we were prepared for the worst possible case, the entire team looked really good when we were able to pull it off successfully. I’m glad it didn’t end up going the other way and it just goes to show that there is always a small unknown factor that could change the amount of time taken for a migration to complete successfully.

It is usually a good idea to perform some test migrations using mailboxes that accurately represent those found in your environment. Using data from those migrations will go a long way to helping you predict your migration velocity. It is really handy to use some pilot user mailboxes for this because you will be able to perform multiple passes later on and not consume any additional licenses. MigrationWiz provides some guidance and a basic calculator here.

The results of the test migrations performed for this post are as follows:

MigrationWiz

Dell On Demand

Duration 16 hrs, 23 min 11 hrs, 0 min
Items Processed 26118 26286
Errors 0 13

The statistics above were taken from each migration tool. There are some discrepancies with the amount of items processed and the Dell tool reported some failures. Looking at the target mailbox used for the Dell On Demand migration, we see:

image

MigrationWiz provides a whole bunch of information about the migration, including some detailed statistics:

image

Dell On Demand provides an overview of the migration with some detailed logging:

image

I am perplexed by the large difference in migration duration. These migrations were run on random days of the week at roughly the same time so I’m not sure if it is a coincidence or not. I might re-do the MigrationWiz one sometime and see if it changes the duration.

Reporting:

MigrationWiz provides some nice charts at a mailbox level as well as some .csv reports at connector level for those who like to create their own reports in Excel.

image

Dell On Demand provides a summary and a migration details report which includes a .csv file containing all the errors that were encountered during the migration. The reports menu is “conveniently” hidden on the bottom right-hand side of the dashboard.

image

Documentation:

MigrationWiz has heaps of useful documentation, the knowledgebase is located here: https://migrationwiz.zendesk.com/forums and it seems they are moving their content to a SharePoint based library located here: https://community.bittitan.com/kb/SitePages/Knowledge%20Base.aspx?product=MigrationWiz

Dell On Demand has a user guide which is published here: http://documents.software.dell.com/On%20Demand%20Migration%20for%20Email/1.6/User%20Guide/

In Summary:

I think both are excellent tools which provide a wide range of options. Dell On Demand is targeted towards those organizations who are migrating to Microsoft Exchange while MigrationWiz supports other target platforms, like the ability to archive to Amazon S3. MigrationWiz has also recently added the ability to perform Public Folder and Storage migrations. Dell On Demand appears to have outperformed MigrationWiz when it comes to migration velocity, however I do find the MigrationWiz documentation to be superior.

How to perform a manual synchronisation with AADSync

I recently posted about the preview (CTP) of Azure Active Directory Sync Services (AADSync). There are a number of differences between AAADSync and DirSync, one of these being that the “DirSyncConfigShell.psc1” shell previously used to perform a manual synchronisation is not longer available. Instead, we can now use “DirSyncClientCmd.exe” which is located in “C:\Program Files (x86)\Windows Azure AD Connection”

image

The syntax is really straightforward, you can perform either an “initial’ or “delta” synchronisation, e.g:

[shell]DirSyncClientCmd delta[/shell]

image

Using AD FS “Alternate Login ID” with Office 365

As Office 365 adoption continues to grow and more organisations are starting to take advantage of identity federation. One of the most common issues I’ve seen over the last couple of years when helping my clients adopt Office 365 services is the disconnect between user principal name (UPN), sAMAccountName (The user name typically used at logon) and the ‘mail’ attribute in Active Directory. There are many reasons for this and I won’t go into that in this post, but it is quite common to see one of the following scenarios:

  1. sAMAccountName = JSmith, UPN = JSmith@internal.local, Mail = John.Smith@domain.com
  2. sAMAccountName = ID123456, UPN = ID123456@internal.local, Mail = John.Smith@domain.com – I’ve seen this scenario quite often when working with .gov and .edu clients.

In the past, the typical recommendation is to add the public domain to the UPN suffix list and change the UPN for each user to match their email address. This causes much less confusion for end users as you won’t need to try and explain the different between their UPN and their email address even though they both appear to be the same.

*Update: I'd like to call out that implementing "Alternate Login ID" with an Exchange Hybrid deployment is not a good idea. Microsoft has the following warning posted on the TechNet wiki.

Warning

The April 2014 Windows Server 2012 R2 Update (KB 2919355) includes a new feature called “Alternate Login ID” which will allow you to configure an alternate attribute to be used to identify a user object in Active Directory. In other words, you can now use a different attribute, for example ‘mail’ during login instead of UPN.

This is great news for those organisations who use of employee ID or payroll numbers as their domain user names. As always, there are a few things to consider. In order for the authentication request to succeed, the attribute configured as the alternate login ID must satisfy the following requirements:

  • The attribute must be indexed.
  • The attribute must be in the global catalog.
  • The attribute must be a well-formed SMTP address and conform to the UPN rules outlined here.
  • The attribute must have a single value.
  • The CanonicalName attribute on the user object must be accessible to the service account that is used for AD FS.
  • The value of the alternate login ID attribute must be unique across all the forests that AD FS is configured to use when enabling this feature.

The configuration process is really simple as well, for example let’s assume we already have AD FS 3.0 implemented with Office 365. My test environment is configured as follows:

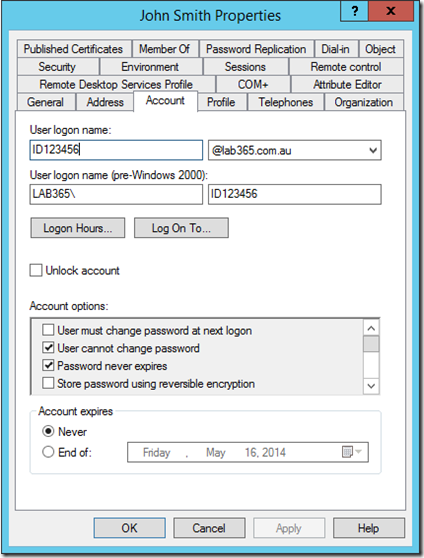
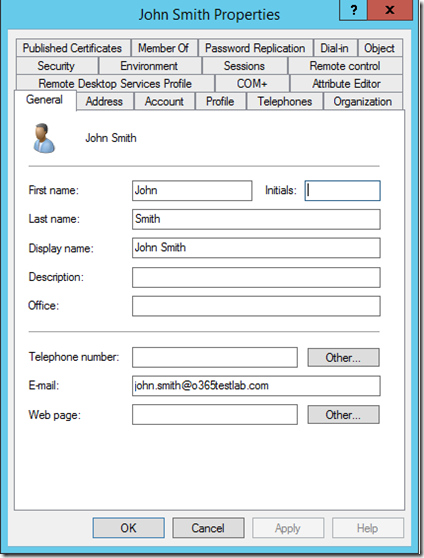
  • Internal AD domain name: lab365.com.au – NOT configured in Office 365
  • Public (SMTP) domain name: o365testlab.com – This domain is also configured in Office 365
  • sAMAccountName = ID123456, UPN = ID123456@lab365.com.au, Mail = John.Smith@o365testlab.com

We would like to allow our users to log in using their email addresses (‘mail’ attribute) instead of their UPN.

image

image

It is important to note that if you are not using a routable UPN suffix, you will most likely want to pre-configure the correct SMTP and SIP addresses for your user accounts before you synchronise them. This can be done via the “proxyAddresses” attribute of the user account:

image

Once the user has been synchronised to Azure AD and assigned the relevant licenses in Office 365 it should look something like:

image

To configure AD FS, the first thing to do is install the April 2014 Windows Server 2012 R2 Update (KB 2919355), this can easily be done via Windows Update:

image

Warning: There is a known issue with the April 2014 Windows Server 2012 R2 Update (KB 2919355) that may effect you if you are using Windows Server Update Services. Be sure to read KB 2959977 before installing this update in your environment. As always, planning and testing is very important!

Next, update the AD FS configuration by running the following PowerShell cmdlet on any of the federation servers in your farm, starting with the primary AD FS server in your farm, obviously you would need to adjust the “AlternateLoginID” and “LookupForests” parameters to suite your particular requirements:

[powershell]Set-AdfsClaimsProviderTrust -TargetIdentifier "AD AUTHORITY" -AlternateLoginID mail -LookupForests lab365.com.au[/powershell]

Next, we need to update one of our AD FS claims rules. We locate the “Microsoft Office 365 Identity Platform” relying party trust and edit issuance transform rule number 1:

image

The new rule should look like this:

image

Lastly, we need to update our DirSync attribute flow to ensure the correct attribute is synchronised. Run the miisclient.exe which can be located in "C:\Program Files\Windows Azure Active Directory Sync\SYNCBUS\Synchronization Service\UIShell”. Select the “Management Agents” tab, right-click to view the properties of “Active Directory Connector”. Under “Configure Attribute Flow”, expand “Object Type: user” and find the “Data Source Attribute” of “,sAMAccountName,userPrincipalName”. To edit it:

  1. Change the “Mapping Type” from “Advanced” to “Direct”
  2. Select the appropriate attribute (“mail” in my case) as the “Data source attribute”.

Ensure that the “Metaverse attribute” is set to “userPrincipalName” and click “Edit” and then “OK” to save your changes.

image

Once you have completed a successful synchronisation, you will be able to log into the Office 365 portal using your email address as login attribute.

image

image

I’d like to conclude this post with the following.. just because something is possible, it doesn't mean it should be done. Unless you have a very specific requirements and/or constraints, I would recommend using UPN as your login attribute even if this means having to go through the process of changing all your user UPNs. In most environments this change will have little or no effect on other systems and may be the best approach.

For more information on Alternate Login ID, see:

Azure Active Directory Sync Services - Kicking the “AADSync” tyres

Windows Azure Active Directory Sync (DirSync) has become synonymous with Office 365 in recent years and while DirSync isn’t a requirement, I haven’t seen any organisations consuming Office 365 services without it. In simple terms, DirSync can be used to synchronise local Active Directory objects to a Windows Azure Active Directory instance which is in turn leveraged by Office 365. After an initial synchronisation, DirSync runs on a schedule (typically, every three hours) to synchronise changes from the on-premises directory to the cloud instance.

The recent addition of password synchronisation to DirSync has made it even more useful and has been one of the many improvements to the tool (initially 32bit only!) which was released a few years ago. Unfortunately, DirSync still has some limitations especially when it comes to multi-forest scenarios. To help address the complexities associated with multi-forest  environments, Microsoft recently announced Azure Active Directory Sync Services (AADSync) which is currently in preview. AADSync is intended to significantly simplify the configuration required to synchronise multi-forest  environments.

I thought I’d take AADSync for a test drive and see what it is all about. At this point I should also mention that it is currently a preview (CTP) release and is not supported in production environments. There preview also has a few limitations:

  • AADSync preview can only use SQL Express LocalDB.
  • PasswordSync and password write-back are not currently supported.
  • Hybrid Exchange configuration is not currently supported.

The pre-requisites are really simple, you will need the following installed on Windows Server 2008, 2008 R2, 2012 or 2012 R2:

  • .NET 3.5 and .NET 4.5.
  • PowerShell 3.0.

The installer will automatically install the Microsoft Online Services Sign-In Assistant (msoidcli_64) which is really convenient as you can now be confident you will have the correct version installed.

As previously mentioned, this is a preview release and therefore the installation wizard is not yet strongly signed. It is therefore important that strong name signing is turned off on the server. The AADSync tool will NOT run if you do not perform this step, instead you will receive the following “DirectorySyncTool has stopped working” error with “Problem Event Name: APPCRASH”

image

To turn off strong name signing, simply use the included “sn.exe” utility and issue the following command:

[shell]sn -Vr *[/shell]

image

For more information about strong name signing and the sn.exe utility, see the following links:

The installation process is pretty simple as one would expect, before starting the process it is helpful to have the following information to hand:

  • Service account in AD (default read permissions will be sufficient)
  • An Azure Active Directory tenant (Office 365 for example)
  • Service account in your Azure AD (Global Administrator role required)

image

image

You will notice the option to add multiple forests. For more information about the multi-forest scenarios supported, see AADSync Scenario Overview. If you configure AADSync to join multiple forests, the default configuration will assume the following:

  • A user will have only one enabled user account and login information is taken from this forest.
  • A user will have only one Exchange mailbox.
  • The data quality for a user is best in the forest where Exchange is located.
  • If an Exchange mailbox is found, common user attributes are taken from this forest.

image

You can configure join rules which map to the supported scenarios mentioned above. In a single forest scenario, the default selection will create all users as individual objects in Azure AD and objects will not join in the metaverse. You also have the option to select the immutable attribute. It is important to note that the attribute selected must not change during the lifetime of the object, even if the object is moved between domains in a forest or between forests. If you are unsure, you are probably better off not changing the default selection.

image

image

image

image

Once completed, it successfully synchronised the 3000 accounts in my lab AD in about 25mins. The “DirSyncConfigShell.psc1” shell is not longer available and seems to have been replaced by “DirectorySyncClientCmd.exe”. I noticed a new PowerShell module which is great.

[powershell]Get-Command -Module PowerShellConfig[/powershell]

image

[powershell]Get-SynchronizationRule | Select Name, Direction[/powershell]

image

I also noticed a new “Synchronization Rules Editor”

image

Many of these configuration options are probably best left at their defaults unless you have a specific requirement or scenario. I expect to see more documentation become available closer to or at release, but in the meantime you can find the current official documentation here.

Lync for Mac 2011 – “Lync was unable to sign in..”

##Update##
Since writing the post, I have been able to obtain a copy of the hotfix described in KB2926055 and I can confirm that it does fix this issue.

I recently came across an interesting issue when attempting to log into Lync Online using Lync for Mac 2011. This was a newly installed an updated version of Lync for Mac 2011, version 14.0.7 (131205) to be exact. At first I thought I’d made a typo with my password but after a couple of attempts I knew something else was wrong. I tried a couple of other Lync accounts and still kept receiving the “Lync was unable to sign in. Please verify your logon credentials and try again. If the problem continues, please contact your support team.” error message.

image

I tried using manual server configuration as suggested in the “Troubleshoot sign in issues with Lync for Mac 2011 in Lync Online” article, but that didn’t make any difference either. I then tried using a different Mac with Lync for Mac version 14.0.6 and that one was able to log in without any issues. After digging into the client logs, we saw the following entry:

04/08/2014|20:48:55.286 25A:B0115000 WARN  :: GetNewWebTicket: "Got new web ticket already expired: Current time=1396954135, expire time=0"

It seems Lync for Mac 2011 tries to use a web ticket that is expired. After a bit of searching around, we found Article ID: 2927775 “Can't sign in or see contact pictures in Lync for Mac 2011 when system time zone is set to UTC+8 or an earlier time zone” which exactly describes the issue which occurs because Lync for Mac 2011 calculates the expiration time of a web ticket based on an incorrect time zone.  I was able to confirm this by changing my time zone settings which resulted in my client immediately being able to log in.

image

Once you have successfully logged in, you can change your time zone back to the correct configuration and you will still be able to log in. Unfortunately, this workaround does not persist across reboots or hibernations.

Article ID: 2926055 “Description of the Microsoft Lync for Mac 2011 14.0.7 hotfix” describes a hotfix that should resolve this issue, unfortunately you need to contact Microsoft Customer Support Services to obtain this hotfix and I haven’t been able to obtain it yet. I have logged the appropriate service request and will update this post once I have tested it.

With the correct DNS configuration, I haven’t found the need to use manual server configuration as suggested in numerous support articles. I find that the default configuration works just fine.

image

I also wanted to thank for my colleague, Lync MCM Aidan Freeman for helping me troubleshoot this issue.

Warning added to Exchange 2013 SP1 description page

Yesterday I wrote a post noting the lack of any warning on the Exchange 2013 SP1 download or description page about the bug that affects environments that make use of third-party or custom-developed transport agents. Tony Redmond also published a similar post on windowsitpro.com. I noticed earlier today that Microsoft have updated the relevant page with a note to acknowledging the bug:

image

Thanks Tony Redmond and Microsoft for making that happen! My comments about thorough planning and testing before deploying SP1 in your production environment still apply!

Step away from that Exchange 2013 SP1 update!

The Exchange Team announced the release of Exchange 2013 SP1 in late Feb and while SP1 introduced some great new features and functionality like Windows Server 2012 R2 support, it didn’t take long for customers to start reporting transport issues after the update. To their credit, Microsoft responded quickly to address these issues and released KB 2938053. The issue affected environments that make use of third-party or custom-developed transport agents, typically in the form of anti-virus or disclaimer software.

All good then? Well, yes and no.. If you were affected by the issue you can now download the relevant PowerShell script that corrects a formatting error in the configuration files that govern the transport extensibility built into Exchange Server 2013 and issue will be resolved. If you are about to update your Exchange 2013 environment to SP1 you should note that this fix has not been included in the SP1 download and a permanent fix for this will only be delivered in Exchange Server 2013 CU5. There also doesn’t appear to be any warning about this issue on the any of the SP1 pages on the Microsoft website so if you make use of any third-party software or custom-developed transport agents you will break your Exchange environment if you apple the SP1 update.

It is important to be aware of any applications running on your Exchange servers that may be making use of transport extensibility and as always I recommend thorough planning and testing before deploying SP1 in your production environment.

For more information about the issue, see KB 2938053

Tony Redmond has also written a great, in-depth article about this on windowsitpro.com

How to find Office 365 Support Phone Number

Every now and then I have a need to contact Office 365 support in order to help a customer resolve a particular issue. Logging a support request is easily done via the “Support” menu in the Office 365 admin portal, however it usually takes me a while to find a a contact telephone number for Office 365 support. The support engineers always have phone numbers listed in their email signatures, however these are rarely local numbers.

Earlier today, I was once again in a position where I needed to call Office 365 support and since I had to call from my mobile phone, an international number just wasn’t going to work. I finally found this link buried in some support documentation and thought I would post it here in order to help someone else out and spare myself the effort next time I need it.

http://virtualchat.support.microsoft.com/client/default.aspx?siteid=32ECF580-B446-44E5-8B4D-25F0AFE07779&scope=S&query=Support%20phone%20number

image

I’ll be at MEC 2014 #IAMMEC

Only a couple of months to go before the Microsoft Exchange Conference 2014 (MEC) in Austin (March 31 - April 2). I’ll be attending and I am really looking forward to catching up with everyone in the community. This event truly is worth getting to - I'll prove it, I'm travelling from Australia! The first 100 sessions have already been posted here. For more info, check out http://www.iammec.com/

mec-icon

Let me know if you are also planning to attend, it would be great to catch up!

Configure Mailbox Regional Settings

I recently completed a small migration for a customer using the MigrationWiz online migration tools. This wasn’t the first time I’ve used these tools, but it was the first time I’ve actually provisioned new destination mailboxes myself. I used PowerShell with a .csv file as input to automate the process of creating each mailbox, granting the correct level of access to the migration account as well as performing a few other tasks that were relevant to the particular migration.

Once I started the migration I was confused for a second when I received the following error message: “Connection did not succeed. Try again later.” The associated MigrationWiz knowledgebase article contained a few suggestions, but none of them applied to my particular situation. When trying to log into one of the test mailboxes, I noticed that it asked me to set my preferred language and time zone.. which is expected:

image

Once I had set these, I was able to connect and migrate data to that mailbox as expected. Obviously, I didn’t want to manually configure these settings for each mailbox and was able to use PowerShell and the Set-MailboxRegionalConfiguration cmdlet to do this for all the relevant mailboxes. Here is a very simple script that will use a .csv as input and set the regional settings for all aliases. It can easily be modified to use some other input too:

[powershell]#The users.csv should contain a Alias colum, eg
#Name,Alias,Email,Whatever
$Users = Import-Csv .\users.csv
Foreach ($User in $Users){
$Alias = $User.Alias
$Language = "en-NZ"
$DateFormat = "d/MM/yyyy"
$TimeFormat = "h:mm tt"
$TimeZone = "New Zealand Standard Time"
Set-MailboxRegionalConfiguration -Identity $Alias -Language $Language -DateFormat $DateFormat -TimeFormat $TimeFormat -TimeZone $TimeZone
}[/powershell]

The easiest way to find your desired settings it to look at a correctly set mailbox using the Get-MailboxRegionalConfiguration cmdlet:

image