Everyday Defender 02x03-azure_fridays_but_its_us.now

In this episode Koos discusses the Odido data breach in The Netherlands by hacker group Shinyhunters, one of the largest public data leaks in Dutch history. Touching on vishing, misconfigurations, and the importance of blocking Device Code Flow. Chris was inspired by a fellow MVP to take a look at common AD security mistakes and provides some detail on how to look for these in your environment.

The Odido Breach

In February 2026, hackersgroup Shinyhunters breached Dutch telecom provider Odido (formerly known as T-Mobile, sold off in 2022), stealing approximately 90 GB of customer data covering 6.5 million people. Which is 1/3rd of the population. The data included passport numbers, bank account numbers, addresses, and sensitive helpdesk notes. The group demanded 1 million euros in ransom, which Odido refused to pay. The data was eventually published in full on March 1st. It became the biggest public data breach in The Netherlands.

How it started: Vishing

The attack began on February 3rd with a simple phone call. A Shinyhunters operative called Odido’s customer helpdesk, impersonating an IT employee. The caller spoke fluent Dutch and persuaded a helpdesk employee to “log in” to what appeared to be a legitimate Odido website.

According to campaigns documented by BleepingComputer and Mandiant in early 2026, Shinyhunters has been combining vishing with abuse of the OAuth 2.0 Device Authorization Grant, also known as Device Code Flow. Vishing, a conjunction of “voice” and “phishing”, is essentially phone-based social engineering. In these attacks, the attacker first generates a legitimate device code using a real Microsoft OAuth client ID. They then call the target, impersonate IT support, and instruct them to navigate to microsoft.com/devicelogin and enter the code. The victim lands on a legitimate Microsoft sign-in page, authenticates with their credentials, including MFA. And because everything runs through Microsoft’s authentication platform, the user won’t notice anything suspicious going on. They approve their MFA and complete their sign-in. And the attacker receives a PRT (Primary Refresh Token) granting persistent access to the victim’s Microsoft Entra account and, through SSO, to every connected SaaS application.

In episode s01e11 I visited the Social Engineering Village at DEFCON where I watched a live vishing contest. Participants used phone calls and social engineering tactics to trick real companies into revealing sensitive information. I was both pleasantly surprised that some employees showed signs of security awareness training, and alarmed at how skilled social engineers could still extract valuable information with enough flair and persuasion. The Odido breach is a textbook example of this playing out in the real world with devastating consequences.

There is no phishing page to detect, no malicious URL to block, and the victim completes MFA successfully on Microsoft’s own infrastructure. And crucially: even phishing-resistant MFA like passkeys does not help here, because the user is authenticating on the real Microsoft domain. The passkey works exactly as designed, the problem is that the user is unknowingly authorizing someone else’s session.

These attacks show why blocking Device Code Flow is not optional.

What could’ve prevented this: several key misconfigurations

Once Shinyhunters had the helpdesk employee’s credentials and tokens, they logged in as that employee and accessed Odido’s customer management system (Salesforce). Several critical misconfigurations made this breach far worse than it perhaps needed to be. But in today’s episode I want to focus on Device Code Flow specifically. If you’re interested to know more details about the Odido attack specifically, I urge you to look at a great writeup by Maarten Goet which also contains loads of links to other external sources with details.

Device Code Flow

One of the defensive recommendations from this breach (and from Microsoft itself) is to block Device Code Flow. This is a topic that deserves a deep dive because it is increasingly being abused by threat actors and I still see this enabled all of the time at my customers.

What is Device Code Flow?

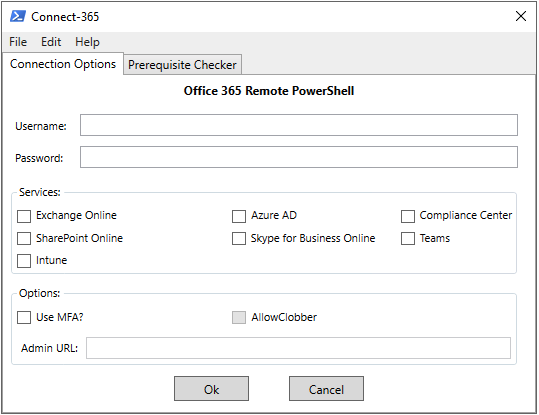
Device Code Flow is an OAuth 2.0 authentication flow designed for devices that lack a local browser or have limited input capabilities. I think most of us have seen this being used in PowerShell scripts for example. But also devices like smart TVs, IoT devices, Microsoft Teams Room devices, printers, or digital signage.

Here’s how the flow works under the hood:

Step 1 - Device Authorization Request The device (or application) sends a POST request to the Microsoft Entra ID device authorization endpoint:

POST https://login.microsoftonline.com/{tenant}/oauth2/v2.0/devicecode
Content-Type: application/x-www-form-urlencoded

client_id=<application-client-id>&scope=openid profile offline_access https://graph.microsoft.com/.default

The client_id identifies the application registration in Entra ID. This is where it gets interesting from an attack perspective: attackers can use well-known first-party Microsoft client IDs (e.g. the Microsoft Azure CLI or Microsoft Office app IDs) so the resulting consent screen looks completely trusted and familiar to the user.

Step 2 - Device Authorization Response Entra ID responds with a JSON payload containing:

{
  "device_code": "GMMhmHCXhWEzkobq...{long opaque string}",
  "user_code": "BRWC-MJNK",
  "verification_uri": "https://microsoft.com/devicelogin",
  "expires_in": 900,
  "interval": 5,
  "message": "To sign in, use a web browser to open the page https://microsoft.com/devicelogin and enter the code BRWC-MJNK to authenticate."
}
  • device_code - A long opaque token that the device keeps privately and uses to poll for completion.
  • user_code - A short, human-readable code (e.g. BRWC-MJNK) that the user must enter. This is the code an attacker would hand to their victim.
  • verification_uri - Always points to Microsoft’s legitimate domain.
  • expires_in - The device code is valid for 15 minutes (900 seconds) by default. If the user doesn’t complete authentication within this window, the code expires.
  • interval - The polling interval in seconds. The device should wait at least this many seconds between each poll.

Step 3 - User authenticates on a separate device The user opens a browser on any device (phone, laptop, etc.), navigates to https://microsoft.com/devicelogin, and enters the user code. Microsoft’s authentication platform takes over from here: the user signs in with their credentials, completes MFA if required, and sees a consent screen showing which application is requesting access and what permissions (scopes) it needs.

At this point, the user has no way to know which physical device initiated the request. They see a legitimate Microsoft page, a legitimate app name, and legitimate permission scopes. Nothing indicates that the device code was generated by an attacker.

Step 4 - Device polls the token endpoint While the user is authenticating, the device continuously polls the token endpoint at the configured interval:

POST https://login.microsoftonline.com/{tenant}/oauth2/v2.0/token
Content-Type: application/x-www-form-urlencoded

grant_type=urn:ietf:params:oauth:grant-type:device_code
&client_id=<application-client-id>
&device_code=GMMhmHCXhWEzkobq...

During polling, the response contains "error": "authorization_pending" until the user completes or denies authentication, or the code expires.

Step 5 - Token issuance Once the user completes authentication, the next poll returns the token payload:

{
  "token_type": "Bearer",
  "scope": "openid profile offline_access https://graph.microsoft.com/.default",
  "expires_in": 4799,
  "access_token": "eyJ0eXAi...{JWT}",
  "refresh_token": "0.ARoAv4j5cvGGr0G...{opaque string}",
  "id_token": "eyJ0eXAi...{JWT}"
}
  • access_token - A short-lived JWT (typically ~60-90 minutes) granting access to the requested resources.
  • refresh_token - A long-lived token (up to 90 days, or indefinite with continuous access evaluation) that can be exchanged for new access tokens without user interaction. This is the real prize for an attacker: it provides persistent access long after the initial authentication.
  • id_token - Contains claims about the authenticated user.

The critical design characteristic is that tokens are issued to whatever device holds the device_code, which is the device that initiated the flow, not the device where the user authenticated. This decoupling is what makes the flow useful for input-constrained devices, and it’s exactly what makes it so dangerous when abused.

What Microsoft is doing to prevent Device Code Flow abuse?

Microsoft has taken several concrete steps as part of their Secure Future Initiative:

1. Microsoft-Managed Conditional Access Policy (February 2025) Microsoft announced the rollout of a Microsoft-managed Conditional Access policy that blocks Device Code Flow by default. Key details:

  • The policy is automatically created in tenants and starts in report-only mode.
  • It targets organizations that have not used Device Code Flow in the past 25 days, ensuring it doesn’t break existing legitimate use.
  • After at least 45 days in report-only mode, Microsoft automatically enables the policy (moves it to “On”) unless the administrator explicitly opts out.
  • Administrators can customize exclusions (e.g. specific users or break-glass accounts) but cannot delete the policy.
  • This policy appears alongside other Microsoft-managed policies like “Block legacy authentication” and “Multifactor authentication for all users.”

2. Authentication Flows condition in Conditional Access

Microsoft added “Authentication Flows” as a dedicated condition in Conditional Access policies, allowing administrators to explicitly target and block Device Code Flow. This enables granular control, for example:

  • Block Device Code Flow for all users except a specific group that uses Teams Room devices.
  • Block Device Code Flow everywhere except for specific network locations.
  • Block Device Code Flow for all resources except specific applications.

3. Protocol Tracking Microsoft implemented “protocol tracking” for sessions that use Device Code Flow. Once a session is established through Device Code Flow, that session is marked as “protocol tracked” and remains subject to authentication flow policy enforcement even through subsequent token refreshes. This prevents attackers from using Device Code Flow to get an initial token and then pivoting to other resources.

What you should do

  1. Check your sign-in logs - Filter for Device Code Flow in the authentication protocol filter to understand if and how it’s being used in your organization. You can run the following KQL query in Microsoft Sentinel or Log Analytics to get an overview:
SigninLogs
| where AuthenticationProtocol == "deviceCode"
| project
    TimeGenerated,
    UserPrincipalName,
    AppDisplayName,
    ResourceDisplayName,
    IPAddress,
    Location = LocationDetails.city,
    DeviceDetail.operatingSystem,
    Status.errorCode,
    ConditionalAccessStatus,
    RiskLevelDuringSignIn,
    OriginalTransferMethod
| sort by TimeGenerated desc

If you see results, investigate each entry. Pay attention to which applications (AppDisplayName) are using Device Code Flow and whether the users and locations are expected. Any sign-in from an unexpected user, app, or location is a red flag.

  1. Don’t wait for the Microsoft-managed policy - Create your own Conditional Access policy to block Device Code Flow now:

    • Assignments: All users (exclude break-glass accounts)
    • Target resources: All resources
    • Conditions: Authentication Flows -> Device code flow
    • Grant: Block access
  2. If you have legitimate use cases, create a narrow exception. Only allow Device Code Flow for documented use cases (e.g. specific users, specific device platforms, specific network locations).

  3. Start in report-only mode if you’re unsure about impact, but move to enforcement quickly.

Common AD Security Mistakes

Koos’ Odido Breach story is a great case in point that demonstrates how breaches don’t always require fancy exploits. More often than not, rely on common misconfigurations, mistakes or legacy configurations to get a foot in the door.

MVP Spencer Alessi recently published a great post called ‘Common Active Directory security mistakes attackers count on’ which really resonated with me. I have spent countless hours working with organizations helping them correct most or all of these.

I thought it would be a good idea to review his list of mistakes for those in the back who may not have seen the post. I think his list is an great place to start if you are looking to inprove the security posture of your AD environment.

1) Weak or reused password Weak and reused passwords remain one of the most exploited vectors in Active Directory environments. Attackers use credential stuffing, password spraying, and hash cracking to compromise accounts.

  • Run a password audit using DSInternals or similar tools to identify accounts with weak or common passwords
  • Cross-reference hashed credentials against the HaveIBeenPwned NTLM hash list to find breached passwords currently in use
  • Check the Default Domain Password Policy and any Fine-Grained Password Policies for minimum length, complexity, and lockout settings
  • Identify accounts with ‘Password Never Expires’ set — these are common targets since they are never forced to rotate
  • Look for service accounts or admin accounts sharing passwords across systems
# Retrieves the default password policy applied to all domain users (min length, complexity, lockout, history)
Get-ADDefaultDomainPasswordPolicy
# Lists all Fine-Grained Password Policies (PSOs) — these override the default policy for specific users/groups
Get-ADFineGrainedPasswordPolicy -Filter *
# Finds all user accounts with 'Password Never Expires' enabled — these accounts never get forced to rotate
Get-ADUser -Filter {PasswordNeverExpires -eq $true} | Select Name,SamAccountName

2) Assigning overly broad permissions on OU, Security Groups, and file shares Misconfigured ACLs on AD objects are a primary enabler of privilege escalation. Attackers with write access to an OU, group, or user object can add members to privileged groups, reset passwords, or modify GPO links without needing Domain Admin credentials. Over-permissioned file shares similarly expose sensitive data and allow lateral movement.

  • Use BloodHound / SharpHound to map all attack paths to Domain Admins and identify principals with excessive AD object permissions
  • Audit ACLs on all Tier-0 and Tier-1 OUs using Get-Acl or PowerView’s Get-ObjectAcl
  • Check for non-admin accounts with GenericAll, GenericWrite, WriteOwner, WriteDACL, or DCSync rights (Replicating Directory Changes All)
  • Audit security group membership, especially ‘nested’ groups that may inadvertently grant elevated access
  • For file shares: use PowerShell or third-party tools to find shares granting ‘Everyone’ or ‘Domain Users’ write/full control
  • Review GPO delegation: who can edit, link, or create GPOs in each OU
# PowerView check ACLs on AdminSDHolder and Tier-0 OUs:
Get-ObjectAcl -ADSPath 'DC=corp,DC=local' -ResolveGUIDs | ?{$_.ActiveDirectoryRights -match 'GenericAll|WriteDACL|WriteOwner'}
# Find accounts with DCSync rights:
Get-ObjectAcl -DistinguishedName 'DC=corp,DC=local' -ResolveGUIDs | ?{$_.ObjectAceType -match 'Replication'}
# Enumerate shares with broad access:
Find-DomainShare -CheckShareAccess | ?{$_.ShareAccess -match 'Everyone|Domain Users'}

3) LAPS deployed but not monitored Local Administrator Password Solution (LAPS) randomizes and manages the local administrator password on domain-joined machines, storing it in a confidential AD attribute. However, deploying LAPS without monitoring creates a false sense of security. Machines that fall out of compliance revert to static passwords, and stale LAPS passwords may indicate the LAPS agent is broken or the machine is offline and unmanaged.

  • Identify domain-joined computers that do NOT have a LAPS password stored in AD (ms-Mcs-AdmPwd attribute is null).
  • Check LAPS password age across all computers: any password older than your defined rotation interval (recommended: 30 days) should be investigated
  • Verify the LAPS GPO is applied to all target OUs and that the CSE (Client-Side Extension) is installed on endpoints
  • Audit who has read access to the ms-Mcs-AdmPwd attribute — only specific admin roles should be able to retrieve passwords
  • Identify machines where the LAPS agent is installed but the password has not updated (stuck agent or connectivity issue)
# Find computers with NO LAPS password (non-compliant):
Get-ADComputer -Filter * -Properties ms-Mcs-AdmPwd | ?{!$_.'ms-Mcs-AdmPwd'} | Select Name
# Find computers where LAPS password is older than 30 days:
Get-ADComputer -Filter * -Properties ms-Mcs-AdmPwdExpirationTime | ?{$_.'ms-Mcs-AdmPwdExpirationTime' -lt (Get-Date)} | Select Name,ms-Mcs-AdmPwdExpirationTime

4) Deploying Active Directory Certificate Services but never checking for misconfigs Active Directory Certificate Services (AD CS) is one of the most under-audited attack surfaces in enterprise environments. Misconfigurations in certificate templates can allow an attacker to enroll a certificate on behalf of any user enabling persistent, password-independent authentication.

  • Run Locksmith or Certify to enumerate all certificate templates and identify ESC1–ESC8 vulnerabilities
  • ESC1: Templates that allow the enrollee to specify a Subject Alternative Name (SAN) and permit enrollment by low-privileged users
  • ESC2: Templates with the ‘Any Purpose’ EKU or no EKU, allowing unrestricted certificate usage
  • ESC3: Templates with the Certificate Request Agent EKU, enabling enrollment on behalf of others
  • ESC4: Templates where low-privileged users have write permissions on the template object itself
  • ESC6: CA configured with EDITF_ATTRIBUTESUBJECTALTNAME2 flag, allowing SAN specification on any request
  • ESC8: HTTP enrollment endpoints (CES/CEP) susceptible to NTLM relay attacks
  • Check who has enrollment permissions on each template — look for ‘Domain Users’, ‘Authenticated Users’, or ‘Everyone’
# Run Locksmith (recommended — provides fix guidance automatically):
Invoke-Locksmith -Mode 4   # Mode 4 = audit + output remediation steps
# Or use Certify to find vulnerable templates:
.\Certify.exe find /vulnerable
# List all certificate templates and their ACLs:
Get-ADObject -SearchBase 'CN=Certificate Templates,CN=Public Key Services,CN=Services,CN=Configuration,DC=corp,DC=local' -Filter * -Properties * | Select Name,nTSecurityDescriptor

5) Allowing regular users to have local admin rights Granting standard users local administrator rights dramatically expands the attack surface. Local admins can install software, disable security tools, extract credentials from LSASS, and persist malware.

  • Enumerate all members of the local Administrators group on domain-joined machines using LAPS reporting, CME, or a script via GPO startup script
  • Check for users added to local Administrators via GPO Restricted Groups or Local Users and Groups preferences
  • Identify machines where standard domain user accounts appear in the local Admins group
  • Check Endpoint Detection & Response (EDR) telemetry for processes run with elevated privileges by standard user accounts
# Enumerate local admins remotely (requires admin rights on target):
Invoke-Command -ComputerName WORKSTATION01 -ScriptBlock {Get-LocalGroupMember -Group 'Administrators'}
# Find GPO Restricted Groups policies that grant local admin:
Get-GPO -All | Get-GPOReport -ReportType Xml | Select-String -Pattern 'Administrators'

6) Including daily use accounts in privileged groups, like Domain Admins Using Domain Admin or other Tier-0 accounts for day-to-day work is one of the most dangerous practices in AD security. These accounts are exposed to phishing, browser exploits, and credential theft every time they browse the web, read email, or open a document.

  • Enumerate all members of Domain Admins, Enterprise Admins, Schema Admins, Administrators, and other Tier-0 groups
  • For each member, check if the account is also used for interactive logons on workstations (Event ID 4624, Logon Type 2 or 10)
  • Look for Tier-0 accounts in the same OU as standard user accounts (they should be in a protected Tier-0 OU)
  • Check if any Tier-0 accounts have SPN set
# List Domain Admins:
Get-ADGroupMember -Identity 'Domain Admins' -Recursive | Get-ADUser -Properties LastLogonDate,Enabled | Select Name,SamAccountName,LastLogonDate,Enabled
# Find DA accounts with SPNs set (Kerberoastable):
Get-ADUser -Filter {adminCount -eq 1} -Properties ServicePrincipalName | ?{$_.ServicePrincipalName} | Select Name,ServicePrincipalName

7) Logging into untrusted hosts with Domain Admin accounts When a Domain Admin account authenticates to a workstation or member server, Windows caches credentials in LSASS memory. If that system is compromised an attacker can extract NTLM hashes or Kerberos tickets using Mimikatz or similar tools and reuse them to authenticate as Domain Admin elsewhere. This is why the source of a logon matters as much as the account itself.

  • Review Windows Security Event Logs (Event ID 4624, 4648) across all non-DC systems for logons by accounts in Domain Admins, Enterprise Admins, or other Tier-0 groups
  • Use EDR telemetry to identify Domain Admin interactive sessions on workstations
  • Check if any Domain Admin accounts have ‘Allow logon locally’ or ‘Allow logon through Remote Desktop’ rights on non-DC systems via GPO
# Check GPO for DA logon restrictions:
Get-GPOReport -All -ReportType Xml | Select-String -Pattern 'DenyInteractiveLogon|DenyRemoteInteractiveLogon'
# PowerShell to find DA accounts with interactive logons (requires event log access):
Get-EventLog -LogName Security -InstanceId 4624 -ComputerName WORKSTATION01 | ?{$_.ReplacementStrings[5] -in (Get-ADGroupMember 'Domain Admins').SamAccountName}

8) Not using Protected Users group The Protected Users security group (introduced in Windows Server 2012 R2) applies a set of non-overridable credential protections to its members. These protections prevent NTLM authentication, block credential caching, require AES Kerberos encryption, and force Kerberos TGT lifetime limits without requiring individual account configuration. It is one of the simplest and most effective controls available for protecting privileged accounts.

  • Check current membership of the Protected Users group. It should include all Domain Admins, Enterprise Admins, Schema Admins, and other Tier-0 accounts
  • Identify privileged accounts NOT in Protected Users and assess why
  • Test for services or applications authenticating via NTLM using Protected Users accounts. These will break and must be identified before rollout
  • Check Kerberos pre-authentication enforcement. Protected Users accounts always require pre-auth, confirm no accounts have ‘Do not require Kerberos preauthentication’ set
# Check Protected Users membership:
Get-ADGroupMember -Identity 'Protected Users' | Select Name,SamAccountName,ObjectClass
# Find privileged accounts NOT in Protected Users:
$puMembers = Get-ADGroupMember 'Protected Users' | Select -ExpandProperty SamAccountName
$daMembers = Get-ADGroupMember 'Domain Admins' -Recursive | Select -ExpandProperty SamAccountName
$daMembers | ?{$_ -notin $puMembers}

9) Weak LM/NTLM domain settings LAN Manager (LM) and NTLM authentication protocols are decades-old and carry significant security weaknesses. LM hashes are trivially cracked. NTLMv1 is susceptible to relay and cracking attacks. Even NTLMv2, while stronger, is vulnerable to relay attacks when SMB signing is not enforced and can be captured and cracked offline. The goal is to eliminate older NTLM versions, enforce NTLMv2 at minimum, and ultimately reduce NTLM dependency across the environment in favour of Kerberos.

  • Audit current LM Compatibility Level across all Domain Controllers and member machines via GPO settings or registry
  • Use a network capture or SIEM to identify systems still sending LM or NTLMv1 authentication requests
  • Check whether SMB signing is enforced on Domain Controllers and all member servers (unsigned SMB enables NTLM relay attacks)
  • Check Event ID 4776 (NTLM authentication attempt) on DCs to identify which accounts and machines are using NTLM vs Kerberos
  • Identify any applications, services, or third-party systems explicitly configured to use NTLMv1 or LM authentication
# Check LM Compatibility Level on a DC:
Get-ItemProperty 'HKLM:\SYSTEM\CurrentControlSet\Control\Lsa' -Name LmCompatibilityLevel
# Value meanings: 0=LM+NTLM, 1=LM+NTLM(NTLMv2 if requested), 3=NTLMv2 only(send), 5=NTLMv2 only(send+accept)
# Check SMB signing on DCs:
Get-SmbServerConfiguration | Select RequireSecuritySignature,EnableSecuritySignature
# Audit NTLM usage via event logs:
Get-WinEvent -ComputerName DC01 -FilterHashtable @{LogName='Security';Id=4776} | Select -First 50 | Format-List

Community Project

Privileged App Path Auditor by Nicolas Blank

A PowerShell tool that maps privilege escalation attack paths through Entra ID application ownership. If a regular user owns an app registration that has RoleManagement.ReadWrite.Directory, AppRoleAssignment.ReadWrite.All, or another Global Admin-equivalent permission, that user can add a secret to the app, authenticate as it, and silently become a Global Administrator — no alerts, no approval, no MFA. This tool finds every one of those paths in your tenant.

It also detects role-based SP control (Application Administrators who can add secrets to any SP with privileged roles — the most common real-world escalation to Global Admin), SP-level credentials hidden from the Entra portal, unowned privileged apps with no accountability, app instance property lock status, shadow admins, stale high-privilege apps, credential hygiene issues, and consent policy weaknesses — all in a single script with zero cost and no dependencies beyond the Microsoft Graph PowerShell SDK.

TCA Podcast Episode 102: Guardrails are good, but..

In Episode 102 of the Cloud Architects Podcast, we sit down with Mona Ghadiri to explore the rapidly evolving world of AI governance. As organizations rush to deploy AI agents, copilots, and automated workflows, Mona argues that the industry is focusing too much on shiny tools and “guardrails” while neglecting the broader governance frameworks needed to manage risk responsibly. The conversation covers everything from prompt injection and supply chain vulnerabilities to the challenges of securing AI across users, applications, models, and training data. Mona shares practical insights on why many organizations are more prepared than they think, how existing security tools can be adapted for AI, and why starting with clear workflows is critical before building AI solutions. It’s a thoughtful discussion on balancing innovation with accountability in a world where AI capabilities are accelerating faster than the processes designed to control them.

Prefer video? check us out on YouTube:

For more information on The Cloud Architects podcast, check us out on SoundCloud

Everyday Defender 02x02_you_shall_not_pass.key

In this episode, Chris take a look at PowerShell modules and how managing M365 and Entra ID has changed over the years. And Koos likes to re-visit Passkeys. This is not new and we covered it earlier in our very first episode in December of 2024. But quite a few things have changed since then and he believes now is the time to start onboarding at scale.

Module Wars

The History Lesson

A long time ago in a galaxy far, far away… back in 2012, I put together a basic script with a GUI to simplify connecting to Exchange Online via remote PowerShell. I had never intended to make the script publicly available and it was just something I used myself. After a couple years I realized that it had been widely shared so I decided to clean it up and publish it on the TechNet gallery. Connect-EXO was born and over the years it matured into what is called Connect-365 today.

Connect-365

In 2020 the Microsoft Graph PowerShell SDK (providing -Mg cmdlets) appears publicly and slowly Microsoft started to moving away from the older modules towards Graph. Microsoft officially deprecated the MSOnline, AzureAD, and AzureADPreview PowerShell modules in March of 2024 - these modules entered deprecated status meaning no new features and only critical fixes available. These modules no longer work today. Personally I think adoption of Microsoft.Graph was slow, mostly due to complexity, but also because of feature parity and the heavy investment many folks had in scripts and automation that used the older MSOnline and AzureAD modules.

Why do we care?

I’ve recently been thinking about this quite a bit - partly because I’ve been looking at updating ‘Connect-365’ to stay current and partly because I’ve heard a lot of myths and incorrect info about the current state of PowerShell management. So what is the answer? Just manage everything with Microsoft.Graph right? As with most things, the answer isn’t quite that simple.

Let’s first look at Microsoft.Graph) - This is a general-purpose SDK for Microsoft Graph, it covers way more than Entra - there is Intune, some Teams, some SharePoint, reports, security, etc. but because the cmdlets map closely to Graph endpoints it can be tricky to use. This is where Microsoft investment is taking place so this is ideally what you should be using, however there are still workload-specific modules. Those modules have not disappeared. These are:

There are also some lesser-know modules that you may need occasionally:

  • AIPService — For admin of Azure Rights Management / Purview Information Protection service.
  • Microsoft.PowerApps.Administration.PowerShell / Microsoft.PowerApps.PowerShell - For Power Platform
  • MicrosoftPowerBIMgmt - For PowerBI

I also wanted to draw attention to three community or non-Microsoft official modules that I believe are ‘must haves’:

  • PnP.PowerShell - PnP PowerShell is a cross-platform PowerShell Module providing over 700 cmdlets that work with Microsoft 365 environments and products such as SharePoint Online, Microsoft Teams, Microsoft Planner, Microsoft Power Platform, Microsoft Entra, Microsoft Purview, Microsoft Search, and more.
  • ImportExcel - PowerShell module to import/export Excel spreadsheets, without Excel.
  • MSAL.PS - PowerShell module wraps MSAL.NET functionality into PowerShell-friendly cmdlets. This is very useful if you’re calling an API that has no good PowerShell module.

I’ll be working on updates for Connect-365 in the coming months - feel free to connect with me on socials if you have any feedback or feature requests.

To Passkey or not to Passkey?

Quick recap: Passkeys?

A passkey is a passwordless sign-in method based on public key cryptography: instead of typing a shared secret, your device creates a unique key pair for each website or service, keeps the private key safe on the device, and proves possession with a quick unlock like biometrics or a PIN.

Passkeys matter because phishing has gotten very effective at stealing passwords but also by performing real-time “man-in-the-middle” tricks. By relaying the users authentication through a fake login page (and letting the user perform a login with MFA) the authentication token can be replayed. And then there’s the human risk of MFA fatigue, where repeated prompts or social engineering leads someone to approve a sign-in they didn’t start.

Phishing-resistant MFA methods like passkeys help break that attack chain by binding sign-in to the legitimate site and requiring a cryptographic proof that can’t be replayed on a fake login page.

Quite a lot has changed since we first talked about this. Especially the user experience was lacking. And the introduction of Passkeys within the Microsoft Authenticator app, led to some awkward configurations steps within the tenant in the early days.

  • On-boarding flow is now much better streamlined.
    First sign-in guides you nicely through the process and it’s no longer required to setup MFA in Microsoft Authenticator app.
  • We now have “Syncable Passkeys”! (preview)
    Other than Device-bound Passkeys these can be stored in a centralized location and synced across devices. (I.e. Password Managers like 1Password, Keeper and such)
  • We now have Passkey Profiles (preview)
    Manage different Passkey configurations for different user groups.

passkey profiles 
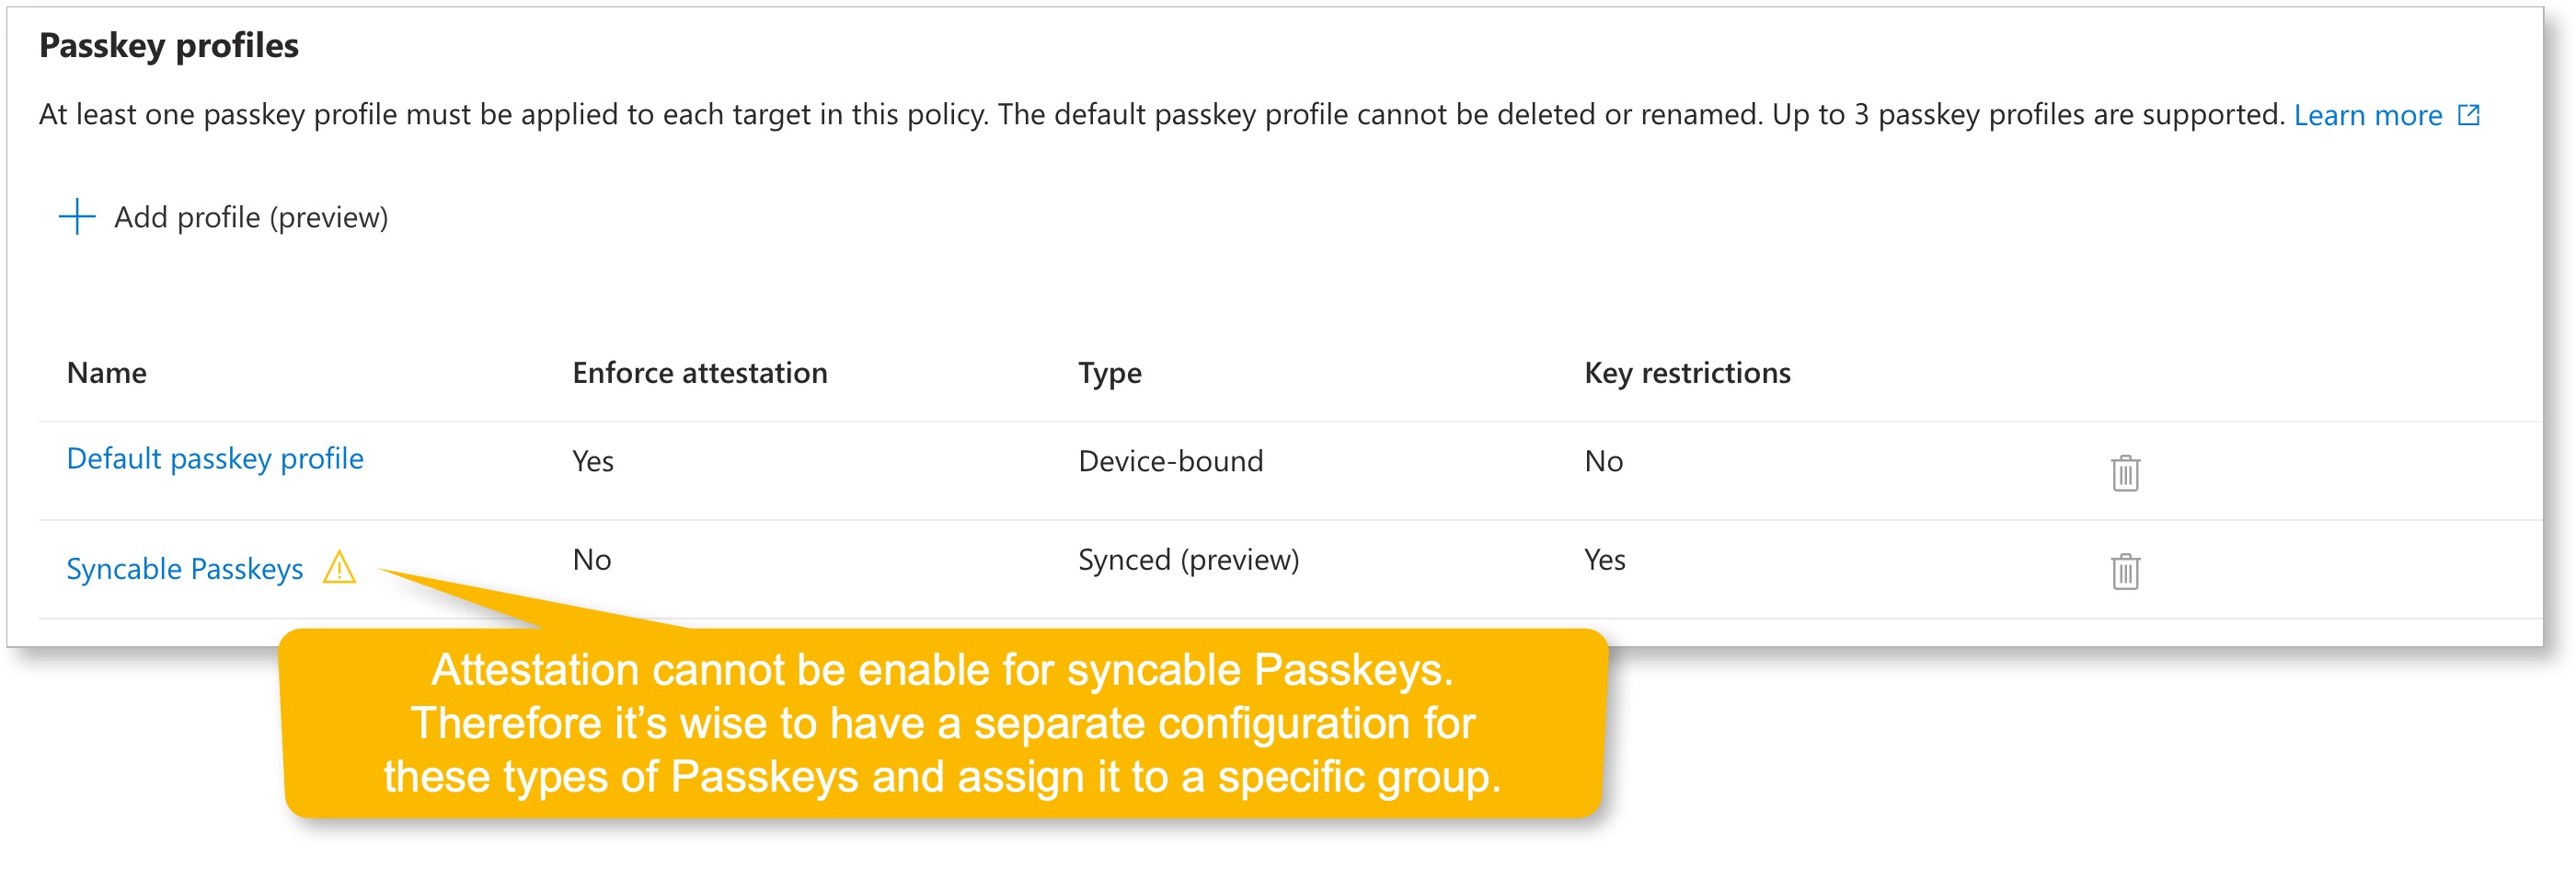
Example of Passkey Profiles

syncable passkeys 
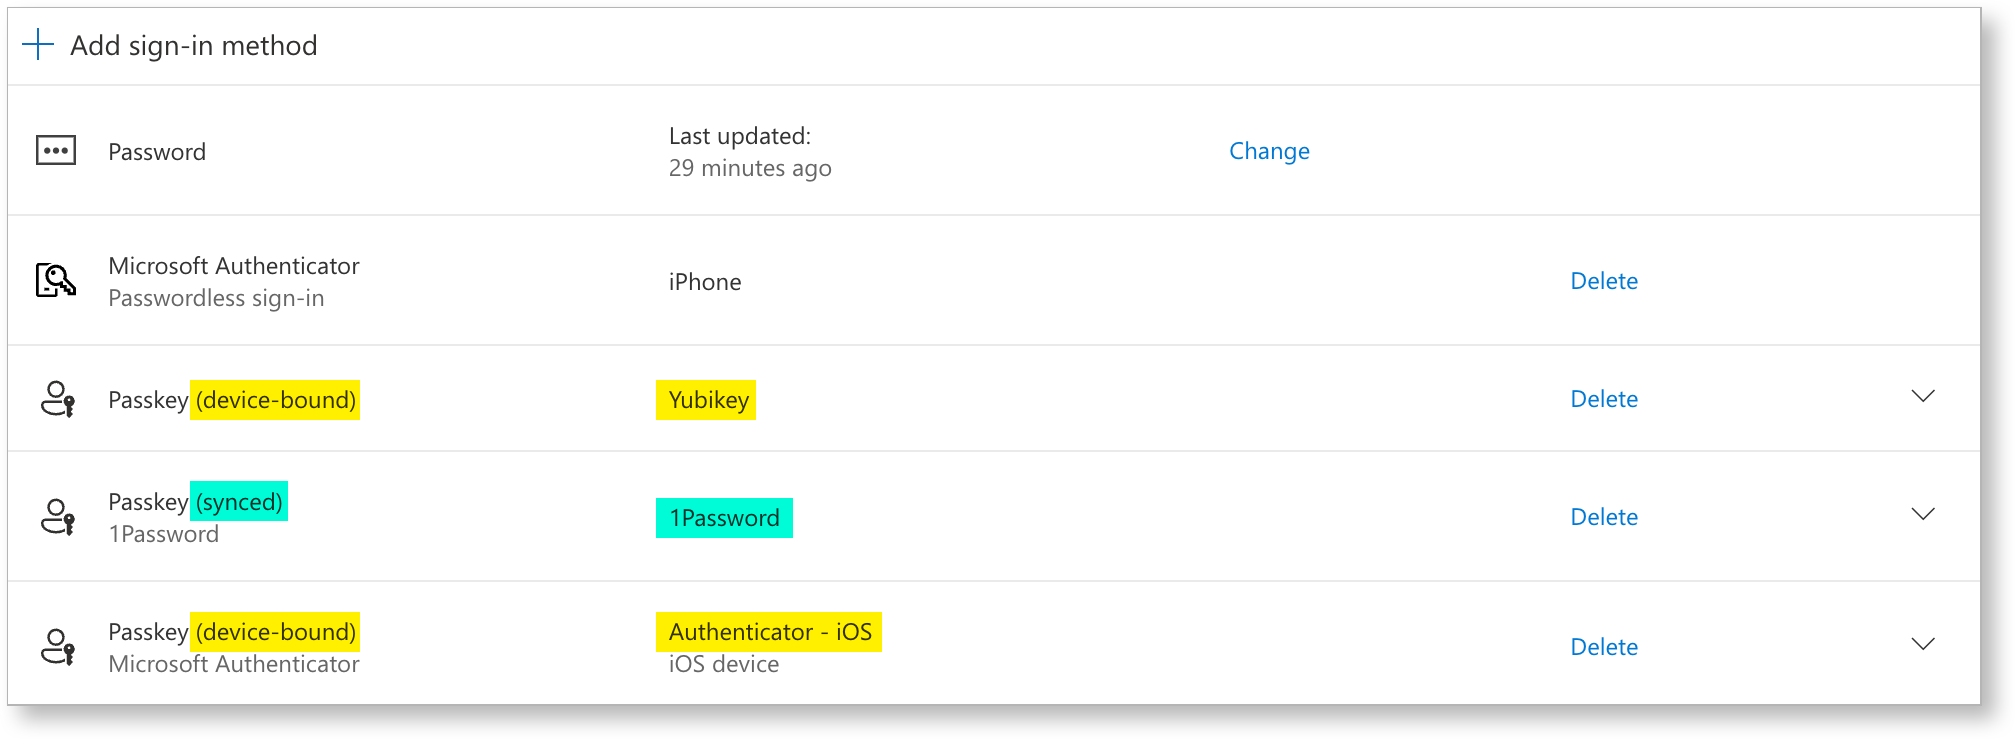
Example of syncable Passkey in 1Password

Attestation

In passkeys (WebAuthn), attestation is about proving what authenticator created the credential using cryptographic evidence during registration. The relying party (Microsoft Entra ID) can validate that evidence against trusted metadata to decide whether to accept that authenticator model.

Without attestation, passkeys are ‘just’ key pairs.
You’ll still get a strong key-based login, but the service cannot reliably prove which authenticator model/provider generated the keys (or whether claimed identifiers are genuine).

I hear you say: “but we also have the AAGUID allow/block list”. Well yes, but there’s a distinction:

  1. With Require attestation = Yes
    • The AAGUID (and model identity) is anchored by verified attestation. • The allow list becomes a hard security control: you can reliably restrict to specific authenticator models/providers because Entra can verify “this really is that model”.

  2. With Require attestation = No (which you need for synced passkeys)
    • Entra may still see an AAGUID value, but it can’t guarantee any attribute about the passkey, including whether it’s synced vs device-bound or even the specific provider/make/model, even if you target AAGUIDs. Microsoft explicitly says to treat AAGUID lists as policy guidance rather than a strict security control when attestation isn’t enforced.
    So in this mode, an AAGUID allow list is best understood as:
    • A best-effort restriction that helps you steer users toward known providers.
    • Not the same as cryptographic proof of “only these authenticators exist here”.

Guest accounts

Microsoft does not currently allow Entra ID guest users to register a passkey in your tenant, so getting guests onto passkeys is a bit less straightforward.

The workaround is to require them to register a passkey in their own tenant by enforcing phishing-resistant MFA in the Conditional Access policies they hit.

Once you configure “Cross-tenant access settings” for those partner tenants, you can trust the inbound MFA claim, because you know it aligns with your highest authentication strength thanks to your CA policies.

cross-tenant mfa trust 
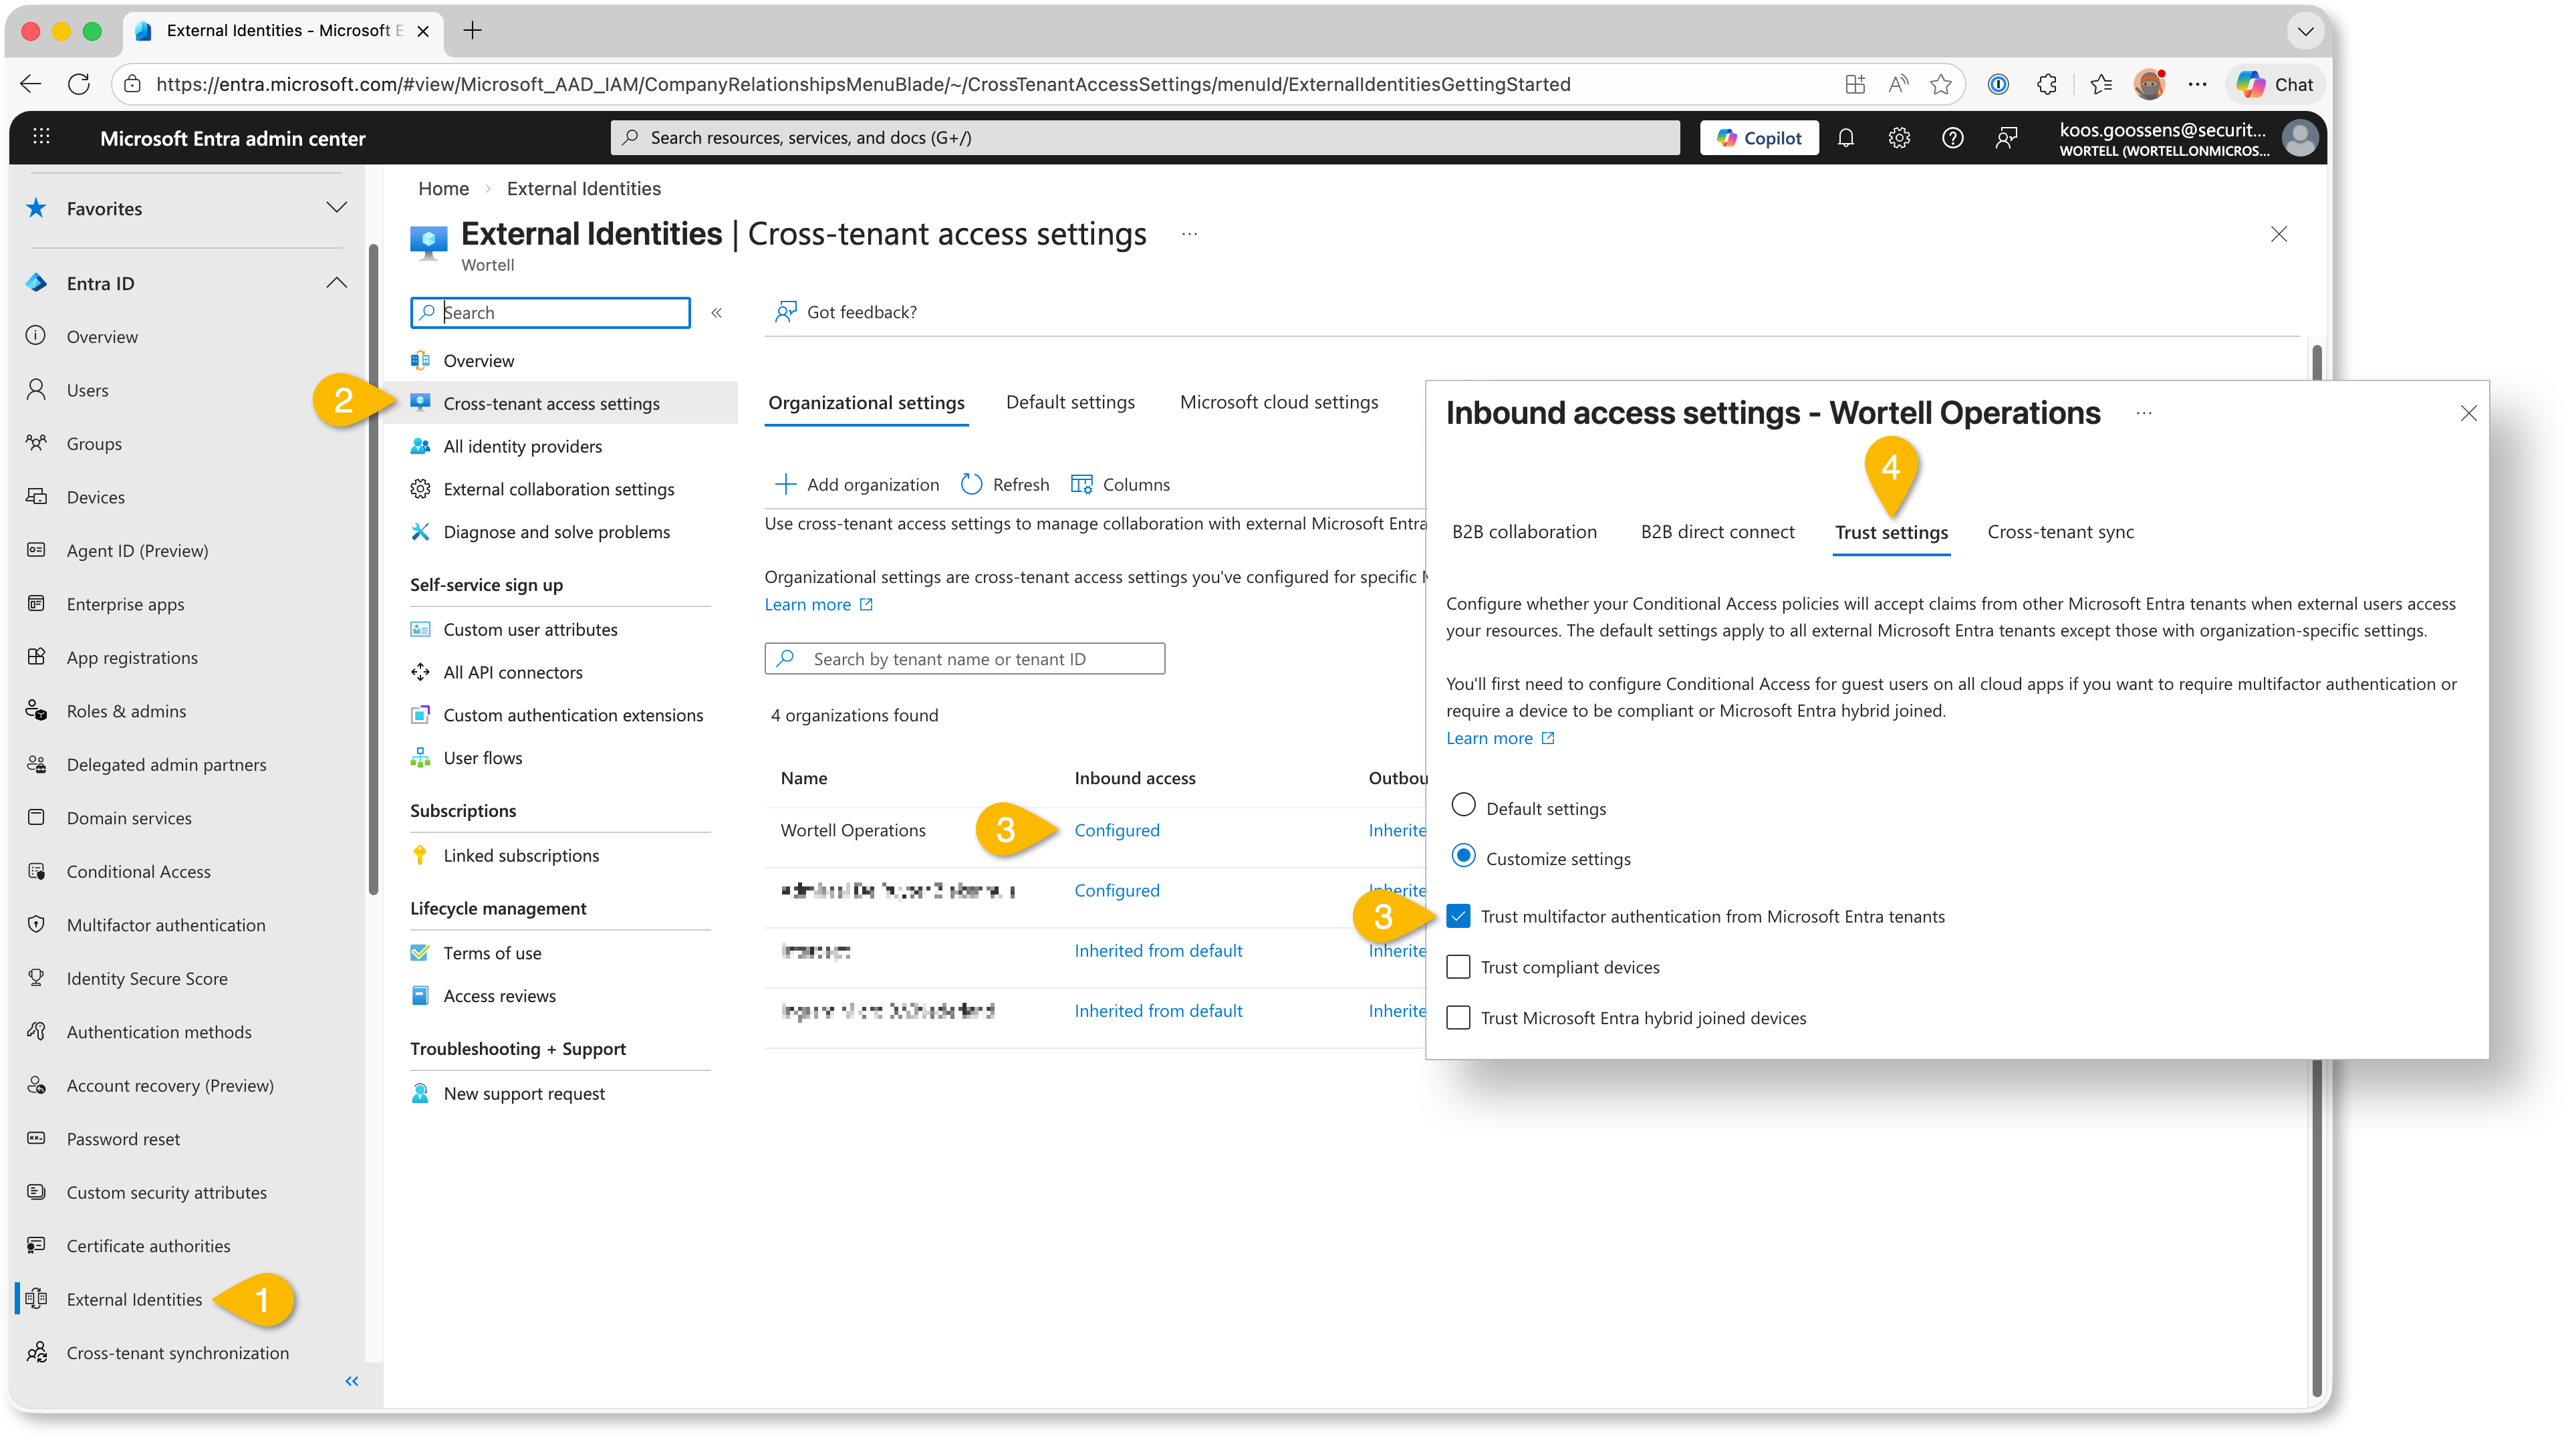
Example trusting MFA claims from partner tenants

Community Project(s)

This month we saw something really cool happen in the community.

It started with Fabian Bader, who we have mentioned before as one of the contributors to Maester. Fabian wrote a blog about a tool he created: Invoke-EntraIDPasskeyLogin.ps1. It lets you authenticate against Microsoft Graph with MFA as a user, but from a script. Using passkeys. Pretty clever stuff!

Then Nathan McNulty picked it up and built a standalone version: PasskeyLogin.ps1. His version uses a passkey exported from Azure Key Vault.

And then Jos Lieben thought, “hold my beer” and took it even further. So he created New-FidoKey.ps1, which can actually generate the passkey for an account.

That is three community members building on top of each other in a short amount of time.

Using these methods obviously raises security concerns. But with the new passkey profiles features, you can create a dedicated automation profile for a dedicated account, while still enforcing stricter requirements for normal interactive logins.

From a security perspective, you have to be very careful here.
You need proper scoping, secure storage of the passkey material, and a very clear understanding of what you are enabling.

When done responsibly, though, this can be extremely powerful. Think automated environment provisioning, one-time onboarding tasks and other interactions with APIs that would otherwise require manual MFA prompts.

And beyond the technical details, the most impressive part is how the community came together. People spending their spare time creating tools and simply giving them to the rest of us. That deserves recognition. 👏🏻👌🏻💪🏻

TCA Podcast Episode 101: The State of AI in 2026

In Episode 101 of the Cloud Architects Podcast, we welcome Microsoft AI MVP James Westall for a candid “state of the nation” discussion on AI in 2026. Moving beyond the LLM hype of 2024 and the agent frenzy of 2025, the conversation explores what’s actually delivering value for organizations today and what isn’t. We unpack common pitfalls like oversold expectations, poor use case selection, and the challenge of measuring ROI, while highlighting practical success stories. We also tackle model “religion wars,” cost realities, developer productivity, and the importance of strategy and governance.

Prefer video? check us out on YouTube:

For more information on The Cloud Architects podcast, check us out on SoundCloud

Everyday Defender 02x01_scu_later_alligator.json

In this episode, Chris explores Agent 365 while Koos takes another look at Security Copilot. Since our last episode, several new announcements have dropped, making this a great time to dive in and see how these tools can help streamline the work of security teams.

Agent 365

If 2024 was the year of LLMs, and 2025 was the year of AI Agents then I’m really hoping 2026 will be the year of AI Governance! Microsoft frames Agent 365 as the foundation for the emerging “agentic era,” where autonomous agents are not just assistants but participants in business processes.

What is Agent 365?

Agent 365 is Microsoft’s new “control plane” for AI agents across Microsoft 365, Teams, Dynamics, Power Platform, and third‑party systems.

It provides a central place to register, manage, monitor, and govern agents, similar to how organizations manage human users today.

Agents get a unique Entra Agent ID, which allows them to authenticate, follow least‑privilege policies, and operate like secure digital workers.

But why?

Agent sprawl is real - Organizations start experimenting with copilot, custom agents, and workflow bots, and quickly lose track of where agents exist and what they’re doing. Agent 365 counters this with a centralized registry and inventory, providing full visibility.

AI agents need different governance than human users, think about it - agents:

  • Act autonomously
  • Trigger workflows
  • Access sensitive data
  • Act continuously and at scale

This creates new compliance, security, and operational risks. Agent 365 provides logging, access controls, threat detection, and lifecycle management specifically designed around agent behavior. Agent 365 standardizes the governance approach regardless if agents come from Microsoft, third parties like ServiceNow, or your internal Copilot Studio builds.

Agent 365 features

Agent 365 unlocks five capabilities that make enterprise-scale AI possible:

  • Registry – provides a single inventory of all AI agents so organisations can see what exists, who owns them, and how they behave.
  • Access Control – uses Entra Agent IDs and least‑privilege permissions to ensure every agent only accesses the data and systems it truly needs.
  • Visualization – offers dashboards and telemetry that help IT and security teams monitor agent performance, risk signals, and ROI.
  • Interoperability – connects agents with Microsoft 365 apps, organisational data, and third‑party platforms so they can operate across business workflows.
  • Security – extends Microsoft Defender protections to agents, detecting misconfigurations, vulnerabilities, and threats like prompt‑injection or risky data access.

What about licensing?

As always with licensing - it’s complicated. Agent 365 introduces a new per‑agent A365 SKU that licenses AI agents as digital workers inside Entra ID, while keeping all existing Microsoft 365, Copilot, and Azure OpenAI licensing in place — resulting in clarity of governance but complexity in cost and deployment.

  • Agents require their own licence (A365 SKU) - Agent 365 uses a dedicated A365 licence that must be assigned to each AI agent instance. These licences are not for humans
  • Agents appear in Entra ID like digital employees - Licensed agents receive an Entra Agent ID and can show up in org charts, have permissions, and interact with systems like a user account.
  • Agent 365 does not replace existing Microsoft licences - Human users still need their usual Microsoft 365, Dynamics 365, and security/compliance licences.
  • A365 covers governance, not model execution - The A365 licence pays for the control plane not AI inference itself.

You need to be part of the Frontier preview program to get early access to Microsoft Agent 365.

Security Copilot

I mentioned AI news but before we dive into that subject there’s one other news item I had to share.

Sentinel data lake now supports Defender XDR logs

In episode 10, we brought in September of last year, I talked about Sentinel data lake. And one of the major shortcomings back then is now resolved.

You can now extend Defender XDR data into data lake natively without any additional complex tooling and solutions!

Just to into your tables overview, select DeviceNetworkEvent for example, and extend its retention into data lake by increasing it beyond the default 30 days. Storage costs are roughly $ 0.025 per GB/month without query costs.

Microsoft brings Security Copilot for free for E5 customers, FOR FREE!

Yes, that right folks.

Customers with Microsoft 365 E5 will have 400 Security Compute Units (SCU) each month for every 1,000 paid user license, up to 10,000 SCUs each month at no additional cost.

  • Example 1: An organization with 400 user licenses gets 160 SCUs/month.
  • Example 2: An organization with 4,000 user licenses gets 1,600 SCUs/month.

At first I was like; “ah there’s the catch!” With 1600 SCU’s per month is only little over 2 SCU’s per hour. And I remember how quickly I burned through those in no time a couple of months ago.

First, it’s good to understand that is is not converted into an hourly rate. You actually have tho’se SCU’s to spend within a month. You can spend them over the course of 30 days, or all in a single day. That’s up to you.

Which brings me to the seconds points: agents!

I would advise starting by only using the SCUs for running Security Copilot Agents and using Microsoft Sentinel MCP Server for LLM-based contextual questions.

Microsoft provides several Agents from their “Security Store” like the “Phishing Triage Agent” which will automatically perform otherwise manual tasks like its name suggest.

You can also find a lot of third-party agents in this store or even build your own.

Security Copilot Agents

PRO TIP set your incident summary generation to “Generate on Demand” (Settings —> Copilot in Defender —> Preferences)

This will save you A LOT of unnecessary SCU usage!

Security Copilot Incident Summary Generation

The bad news unfortunately is that Microsoft is still rolling out to customers. It’s probably a capacity problem. If you’re eligible you’ll receive a notification 30-days in advance before they activate it for you.

All those new shiny AI tools also come with new attack vectors

Entra ID Identity Protection for Agents is available in Preview

Because agents can operate autonomously and on behalf of a user, they can display unique sign-in behavior. Agents can take initiative, interact with sensitive data, and operate at scale. Microsoft Entra ID Protection for Agents is designed to identify and mitigate risks associated with these capabilities.

And once Identity Protection flags a user as risky, you can prevent them from accessing certain resource with Conditional Access by blocking certain Risk Levels.

Creating your own Agents within Copilot Studio also comes with some risks

Because Prompt Injection Attacks exist, data can potentially be exfiltrated through conversations and AI permissions can be abused thru Privilege Escalation.

Fellow Security MVP Raymond Roethof (he’s Dutch of course 😉) wrote an excellent blog about how you can protect Copilot Studio with the help of Microsoft Defender for Cloud Apps. Definitely check this out.

YELLOWHAT Capture-the-Flag was hacked with AI

During YELLOWHAT on January 13th, people on-site were able to compete in a Capture-the-Flag we got provided through Blu Raven.

Nicola Suter decided to see what’s possible with AI. He used Azure Fabric Real-time Intelligence MCP Server to connect to the lab environment and let AI assist him during his hunt.

He wrote down his experience and lessons learned in a blog you should also check out.

Community Project

Azure Sentinel Solutions Analyzer by Ofer Shezaf - The SIEM Guy @ Microsoft

People in the community probably know his as the father of Sentinel. 😉

Het worked on ArcSight @ HP and came to Microsoft in 2019 to help create Microsoft Sentinel.

I get asked all the time which tables each Sentinel connector writes to. Surprisingly, the answer isn’t straightforward: many connectors share tables, others write to multiple tables, and—until now—there hasn’t been a single, complete list. So…I built one. 🚀 (Okay, a GitHub Copilot agent with Claude Sonnet 4.5 did most of the heavy lifting 😅)

Everyday Defender 02x00_insert_disk_2.img

Not your regular episode but an announcement for our upcoming second season. Chris and I share what we’ve been working in preparations for season 2, and what you can expect from us during the upcoming year.

Follow us on your favorite podcast platform or check us out on YouTube

01x12_df3ndr.eof.01.tar.gz

📍 Live from Times Square, New York City 🇺🇸 This was the first edition of Experts Live in the United States, and we couldn’t be more proud to be part of it!

We wrap up Season One with a special in-person recording from Microsoft’s office in NYC during Experts Live US.
No planning, no script – just good conversation, best practices, and bad Sentinel acronyms. 😉 Chris and Koos will both be talking about their sessions they gave at the event. Chris will discuss securitu baseline best-practices. And Koos will be sharing Sentinel tips from the field.

🔐 Security Baselines in Microsoft 365

Chris brought a fresh look at building, maintaining, and automating security baselines in M365 environments.

Why Baselines Matter

Not all security risks come from attackers—some come from insecure defaults and configuration drift. Chris explains the difference between:

  • Baseline risk – inherent misconfigurations or risky defaults (e.g., Teams external messaging or anonymous sharing)
  • Threat actor risk – malicious activity like phishing, token theft, brute force attacks

“Most users don’t go in and change things. They just assume someone smarter than them chose the settings that are best for them…”

“The tyranny of the default” - Steve Gibson

The Security Baseline Lifecycle

Chris walked through his five-step model:

  1. Assess – Understand where your current security posture stands (warts and all)
  2. Define – Choose a framework (CIS, NIST, ISO) and define your secure baseline
  3. Implement – Put the controls and processes in place
  4. Monitor – Watch for drift and misconfigurations over time
  5. Improve – Feed real-world lessons back into your process

Tools & Demos

Chris demoed several tools including:

  • M365 Maester Toolkit – By Merill Fernando & community
  • MaesterDiff – Track baseline drift over time
  • Azure Automation – Run Maester weekly & notify via Teams/Email
  • MCP Server – Future potential for integrating with detection/response pipelines

Start small. Focus on one domain (e.g., identity) and iterate.

Check out Chris’ slidedeck with a lot of valuable links here!


🌊 Getting the Most Bang for Your Logs – Again!

Koos couldn’t help himself—he brought more Sentinel content, including some very practical demos and updates on data lake, MCP Server, and cost-saving strategies.

Sentinel Cost Optimization

Koos shared a story from that very morning where a customer accidentally enabled Sentinel on an operational Log Analytics workspace—leading to an unnecessary €2,000/month bill. That’s why it’s important to really understand the pricing model and be aware of the different discounts that are available.

Automate Commitment Tier Management

Koos a plethora of practical tips and tricks from the field he gathered during the last years.

  • Architecture decisions are more important than you’d think
  • Automatically scale commitment tiers based on past 90-day usage
  • Use Azure Monitor to trigger on cost spikes to prevent unpleasant surprises at the end of the month
  • Leverage SCU (Sentinel Commitment Units) (another SCU acronym, thanks Microsoft);-) with pre-payment plans for even higher discounts

Sentinel data lake

Not just that Scooby-Doo meme but an actual game-changer: Sentinel data lake.

  • Simple setup (no DCRs/DCEs)
  • Raw log mirroring from Sentinel
  • Long-term storage + post-ingestion querying
  • Asset tables — great for incident correlation

GitHub Copilot + data lake = Magic?

Koos previewed how GitHub Copilot can now query the Sentinel data lake using natural language KQL via MCP Server in VS Code:

“Give me all Graph activity from an app with this display name…”
Copilot brute-forced the AppId collection based of a DisplayName and generated a working query, pretty wild.

Some caveats:

  • GitHub Copilot not aware of Asset Tables (yet)
  • Limited to VS Code
  • Costs still apply when querying data lake

Check out Koos’ slidedeck with embedded pre-recorded demos here!


🛠️ Community Project: Experts Live US: Vibes & Gratitude

  • We loved meeting the community in person
  • The event was full of energy, new ideas, and hallway chats
  • Sessions were not recorded, but we’ll share slides and demos on LinkedIn + GitHub
  • Big thanks to the organizers for an amazing first US edition!

🎙️ Finalizing our first season

It’s been a great year of podcasting! This unscripted episode was a fun way to wrap up Season One. Thanks for listening! Hope you see you again next year! 👋🏻

01x11_trust_me_im_a_keyboard.hid

In this episode Chris asks “To block or not to block?” as he looks at geo blocking in Conditional Access, while Koos explores the human element in cybersecurity.

Geo Blocking in Conditional Access

Geo blocking in Entra Conditional Access is all about controlling access to Microsoft 365 or Entra-integrated apps based on the geographic location of a sign-in attempt. Geo blocking helps reduce risk from regions where an organization doesn’t operate or where malicious activity is common. If you’ve ever looked at your sign-in logs in Entra, you’ve likely seen something like this:

failed

Many organizations are familiar with network locations in Entra Conditional Access as a way to relax security requirements for connections from ‘trusted’ locations such as local office IPs, etc. With the geo blocking approach you can completely block geographic regions. Geo blocking is particularly effective at reducing the attack surface and enforcing compliance requirements, but as always there are some important considerations:

  • Accuracy: IP-based geo-location isn’t perfect (VPNs, proxies, mobile carriers can obscure true location).
  • Legitimate travel: A user traveling overseas may get blocked unless you allow certain exceptions - you’d want to implement an exception policy etc.
  • Break glass accounts: Always exempt at least one emergency admin account from geo-blocking rules.
  • Service traffic: Some Microsoft services may appear to originate from outside your “allowed” regions.

It’s Conditional Access so you have a lot of flexibility - for example: Only allow access from trusted devices inside your approved geographies, otherwise block or enforce MFA. Personally, I usually advise customers to block access from what we deem to be ‘high-risk’ countries - this list will usually different from organization to organization and may even be different by industry. A good place to start is to look at your sign-in logs and build a list from there. Another strategy is to look at the list of Office of Foreign Assets Control (OFAC) or similar sanctioned countries or the Top 10 cyber threat countries:

  • Russia
  • China
  • Ukraine
  • Nigeria
  • Romania
  • North Korea
  • Brazil
  • India
  • Pakistan
  • Vietnam

It is important to understand that geo blocking by itself isn’t a comprehensive strategy, it will reduce your attack surface and keep script kiddies away but it should form part of a layered security approach that makes it more difficult and/or expensive for bad actors to target you.

The simplest way to implement a geo blocking policy:

  1. Go to Entra admin center > Security > Conditional Access > Named locations.
  2. Create a Named location and select the countries/regions to allow or block - call it ‘Risky Countries’
  3. Create a new Conditional Access policy:
  • Users - Include: All Users
  • Target - Include: All Resources
  • Network - Include: Risky Countries
  • Grant: Block access

The Human element in cybersecurity

So yes, the human factor in cybersecurity. “The human is usually the weakest link” a statement that is often thrown around casually. But I don’t agree with it.

This topic came to me after I visited the hak5 booth at DEFCON actually. I picked up an O.MG cable there and starting tinkering with it and tried to answer the question “Could I protect end users from this?”. And I think we can’t.

For people who don’t know an O.MG cable looks like a regular USB cable but can inject keystrokes, exfiltrate data, and/or create backdoors. If you want to know more go listen one of the recent episodes of Darknet Diaries. This episode was actually the first time I heard about this. I feel a bit stupid for saying this but I’m not into red teaming, I’m no pentester, I wasn’t aware of half the catalog hak5 was selling at DEFCON. And it made me think: if I wasn’t aware of this cable, how can I expect my colleagues from HR or Marketing to know about it?!

Because this malicious USB device acts like a keyboard, I’m not sure how to prevent it from working except for blocking all USB ports altogether.

So, “Could I protect end users from this?” well perhaps, but not with tools but by training people. Humans are not the weakest link against these types of attacks, they might actually be the last line of defense.

This was also made clear to me when visiting the Social Engineering Village at DEFCON where I watched a “vishing” contest. A vishing contest is a live competition where participants use phone calls and social engineering tactics to trick real companies into revealing sensitive information. I was both pleasantly surprised to hear the people who picked up the phone mostly had some form of security awareness training, and weren’t handing out information for the get go. But unfortunately the skills of the social engineering experts were better in a lot of cases and with all kinds of flair and persuasion they still managed to get some valuable information about the systems they were using, how people enter the building etc.

Why Humans Matter in Modern Security

  • Humans (when trained properly) could detect social engineering attempts when tech can’t (e.g. gut feeling / instinct / intuition).
  • Humans can report phishing links to the cybersecurity team whenever Defender for Office failed to remove it.
  • Humans can spot MFA fatigue attacks by reporting repeated prompts instead of blindly accepting them.
  • Humans question strange behavior like “Why is this random guy plugging in this cable in that PC under the desk?” ;-)

Ways for building a “Human Firewall”

So how do we strengthen that human layer? Not with simulated phishing campaigns alone I think. Whenever I’m at a party and explain to people what I do for a living, most people get started about the ridiculously fake phishing e-mails they receive within the company, and the boring video training they have to complete.

  • Security awareness that resonates – Customize your phishing exercises and tailor them to your organization. I think not enough companies take advantage of this.
  • Realistic scenarios – Simulate believable attacks and don’t stick to e-mails only. Drop some phishing USB drives on the parking lot, have mystery guests visit, install rogue hardware in that one meeting room with all those exposed ports alongside the wall.
  • Hands-on demos – Show users a real O.MG cable or Rubber Ducky and explain what they do. If I wasn’t aware of this cable, how can I expect my colleague from HR or Marketing to know about it?!
  • Instruct about Public WiFi - Explain the risks and teach them how to remove those stored networks from when they visited that hotel 5 years ago. DEFCON also led me to learn that this is possible on my iPhone ;-)

For those unaware; a rogue access point can passively listen for “probe requests” that your device sends out when looking to reconnect to known networks. These probes contain the SSIDs of networks your device has previously connected to. By mimicking a SSID your devices recognizes it tricks your device into auto-connecting (without any user interaction) and enables for various man-in-the-middle attacks.

  • Encourage questions – Employees might be hesitant to report weird behavior or phishing e-mails becaus they don’t want to look stupid or are afraid to get into trouble if they clocked/opened something. I think it’s best to remove the fear of reporting false alarms before this happens. Make employees feel empowered rather than intimidated.

But Technology can still help as well!

  • Use Defender for Endpoint’s device control for unapproved USB HID class devices like unapproved keyboards. Apply allow lists based on vendor ID (VID) and product ID (PID) to only permit known hardware. Also remember to educate employees why personal USBs for example are blocked. Turn frustration into awareness.
  • Use “Additional context in Authenticator notifications” to ensure that additional data is shown in the popup like location of origin, application, IP address etc.
  • Enable “Report suspicious activity” for MFA so that users can report malicious MFA request.
  • Make people aware of the “Report Message” option in Outlook.
  • Far too few companies incorporate 802.1X if you’d ask me. This is a network access control protocol for devices connecting to your LAN. It enforces authentication at the network switch port level before granting access to the network. You typically need a RADIUS server and authentication can be done with a client certificate to ensure that unknown devices don’t even receive an IP address on your trusted network.
  • And even without this, know that Defender for Endpoint will “snitch” on potentially rogue devices if Device Discovery is turned on. Go to Microsoft 365 Defender portal –> Settings –> Endpoints –> Discovery and select ‘Standard’. (‘Standard’ will provide richer device info than ‘Basic’) View discovered devices at “Device Inventory” –> “Discovered devices” or create a custom detection with:
DeviceInfo
| where OnboardingStatus != "Onboarded"
| summarize count() by DeviceName, DeviceType, IPAddress

Community Project

EntraOps and SentinelEnrichment

EntraOps was made by German Security MVP Thomas Naunheim and he together with Fabian Bader (also Security MVP from Germany) worked together on SentinelEnrichment.

SentinelEnrichment caught my eye first because this PowerShell module will make your life creating/updating Microsoft Sentinel Watchlists a lot easier!

  • Supports large MicrosoftSentinel Watchlist uploads without requiring blob storage - by using file batching.
  • Improved Deletion Handling, enhanced asynchronous operations make Watchlist cleanup smoother and more reliable.

Download the module from PSGallery

Only then I’ve noticed that Thomas incorporated SentinelEnrichment into EntraOps:

EntraOps is a research project to show capabilities for automated management of Microsoft Entra ID tenant at scale by using DevOps-approach

Key features

  • Track changes and history of privileged principals and their assignments “as code”
  • Identify privileged assets based on automated and full customizable classifications
  • Build reports (Workbooks) on your classified privileges
  • Automated assignment of privileged assets in Conditional Access Groups to protect high-privileged assets from lower privileges and apply strong Zero Trust policies.
  • And much more!

Experts Live US

Experts Live is a global network that brings together Microsoft executives, MVPs, subject matter experts, and community members through regional and country events to share knowledge and expertise about Microsoft technologies.

Held on October 10th for the very first time in the United States at the Microsoft office at Times Square in New York City. The lineup of speakers looks to be amazing and tickets are only $ 15,- !! Will we see you there??

Experts Live US is proud to support STEM Kids NYC, helping them bring technical classes, materials and support to kids in the New York City area. All proceeds from our attendee registration will be donated to STEM Kids NYC!

Check out the Experts Live US website for more information

01x10_lake_it_till_you_make_it.log

In this episode Koos takes a look at the recent release of Sentinel data lake and, Chris shares 5 tips to help your Entra Privileged Identity Management (PIM) deployment.

Microsoft Sentinel data lake (yes, that’s in lowercase Microsoft assured me)

Security departments have always struggled with the need for security data. How can they retain as much security data as possible? But with the pricing model — especially for Microsoft Sentinel — they always needed to be selective about what to ingest. That led many to explore (third-party) alternatives, which introduced their own challenges.

  • “We can’t ingest that data because it’s too expensive.”
  • “We can ingest that, but let’s cut out these columns and hope we won’t need them later.”
  • “We can ingest this data, but we can’t retain it for very long due to cost.”

The result is often a patchwork of custom, bespoke solutions, with complex transformations through third-party platforms like Elastic and Azure Data Explorer. And all of this creates additional overhead.

While I’ve always been a big fan of running ADX alongside Sentinel (I talked about this back in episode 4), I’ve also acknowledged the extra complexity and overhead it introduces.

It’s always been frustrating that the technical capabilities for storing the data existed — but the data wasn’t there when you actually needed it.

With a data lake, the idea is to ingest everything in raw format and apply transformations in place rather than on ingest. And because it’s fully integrated, you can query it from multiple angles — not only with KQL, but also using Power BI and Jupyter Notebooks.

Over time, customers tend to store data in different silos:

  • Microsoft Sentinel
  • Azure Data Explorer
  • Azure Blob Storage

But how do you join it all together?

Mark Kendrick (Principal Product Manager @ Microsoft) described this beautifully on The Azure Security Podcast — calling it “Data Adjacency.” I think that’s a very fitting term.

The cool thing about Sentinel data lake is that it mirrors, by default, everything that comes into Sentinel. So, you can decide to ingest new logs exclusively into the data lake, and later choose to “promote” specific logs for analytics use. Hence today’s episode title: lake it till you’ve decided to use (make) it later ;-)

Data lake is essentially a combination of features

Sentinel Auxiliary Logs went GA on April 1st, 2025. This was the cheapest log storage option until now — but it was limited to custom logs only, and had some other limitations like lack of dynamic datatype support and a somewhat painful setup (DCR/DCE, API-based only).

Then we had Basic logs, which were arguably already superseded by Aux logs — except in a few scenarios where Aux wasn’t supported.

Data lake seems to sit one layer higher (or lower, depending on how you phrase it 😉), abstracting away much of that complexity — while supporting many more tables. When you configure a table to use the data lake tier, my guess is that it’s still stored using Auxiliary under the hood — although this isn’t explicitly mentioned in the docs.

It’s a much more refined and streamlined experience, in my opinion.

datalake_meme

Although I appreciated the humor of this meme, I think it doesn’t do data lake enough justice. It’s much more than just Auxiliary logs with a new name.

Jupyter Notebooks

A Jupyter Notebook contains an ordered list of input/output cells which can contain code, text (Markdown), mathematics, plots and other media.

Jupyter notebooks are an integral part of the Microsoft Sentinel data lake ecosystem, offering powerful tools for data analysis and visualization. The notebooks are provided by the Microsoft Sentinel Visual Studio Code extension (preview) that allows you to interact with the data lake using Python for Spark (PySpark). Notebooks enable you to perform complex data transformations, run machine learning models, and create visualizations directly within the notebook environment.

jupyternotebook

Caveats

I get the feeling that whenever Microsoft ships a new feature, customers are happy for a few minutes… and then immediately want more. 😅

There are already a few things people are wishing for with data lake — like extending XDR data (e.g., MDE tables) into the data lake natively. That’s not possible yet.
These “XDR-tiered” tables still have a 30-day retention limit. You could already extend this via Sentinel, but that required ingesting logs into Sentinel first — and since these tables generate huge volumes, this was never a very cost-effective strategy.

I’ve seen community blog posts showing ways to work around this — like manually storing MDE data in custom auxiliary tables and then streaming that into the lake — but in my opinion, that defeats the whole idea of a streamlined experience.

Pro tip

Although the UI says it’s possible to extend data retention into the lake for tables like DeviceNetworkEvents, don’t enable it this way!
This will first ingest those logs into Sentinel (at full price), and then mirror them to the data lake — defeating the purpose of having a low-cost solution.

A bigger warning label on this would’ve been appreciated.

Closing notes

Remember: it’s called Microsoft Sentinel data lake, not Defender XDR data lake. So this is all about extending Sentinel data only! Keep that in mind.

My best guess? Microsoft will continue to extend data lake capabilities in the future. And since it’s still in preview, who knows what we’ll see when it hits GA…

Microsoft Sentinel data lake pricing (preview)

Plan costs and understand Microsoft Sentinel pricing and billing

Planning your move to Microsoft Defender portal for all Microsoft Sentinel customers

Jupyter notebooks and the Microsoft Sentinel data lake (preview)

Project Jupyter on Wikipedia


Entra PIM

Microsoft Entra Privileged Identity Management (PIM) is a security and governance feature that helps you manage, control, and monitor access to high-impact roles across Microsoft Entra ID, Azure, and other Microsoft 365 services. PIM is designed to reduce the risks of standing administrative access by offering just-in-time and time-bound role activation. Here’s what it enables:

  • Just-in-time access: Users can activate privileged roles only when needed, reducing exposure.
  • Approval workflows: You can require approval before a role is activated.
  • MFA enforcement: Activation can require multi-factor authentication.
  • Access reviews: Periodic checks to ensure users still need their roles.
  • Audit logging: Full visibility into who activated what, when, and why.
  • Notifications: Alerts when privileged roles are activated.

PIM

More Licenses?

As always, licensing is.. well, complicated. PIM is a Microsoft Entra ID P2 feature, Entra ID P2 is available as a standalone product or included with Microsoft 365 E5 for enterprise customers.

PIM is also included with Microsoft Entra ID Governance which is available as an add-on or part of Microsoft Entra Suite

PIM Licenses

Deployment Tips

You can manage the following with PIM:

  • Microsoft Entra roles (e.g., Global Admin, Security Admin)
  • Azure resource roles (e.g., Owner, Contributor)
  • Group membership (via PIM for Groups)

Tip 1 - Start with an audit

Before deploying PIM, its a good idea to start with an audit and review of all your existing role assignments.

Tip 2 - Limit highly privileged roles to 4 hours or less

I typically recommend limiting these roles to a 4 hour activation window:

  • Global Administrator
  • Privileged Role Administrator
  • Security Administrator
  • Compliance Administrator
  • Exchange Administrator
  • SharePoint Administrator
  • Teams Administrator
  • User Administrator
  • Authentication Administrator
  • Application Administrator
  • Cloud App Administrator
  • Intune Administrator
  • Billing Administrator
  • Directory Writers

All other roles are typically ok with 8 hour activations - your environment may differ so consider your risk profile etc.

Tip 3 - It’s ok to mix direct and group-based assignments, but plan it carefully

I prefer to always directly assign roles to admin users, however there are use-cases where it doesn’t make sense - for example you may have help desk users that perform several different tasks and these don’t map directly to a specific built-in role in Entra. Expecting users to always know which is the best least privilege fit for a specific task isn’t always viable. In these cases, creating a group that has the various roles assigned makes sense and allows users to activate group membership instead and as a member of that group they will inherit the relevant roles.

PIM Groups

Tip 4 - Always MFA!

You may hear differing opinions on this one, but personally I always recommended requiring MFA for any role activation no matter if its Global Admin or Global Reader.

Tip 5 - Approval workflows can be painful

Approval workflows are great in highly-regulated environments, but approvals also add a lot of administrative overhead so I always recommend careful consideration here. If you are going to use approvals, start with highly-privileged roles like Compliance Admin or Global Admin first and gradually deploy to other roles as needed. Requiring approval for all roles will be no fun for anyone!


Community Project

EasyPIM

Created by Loïc Michel, a support engineer in the Azure identity team at Microsoft.

EasyPIM is a PowerShell module created to help you manage Microsof Privileged Identity Management (PIM) either working with Entra ID, Azure or groups. Packed with more than 30 cmdlets, EasyPIM leverages the ARM and Graph APIs complexity to let you configure PIM Azure Resources, Entra Roles and groups settings and assignments in a simple way.

Features:

  • Support editing multiple roles at once
  • Copy settings from one role to another
  • Copy eligible assignments from one user to another
  • Export role settings
  • Import role settings
  • Backup all roles

Check out EasyPIM on Github


Experts Live US

Experts Live is a global network that brings together Microsoft executives, MVPs, subject matter experts, and community members through regional and country events to share knowledge and expertise about Microsoft technologies.

Held on October 10th for the very first time in the United States at the Microsoft office at Times Square in New York City. The lineup of speakers looks to be amazing and tickets are only $ 15,- !! Will we see you there??

Experts Live US is proud to support STEM Kids NYC, helping them bring technical classes, materials and support to kids in the New York City area. All proceeds from our attendee registration will be donated to STEM Kids NYC!

Check out the Experts Live US website for more information

01x09 | open_port_regrets.pcap

Chris revisits Microsoft Entra Suite and takes a deep dive into GSA - Global Secure Access. Koos did a project recently where Defender for External Attack Surface Management (EASM) was also implemented. And he likes to share how awesome this product is, as well as share some practical tips and pitfalls you need to wary of.

Global Secure Access

Microsoft Global Secure Access (GSA) is a modern network access solution built on zero-trust principles, delivering secure and identity-aware connectivity to both internet-based and private applications:

  • It replaces traditional VPNs with Microsoft Entra Private Access and
  • Enhances protection for SaaS apps and Microsoft 365 services via Entra Internet Access.

GSA Requirements

  • Microsoft Entra ID P1 + Private/Internet Access or Microsoft Entra Suite
  • Global Secure Access Client installed on supported platforms - Windows, macOS, iOS, Android - No Linux support
  • Devices must be Microsoft Entra joined, hybrid joined, or registered for Conditional Access enforcement - limits BYOD scenarios
  • Entra Private Access uses Private Network Connector which is Windows only
  • Traffic forwarding profiles must be enabled in the Entra admin center:
    • Microsoft traffic
    • Private Access
    • Internet Access

GSA Profiles

The Microsoft Traffic Profile is a specialized traffic forwarding configuration within GSA that focuses on securing and optimizing access to Microsoft 365 services like Exchange Online, SharePoint, OneDrive, Teams, and Office Online. It is included with Microsoft Entra ID P1 or P2, which is part of Microsoft 365 Business Premium and E3/E5 plans—no extra license needed beyond that

  • Applies Conditional Access policies to ensure only trusted users and devices can access these services.
  • When combined with Universal Tenant Restrictions (UTR) policies, it becomes a powerful tool to limit Microsoft 365 connectivity to only a specific tenant.

Entra Private Access

Microsoft Entra Private Access is a modern, identity-centric alternative to traditional VPNs, built on Zero Trust Network Access (ZTNA) principles. It enables secure, conditional access to private apps and resources. It’s designed to replace legacy VPNs, reduce lateral movement risk, and simplify secure access for remote and hybrid users.

  • Access is granted based on verified identity, device posture, and Conditional Access policies—not network location.
  • Supports all TCP/UDP protocols (e.g. RDP, SMB, SSH), not just web apps.
  • Configure broad IP/FQDN ranges or fine-grained app-level access with separate policies.
  • Global Secure Access client is installed on endpoints to route traffic securely through Microsoft’s SSE infrastructure.
  • Works with legacy and modern apps alike, enforcing MFA, SSO, and segmentation without modifying the app itself.
  • Uses lightweight agents (Private Network Connectors) deployed near private resources to broker secure access.

Entra App Proxy vs. Private Access

Category Entra App Proxy Entra Private Access
Primary Purpose Securely publish internal web apps to external users Provide Zero Trust access to any private resource
Protocol Support HTTP/HTTPS only All TCP/UDP protocols (e.g. RDP, SMB, SSH, SQL)
Ideal Scenarios Legacy web apps, B2B partner access, browser-based usage VPN replacement, secure access to hybrid/multicloud private apps
Authentication Method Entra ID via browser SSO (SAML, KCD, headers) Entra ID authentication via Global Secure Access client

Currently in Preview - Microsoft Entra Private Access for domain controllers - It allows you to enforce Conditional Access, including MFA, for apps and services that authenticate via Kerberos, without exposing your domain controllers to broad network access.

  • Private Access Sensor: Installed on domain controllers to intercept and evaluate Kerberos requests
  • Private Network Connector: Routes traffic from GSA clients to internal resources
  • SPN-based policy enforcement: You define which services (e.g. cifs/, host/) require enforcement
  • Audit and Enforce modes: Start in report-only mode, then shift to enforcement once validated

Entra Internet Access

Microsoft Entra Internet Access is an identity-centric secure web gateway that protects users, devices, and data as they access the public internet and SaaS applications. It’s part of Microsoft’s Security Service Edge (SSE) solution and deeply integrates with Microsoft Entra ID to enforce Conditional Access policies across all internet destinations. It’s ideal for organizations looking to unify identity and network security, reduce reliance on legacy proxies, and enforce Zero Trust principles across all internet-bound traffic.

  • Web content filtering by category or FQDN
  • Universal Conditional Access enforcement
  • Source IP restoration for accurate logging
  • Compliant Network checks to block token replay attacks

🛡️ Defender for External Attack Surface Management (EASM)

What is Defender for EASM?

Defender for External Attack Surface Management (EASM) is a tool designed to help organizations discover, monitor, and secure their internet-facing assets—even the ones they didn’t know existed. Think of it as an automated reconnaissance engine that simulates what an attacker might see when scanning your external footprint. From DNS records and IP ranges to exposed services, forgotten domains, and shadow IT—EASM aims to surface it all.

Why should organizations care?

You can’t protect what you don’t know you own. As companies grow, acquire others, move to the cloud, and spin up new environments, their external attack surface becomes harder to track. EASM helps regain visibility and control, identifying unknown, unmanaged, or misconfigured assets before attackers do. It’s like shining a flashlight into all the corners of your digital presence.

What makes it powerful?

EASM doesn’t just dump raw data—it enriches findings with risk context, prioritizes issues, and ties into your existing Defender ecosystem. Whether you’re trying to reduce attack surface, audit your digital estate, or comply with regulatory requirements, EASM brings structure to chaos. It’s especially useful for security teams dealing with legacy sprawl, mergers & acquisitions, or hybrid cloud environments.

Lessons learned

So, I helped a large online retailer recently to setup their EASM instance and configure their Discovery Groups (Seeds). Here you’ll provide their domain names, IP address ranges, ASNs and contact information. All this information is used to discover (crawl) across your public-facing estate and check for potential security risks.

I was interesting to see that once a primary domain got added, the WHOIS information was retrieved and additional domains registered by the same e-mail address were discovered as well! Here also lies the first thing you need to check regularly. Microsoft might think all kinds of domains, hosts and IP blocks are associated with your organization while they’re not. Since you’ll be charged per asset in inventory per day, this is something to keep an eye on.

After assets are being discovered you’ll see a detailed overview of services running behind that host/ip, which certificates are being used and this is helpful to assess vulnerabilities. These range from Low to Medium and High

While keeping an eye on assets you might need to exclude certain hosts, domains etc later to make sure they aren’t automatically discovered any longer in the future.

It seemed kind of weird at first to me that you’re able to add all sorts of domains which aren’t yours. But then I figured, that these are public-facing entities. the whole world is able to connect to them and check for potential vulnerabilities. As long as you’re willing to pay for these assets in your inventory, you’re free to add whatever you want.

There might also be assets discovered by EASM where Microsoft wasn’t 100% confident that these are yours. These assets will have a state of Requires Investigation and this is also something you should regularly check. Either remove them from your inventory (don’t forget to exclude them as well, otherwise they’ll probably come back) of mark them as Approved.

Although you initially create a Defender for EASM instance in Azure, you can also incorporate it into Defender XDR by:

  • Visit security.microsoft.com
  • Go to Exposure Management –> Exposure insights –> Initiatives
  • Click one the External Attack Surface banner on top and select your MDEASM instance.

Also make sure to enable Log Analytics integration for useful integration with Microsoft Sentinel! You can find these inside the Defender for EASM instance in the Azure Portal and selecting Manage –> Data Integrations

Sentinel Detections

I also like to share a couple of detections we’ve been using:

Defender for EASM discovered asset(s) with a HIGH priority observation

Defender for External Attack Surface Management (EASM) continuously monitors and discovers new assets related to your organization s external attack surface, based on the provided “seeds”. This alert indicates that Defender for EASM has identified one or more newly discovered assets associated with high-criticality vulnerabilities or significant exposure. Please review these findings in Defender for EASM within the Azure Portal and assess their impact.

EasmRisk_CL
| where CategoryName_s has "High"
| mv-expand Item = todynamic(AssetDiscoveryAuditTrail_s)
| extend
    AssetKey = tostring(Item.AssetName),
    AssetValue = tostring(Item.AssetType)
| summarize AssetsPivot = make_bag(pack(AssetKey, AssetValue))
    by
    TimeGenerated,
    Description = CategoryDescription_s,
    DisplayName = MetricDisplayName_s,
    AssetName = AssetName_s
| evaluate bag_unpack(AssetsPivot)

Defender for EASM discovered asset(s) with a MEDIUM priority observation

Defender for External Attack Surface Management (EASM) continuously monitors and discovers new assets related to your organization s external attack surface, based on the provided “seeds”. This alert indicates that Defender for EASM has identified one or more newly discovered assets associated with medium-criticality vulnerabilities or significant exposure. Please review these findings in Defender for EASM within the Azure Portal and assess their impact.

EasmRisk_CL
| where CategoryName_s has "Medium"
| mv-expand Item = todynamic(AssetDiscoveryAuditTrail_s)
| extend
    AssetKey = tostring(Item.AssetName),
    AssetValue = tostring(Item.AssetType)
| summarize AssetsPivot = make_bag(pack(AssetKey, AssetValue))
    by
    TimeGenerated,
    Description = CategoryDescription_s,
    DisplayName = MetricDisplayName_s,
    AssetName = AssetName_s
| evaluate bag_unpack(AssetsPivot)

Defender for EASM total assets increased significantly

Defender for External Attack Surface Management (EASM) continuously monitors and discovers new assets related to your organization s external attack surface, based on the provided “seeds”. Assets are charged as part of Azure billing and to help keep costs somewhat under control, this detection will compare the number of assets this week with the previous week. If an unexpectedly large increase (10%) is observed, this could indicate incorrect assumptions in the discovery process but, more importantly, could result in an unexpectedly high invoice at the end of the month. This way, we can potentially take timely corrective action.

// Define the Defender for EASM daily price per asset in Euros (West Europe region)
let AssetPriceDayEur = 0.010;
// Retrieve a 7-day historic baseline window (15-8 days ago)
let AssetCountHistoric = workspace('').EasmAsset_CL
| where TimeGenerated between (ago(15d) .. ago(8d))
| summarize CountHistoric = dcount(AssetName_s) by AssetType_s;
// Retrieve a 7-day recent window (last 7 days)
let AssetCountLastWeek = workspace('').EasmAsset_CL
| where TimeGenerated between (ago(7d) .. now())
| summarize CountLastWeek = dcount(AssetName_s) by AssetType_s
// Calculate the projected monthly cost for each asset type
| extend ProjectedMonthlyCostPerAssetTypeEur = round(CountLastWeek * AssetPriceDayEur * 30,2);
// Calculate the total projected monthly cost across all asset types
let TotalProjectedCost = AssetCountLastWeek
| summarize TotalProjectedMonthlyCostEur = sum(ProjectedMonthlyCostPerAssetTypeEur);
// Join historic and recent counts on AssetType
AssetCountHistoric
| join kind=fullouter (AssetCountLastWeek) on AssetType_s
// Replace null counts with 0
| extend CountHistoric = coalesce(CountHistoric, 0)
| extend CountLastWeek = coalesce(CountLastWeek, 0)
// Calculate percentage change between historic and recent counts
| extend AssetCountDeltaPercent = iff(
    CountHistoric == 0 and CountLastWeek > 0,
    100, // If no historic count and new count >0, consider as 100% increase
    iff(
        CountHistoric == 0 and CountLastWeek == 0,
        0, // No change if both are zero
        tolong((CountLastWeek - CountHistoric) * 100 / CountHistoric) // Standard % delta
    )
)
// Add the total projected monthly cost to each row
| extend TotalProjectedMonthlyCostEur = toscalar(TotalProjectedCost)
// Final output columns
| project
    AssetType = AssetType_s,
    CountHistoric,
    CountLastWeek,
    AssetCountDeltaPercent,
    ProjectedMonthlyCostPerAssetTypeEur,
    TotalProjectedMonthlyCostEur
// Sort by the absolute delta percentage
| order by abs(AssetCountDeltaPercent) desc
// Only include rows where there was historic data (EASM must be enabled >2 weeks)
| where isnotempty(CountHistoric) and CountHistoric != 0
// Only output if there's more than 10% growth in assets
| where AssetCountDeltaPercent > 10

Feature requests

I’m currently in touch with the engineering team of MDEASM because I think two things could be improved on currently. I’ve requested additional features to improve:

  1. The asset state is currently not logged to Log Analytics. Therefore I’m unable to alert on new assets discovered which Requires investigation. Assets with this state are currently nog even visible in Log Analytics at all! Hopefully we’ll get more controls on this.
  2. Log ingestion into Log Analytics seems to be updated only once per 24 hours. I want to be notified sooner if for example a new assets with a HIGH vulnerability is discovered by MDEASM. In theory this can add an additional day, and I think this should be shorter.

🛠️ Community Project

IntuneManagement

Mikael Karlsson has created IntuneManagement - A PowerShell tool to Copy, export, import, delete, document and compare policies and profiles in Intune and Azure with a nice WPF UI. This tool makes it easy to backup or clone a complete Intune environment. The scripts can export and import objects including assignments and support import/export between tenants.

IntuneManagement

Check out IntuneManagement on Github